Lightflow円柱にふたをする
- Lightflow > Lightflow python script
- by yuichirou yokomakura
- 2010.08.20 Friday 14:30
disc,cylinderを使って、ふたをした円柱を原点で作成する。
capをしてグループ化してみた。
hole = s.newObject( "boundary", [ "surfaces", cyl, cap1, cap2 ] )
これでひとつにまとめ、レンダリングで画面に表示するためには、
s.addObject(hole)を行う。
サンプルファイルは次のようになる。

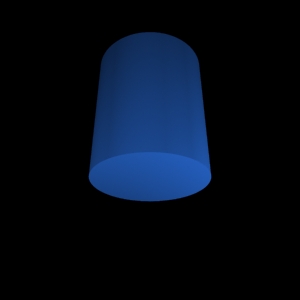
X軸中心に角度を-60度傾けてみた。
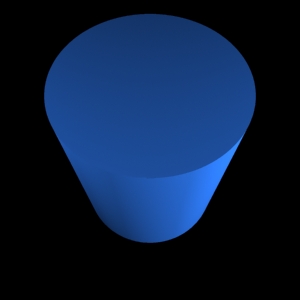
X軸中心に角度を30度傾けてみた。
ありがとうございます。
capをしてグループ化してみた。
hole = s.newObject( "boundary", [ "surfaces", cyl, cap1, cap2 ] )
これでひとつにまとめ、レンダリングで画面に表示するためには、
s.addObject(hole)を行う。
サンプルファイルは次のようになる。
#! /usr/bin/env python

from lightflowPM import *

from math import *


s = scene()


s.lightOn( s.newLight( "point", [ "position", vector3( 5.0, -5.0, 3.0 ), "color", vector3( 300.0, 300.0, 300.0 ) ] ) )


s.lightOn( s.newLight( "point", [ "position", vector3( -5.0, -5.0, 3.0 ), "color", vector3( 300.0, 300.0, 300.0 ) ] ) )


s.lightOn( s.newLight( "point", [ "position", vector3( 5.0, -5.0, -3.0 ), "color", vector3( 300.0, 300.0, 300.0 ) ] ) )


plastic = s.newMaterial( "standard", [ "kc", vector3( 0.096, 0.252, 0.504 ), "kd", 0.5, "km", 0.1 ] )


s.materialBegin( plastic )

s.transformBegin( transform().rotationAroundX( pi*15.0/180 ) )

s.transformBegin( transform().translation( vector3( 0, 0, 2.4 ) ) )

cap1=s.newObject( "disc", [ "radius", 1.0 ] )

s.transformEnd()


s.transformBegin( transform().translation( vector3( 0, 0, 0 ) ) )

cap2=s.newObject( "disc", [ "radius", 1.0 ] )

s.transformEnd()


cyl=s.newObject( "cylinder", [ "radius", 1.0 ,"height",2.4] )

s.transformEnd()


hole = s.newObject( "boundary", [ "surfaces", cyl, cap1, cap2 ] )


s.materialEnd()


s.addObject(hole)


saver = s.newImager( "tga-saver", [ "file", "bool02.tga" ] )


s.imagerBegin( saver )


camera = s.newCamera( "pinhole", [ "eye", vector3( 0, -4, 3 ),

									"aim", vector3( 0, 1, 0 ),

									"aa-samples", 2,5

									 ] )


s.imagerEnd()


s.render( camera, 300, 300 )
X軸中心に角度を-60度傾けてみた。
X軸中心に角度を30度傾けてみた。
ありがとうございます。
- -
- -