1/2 >>
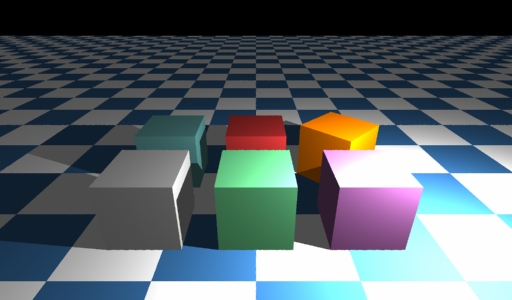
Lightflowで立方体生成関数をつくる その1
plasticマテリアルを以下のようにリスト化した
col=[plastic,plastic2,plastic3,plastic4,plastic5,plastic6]
これで、col[0]からcol[5]まで6つのマテリアルが呼び出せる。
Pythonで関数は、def hoge:で書いていく。
Lightflow内のboxの位置とリスト化したマテリアルを引数として渡して、立方体を生成するように以下のように定義した。
#関数定義 ボックスの位置とリストcolのインデックス番号0から5まで

def boxpos(x0,y0,z0,c):

	s.materialBegin( col[c] )

	s.transformBegin( transform().translation( vector3(x0,y0,z0)))

	s.addObject( s.newObject( "box", [ "position",vector3( -1.0, -1.0, -1.0 ),vector3( 1.0, 1.0, 1.0 )] ) )

	s.transformEnd()

	s.materialEnd()
よって、一行
boxpos(0,0,0,0)
boxpos(-3.0,0,0,1)
boxpos(-3,-3,0,3)
boxpos(0,-3,0,4)
のように記述してあげると良い。
以下はサンプルファイルである。
#! /usr/bin/env python

#box_def.py


from lightflowPM import *

from math import *

import colorinc


s = scene()


s.lightOn( s.newLight( "point", [ "position", vector3( 5.0, -5.0, 4.0 ), "color", vector3( 300.0, 300.0, 300.0 ) ] ) )


s.lightOn( s.newLight( "ambient", [ "color", vector3( 0.3, 0.3, 0.3 ) ] ) ) #環境光を加える。


plastic = s.newMaterial( "standard",[ "kc", colorinc.Brown,"kd",0.66 ] ) #


plastic2 = s.newMaterial( "standard",[ "kc", colorinc.CadetBlue,"kd",0.66 ] ) #


plastic3 = s.newMaterial( "standard",[ "kc", colorinc.Coral,"kd",0.66 ] ) #


plastic4 = s.newMaterial( "standard",[ "kc", colorinc.VLightGray,"kd",0.66 ] ) #


plastic5 = s.newMaterial( "standard",[ "kc", colorinc.Aquamarine,"kd",0.66 ] ) #


plastic6 = s.newMaterial( "standard",[ "kc", colorinc.BlueViolet,"kd",0.66 ] ) #


#plasticをリスト化した

col=[plastic,plastic2,plastic3,plastic4,plastic5,plastic6]


check_ground=s.newPattern("check",["color",vector3( 0.2, 0.4, 0.6 ),"scale",0.025])


ground=s.newMaterial( "standard",[ "kc", check_ground,"kc",vector3( 1.0, 1.0, 1.0 ),"ka",check_ground ] ) #チェック青と白


#関数定義 ボックスの位置とリストcolのインデックス番号0から5まで

def boxpos(x0,y0,z0,c):

	s.materialBegin( col[c] )

	s.transformBegin( transform().translation( vector3(x0,y0,z0)))

	s.addObject( s.newObject( "box", [ "position",vector3( -1.0, -1.0, -1.0 ),vector3( 1.0, 1.0, 1.0 )] ) )

	s.transformEnd()

	s.materialEnd()


#Brown box

boxpos(0,0,0,0)


#CadetBlue box

boxpos(-3.0,0,0,1)


#Coral box z軸中心に45度回転

s.materialBegin( col[2] )

s.transformBegin( transform().translation( vector3(3.0,0,0)))

s.transformBegin( transform().rotationAroundZ( pi*45.0/180 ))


s.addObject( s.newObject( "box", [ "position",vector3( -1.0, -1.0, -1.0 ),vector3( 1.0, 1.0, 1.0 )] ) )


s.transformEnd()

s.transformEnd()

s.materialEnd()


#VLightGray box

boxpos(-3,-3,0,3)


#Aquamarine box

boxpos(0,-3,0,4)


#BlueViolet box

boxpos(3,-3,0,5)


#check模様の地面groundをpatchで作成しています。高さ(z軸)を-1.0にしてぴったり立方体とあわせています。

s.materialBegin( ground )

s.addObject( s.newObject( "patch", [ "points",vector3( -50, -50, -1.0 ),vector3( -50, 50, -1.0 ),vector3( 50, -50, -1.0 ),vector3( 50, 50, -1.0 )] ) )

s.materialEnd()


saver = s.newImager( "tga-saver", [ "file", "box_def.tga" ] )


s.imagerBegin( saver )

camera = s.newCamera( "pinhole", [ "eye", vector3( 0, -10, 5 ), "aim", vector3( 0, 0, 0 ) ] )

s.imagerEnd()


s.render( camera, 512, 300 )
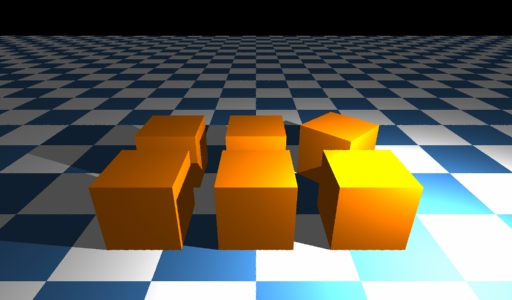
Lightflowで立方体生成関数をつくる その2
マテリアルを1色にしてみた。
col=[plastic,plastic2,plastic3,plastic4,plastic5,plastic6]
の中から、col[2]を選ぶ。
boxpos(0,0,0,2)
boxpos(-3.0,0,0,2)
boxpos(-3,-3,0,2)
boxpos(0,-3,0,2)
のように記述した。
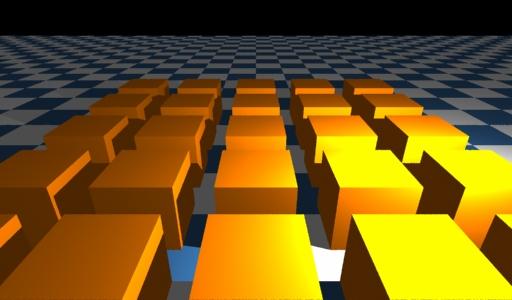
Lightflowで立方体生成関数をつくる その3
立方体を並べてみた。25個並べてみる。色は全部同じ。
#関数定義 ボックスの位置とリストcolのインデックス番号0から5まで

def boxpos(x0,y0,z0,c):

	s.materialBegin( col[c] )

	s.transformBegin( transform().translation( vector3(x0,y0,z0)))

	s.addObject( s.newObject( "box", [ "position",vector3( -1.0, -1.0, -1.0 ),vector3( 1.0, 1.0, 1.0 )] ) )

	s.transformEnd()

	s.materialEnd()


#Create boxes!! 色は全部同じ

for i in range(-6,7,3):

	for k in range(-6,7,3):

		boxpos(i,k,0,2)
rangeの部分で-6から6まで3つ飛びで位置を決めている。
試しに、pythonのコマンドラインから
for i in range(-6,7,3):
print i
と入れてどのように動くか試してみるとわかるでしょう。
以下は、サンプルファイルである。
#! /usr/bin/env python

from lightflowPM import *

from math import *

import colorinc


s = scene()


s.lightOn( s.newLight( "point", [ "position", vector3( 5.0, -5.0, 4.0 ), "color", vector3( 300.0, 300.0, 300.0 ) ] ) )


s.lightOn( s.newLight( "ambient", [ "color", vector3( 0.3, 0.3, 0.3 ) ] ) ) #環境光を加える。


plastic = s.newMaterial( "standard",[ "kc", colorinc.Brown,"kd",0.66 ] ) #


plastic2 = s.newMaterial( "standard",[ "kc", colorinc.CadetBlue,"kd",0.66 ] ) #


plastic3 = s.newMaterial( "standard",[ "kc", colorinc.Coral,"kd",0.66 ] ) #


plastic4 = s.newMaterial( "standard",[ "kc", colorinc.VLightGray,"kd",0.66 ] ) #


plastic5 = s.newMaterial( "standard",[ "kc", colorinc.Aquamarine,"kd",0.66 ] ) #


plastic6 = s.newMaterial( "standard",[ "kc", colorinc.BlueViolet,"kd",0.66 ] ) #


#plasticをリスト化した

col=[plastic,plastic2,plastic3,plastic4,plastic5,plastic6]


check_ground=s.newPattern("check",["color",vector3( 0.2, 0.4, 0.6 ),"scale",0.025])


ground=s.newMaterial( "standard",[ "kc", check_ground,"kc",vector3( 1.0, 1.0, 1.0 ),"ka",check_ground ] ) #チェック青と白


#関数定義 ボックスの位置とリストcolのインデックス番号0から5まで

def boxpos(x0,y0,z0,c):

	s.materialBegin( col[c] )

	s.transformBegin( transform().translation( vector3(x0,y0,z0)))

	s.addObject( s.newObject( "box", [ "position",vector3( -1.0, -1.0, -1.0 ),vector3( 1.0, 1.0, 1.0 )] ) )

	s.transformEnd()

	s.materialEnd()


#Create boxes!!

for i in range(-6,7,3):

	for k in range(-6,7,3):

		boxpos(i,k,0,2)


#check模様の地面groundをpatchで作成しています。高さ(z軸)を-1.0にしてぴったり立方体とあわせています。

s.materialBegin( ground )

s.addObject( s.newObject( "patch", [ "points",vector3( -50, -50, -1.0 ),vector3( -50, 50, -1.0 ),vector3( 50, -50, -1.0 ),vector3( 50, 50, -1.0 )] ) )

s.materialEnd()


saver = s.newImager( "tga-saver", [ "file", "box_def3.tga" ] )


s.imagerBegin( saver )

camera = s.newCamera( "pinhole", [ "eye", vector3( 0, -10, 5 ), "aim", vector3( 0, 0, 0 ) ] )

s.imagerEnd()


s.render( camera, 512, 300 )
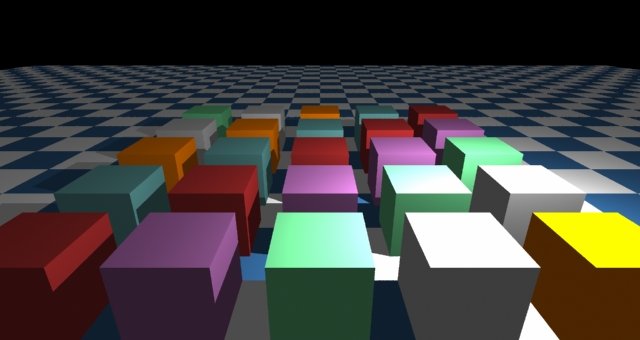
Lightflowで立方体生成関数をつくる その4
立方体をさらに並べてみる。25個並べてみる。色も6色順番に表示している。
#Create boxes!!

c=0

cnt=0

for i in range(-6,7,3):

	for k in range(-6,7,3):

		boxpos(i,k,0,c)

		cnt=cnt+1

		c=cnt%6
cnt=cnt+1でカウントを行い、c=cnt%6で、6で割った余りが
0から5までになるので、順番に色を決めていくことができる。
以下は、サンプルファイルである。
#! /usr/bin/env python

from lightflowPM import *

from math import *

import colorinc


s = scene()


s.lightOn( s.newLight( "point", [ "position", vector3( 5.0, -5.0, 6.0 ), "color", vector3( 300.0, 300.0, 300.0 ) ] ) )


s.lightOn( s.newLight( "ambient", [ "color", vector3( 0.3, 0.3, 0.3 ) ] ) ) #環境光を加える。


plastic = s.newMaterial( "standard",[ "kc", colorinc.Brown,"kd",0.66 ] ) #


plastic2 = s.newMaterial( "standard",[ "kc", colorinc.CadetBlue,"kd",0.66 ] ) #


plastic3 = s.newMaterial( "standard",[ "kc", colorinc.Coral,"kd",0.66 ] ) #


plastic4 = s.newMaterial( "standard",[ "kc", colorinc.VLightGray,"kd",0.66 ] ) #


plastic5 = s.newMaterial( "standard",[ "kc", colorinc.Aquamarine,"kd",0.66 ] ) #


plastic6 = s.newMaterial( "standard",[ "kc", colorinc.BlueViolet,"kd",0.66 ] ) #


#plasticをリスト化した

col=[plastic,plastic2,plastic3,plastic4,plastic5,plastic6]


check_ground=s.newPattern("check",["color",vector3( 0.2, 0.4, 0.6 ),"scale",0.025])


ground=s.newMaterial( "standard",[ "kc", check_ground,"kc",vector3( 1.0, 1.0, 1.0 ),"ka",check_ground ] ) #チェック青と白


#関数定義 ボックスの位置とリストcolのインデックス番号0から5まで

def boxpos(x0,y0,z0,c):

	s.materialBegin( col[c] )

	s.transformBegin( transform().translation( vector3(x0,y0,z0)))

	s.addObject( s.newObject( "box", [ "position",vector3( -1.0, -1.0, -1.0 ),vector3( 1.0, 1.0, 1.0 )] ) )

	s.transformEnd()

	s.materialEnd()


#Create boxes!!

c=0

cnt=0

for i in range(-6,7,3):

	for k in range(-6,7,3):

		boxpos(i,k,0,c)

		cnt=cnt+1

		c=cnt%6


#check模様の地面groundをpatchで作成しています。高さ(z軸)を-1.0にしてぴったり立方体とあわせています。

s.materialBegin( ground )

s.addObject( s.newObject( "patch", [ "points",vector3( -50, -50, -1.0 ),vector3( -50, 50, -1.0 ),vector3( 50, -50, -1.0 ),vector3( 50, 50, -1.0 )] ) )

s.materialEnd()


saver = s.newImager( "tga-saver", [ "file", "box_def4.tga" ] )


s.imagerBegin( saver )

camera = s.newCamera( "pinhole", [ "eye", vector3( 0, -12, 5 ), "aim", vector3( 0, 0, 0 ) ] )

s.imagerEnd()


s.render( camera, 640, 340 )
Lightflowで立方体生成関数をつくる その5
立方体をさらに並べてみる。49個並べてみる。
#! /usr/bin/env python

from lightflowPM import *

from math import *

import colorinc


s = scene()


s.lightOn( s.newLight( "point", [ "position", vector3( 5.0, -5.0, 6.0 ), "color", vector3( 300.0, 300.0, 300.0 ) ] ) )


s.lightOn( s.newLight( "ambient", [ "color", vector3( 0.3, 0.3, 0.3 ) ] ) ) #環境光を加える。


plastic = s.newMaterial( "standard",[ "kc", colorinc.Brown,"kd",0.66 ] ) #


plastic2 = s.newMaterial( "standard",[ "kc", colorinc.CadetBlue,"kd",0.66 ] ) #


plastic3 = s.newMaterial( "standard",[ "kc", colorinc.Coral,"kd",0.66 ] ) #


plastic4 = s.newMaterial( "standard",[ "kc", colorinc.VLightGray,"kd",0.66 ] ) #


plastic5 = s.newMaterial( "standard",[ "kc", colorinc.Aquamarine,"kd",0.66 ] ) #


plastic6 = s.newMaterial( "standard",[ "kc", colorinc.BlueViolet,"kd",0.66 ] ) #


#plasticをリスト化した

col=[plastic,plastic2,plastic3,plastic4,plastic5,plastic6]


check_ground=s.newPattern("check",["color",vector3( 0.2, 0.4, 0.6 ),"scale",0.025])


ground=s.newMaterial( "standard",[ "kc", check_ground,"kc",vector3( 1.0, 1.0, 1.0 ),"ka",check_ground ] ) #チェック青と白


#関数定義 ボックスの位置とリストcolのインデックス番号0から5まで

def boxpos(x0,y0,z0,c):

	s.materialBegin( col[c] )

	s.transformBegin( transform().translation( vector3(x0,y0,z0)))

	s.addObject( s.newObject( "box", [ "position",vector3( -1.0, -1.0, -1.0 ),vector3( 1.0, 1.0, 1.0 )] ) )

	s.transformEnd()

	s.materialEnd()


#Create boxes!!

c=0

cnt=0

for i in range(-9,10,3):

	for k in range(-6,13,3):

		boxpos(i,k,0,c)

		cnt=cnt+1

		c=cnt%6


#check模様の地面groundをpatchで作成しています。高さ(z軸)を-1.0にしてぴったり立方体とあわせています。

s.materialBegin( ground )

s.addObject( s.newObject( "patch", [ "points",vector3( -50, -50, -1.0 ),vector3( -50, 50, -1.0 ),vector3( 50, -50, -1.0 ),vector3( 50, 50, -1.0 )] ) )

s.materialEnd()


saver = s.newImager( "tga-saver", [ "file", "box_def5.tga" ] )


s.imagerBegin( saver )

camera = s.newCamera( "pinhole", [ "eye", vector3( 0, -12, 5 ), "aim", vector3( 0, 0, 0 ) ] )

s.imagerEnd()


s.render( camera, 640, 340 )
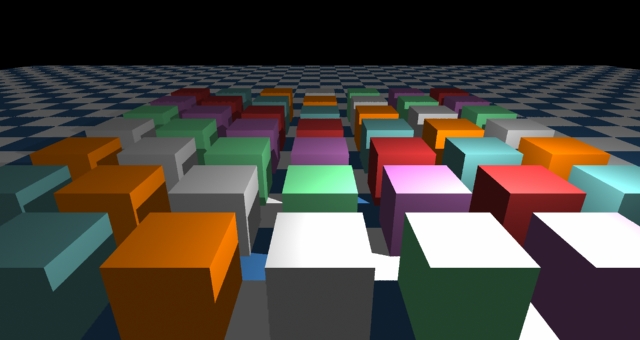
Lightflowで立方体をランダムに回転配置する
立方体49個並べてZ軸中心に回転させる。乱数を発生させる
import random
モジュールを呼び出す。
関数も回転を入れて書き換える。
乱数でリストの中から数値を取り出すようにした。
rot=random.choice([0,6,15,23,30,45,60,75,88])
立方体なので0から90度以内で変化する。
#関数定義 ボックスの位置とリストcolのインデックス番号0から5まで、Z軸中心回転角度rotを追加

def boxpos(x0,y0,z0,rot,c):

	s.materialBegin( col[c] )

	s.transformBegin( transform().translation( vector3(x0,y0,z0)))

	s.transformBegin( transform().rotationAroundZ( pi*rot/180 ))

	s.addObject( s.newObject( "box", [ "position",vector3( -1.0, -1.0, -1.0 ),vector3( 1.0, 1.0, 1.0 )] ) )

	s.transformEnd()

	s.transformEnd()

	s.materialEnd()


#Create boxes!!

c=0

cnt=0

for i in range(-9,10,3):

	for k in range(-6,13,3):

		rot=random.choice([0,6,15,23,30,45,60,75,88])

		boxpos(i,k,0,rot,c)

		cnt=cnt+1

		c=cnt%6

以下は、サンプルファイル参考にしてください。
#! /usr/bin/env python

#box_pos_rot.py


from lightflowPM import *

from math import *

import colorinc

import random


s = scene()


s.lightOn( s.newLight( "point", [ "position", vector3( 5.0, -5.0, 6.0 ), "color", vector3( 300.0, 300.0, 300.0 ) ] ) )


s.lightOn( s.newLight( "ambient", [ "color", vector3( 0.3, 0.3, 0.3 ) ] ) ) #環境光を加える。


plastic = s.newMaterial( "standard",[ "kc", colorinc.Brown,"kd",0.66 ] ) #


plastic2 = s.newMaterial( "standard",[ "kc", colorinc.CadetBlue,"kd",0.66 ] ) #


plastic3 = s.newMaterial( "standard",[ "kc", colorinc.Coral,"kd",0.66 ] ) #


plastic4 = s.newMaterial( "standard",[ "kc", colorinc.VLightGray,"kd",0.66 ] ) #


plastic5 = s.newMaterial( "standard",[ "kc", colorinc.Aquamarine,"kd",0.66 ] ) #


plastic6 = s.newMaterial( "standard",[ "kc", colorinc.BlueViolet,"kd",0.66 ] ) #


#plasticをリスト化した

col=[plastic,plastic2,plastic3,plastic4,plastic5,plastic6]


check_ground=s.newPattern("check",["color",vector3( 0.2, 0.4, 0.6 ),"scale",0.025])


ground=s.newMaterial( "standard",[ "kc", check_ground,"kc",vector3( 1.0, 1.0, 1.0 ),"ka",check_ground ] ) #チェック青と白


#関数定義 ボックスの位置とリストcolのインデックス番号0から5まで、Z軸中心回転角度rotを追加

def boxpos(x0,y0,z0,rot,c):

	s.materialBegin( col[c] )

	s.transformBegin( transform().translation( vector3(x0,y0,z0)))

	s.transformBegin( transform().rotationAroundZ( pi*rot/180 ))

	s.addObject( s.newObject( "box", [ "position",vector3( -1.0, -1.0, -1.0 ),vector3( 1.0, 1.0, 1.0 )] ) )

	s.transformEnd()

	s.transformEnd()

	s.materialEnd()


#Create boxes!!

c=0

cnt=0

for i in range(-9,10,3):

	for k in range(-6,13,3):

		rot=random.choice([0,6,15,23,30,45,60,75,88])

		boxpos(i,k,0,rot,c)

		cnt=cnt+1

		c=cnt%6


#check模様の地面groundをpatchで作成しています。高さ(z軸)を-1.0にしてぴったり立方体とあわせています。

s.materialBegin( ground )

s.addObject( s.newObject( "patch", [ "points",vector3( -50, -50, -1.0 ),vector3( -50, 50, -1.0 ),vector3( 50, -50, -1.0 ),vector3( 50, 50, -1.0 )] ) )

s.materialEnd()


saver = s.newImager( "tga-saver", [ "file", "box_pos_rot.tga" ] )


s.imagerBegin( saver )

camera = s.newCamera( "pinhole", [ "eye", vector3( 0, -12, 5 ), "aim", vector3( 0, 0, 0 ) ] )

s.imagerEnd()


s.render( camera, 640, 340 )
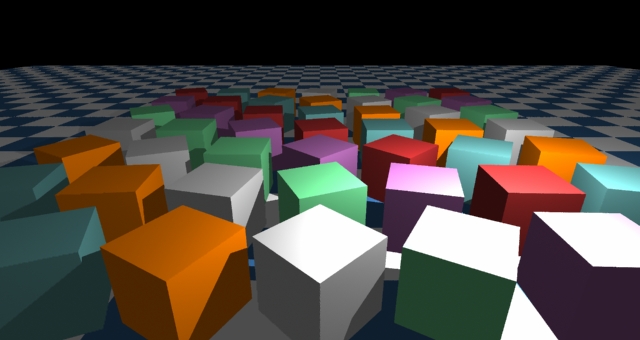
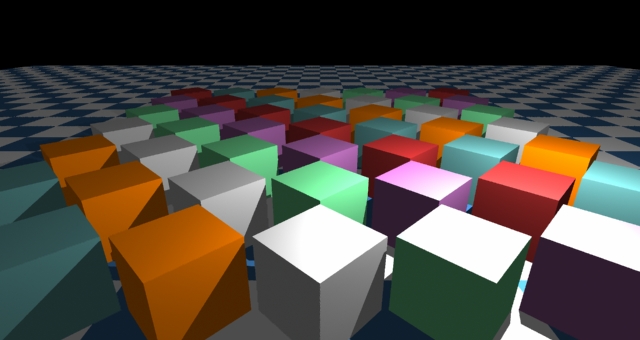
Lightflowで立方体を45度回転配置する
rot=45に指定してしまうと、全部がいっせいに整列します。
球体の質感1
球体の質感について調整する。
基本質感。
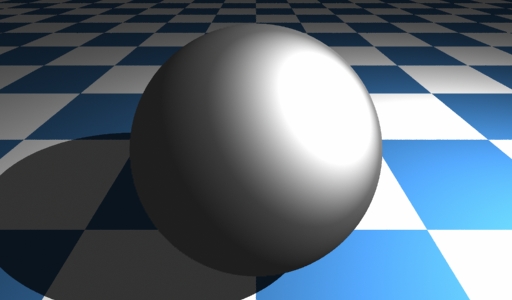
以下はサンプルファイル参考にしてください。
#! /usr/bin/env python

from lightflowPM import *

from math import *


s = scene()


s.lightOn( s.newLight( "point", [ "position", vector3( 5.0, -2.0, 5.0 ), "color", vector3( 300.0, 300.0, 300.0 ) ] ) )


s.lightOn( s.newLight( "ambient", [ "color", vector3( 0.2, 0.2, 0.2 ) ] ) ) #環境光を加える。


plastic = s.newMaterial( "standard",[ "kc", vector3( 0.6, 0.6, 0.6 ),"kd", 0.33 ] )


plastic2 = s.newMaterial( "standard",[ "kc", vector3( 0.6, 0.6, 0.6 ),"kd", 0.33 ] )


plastic3 = s.newMaterial( "standard",[ "kc", vector3( 0.6, 0.6, 0.6 ),"kd", 0.33 ] )


check_ground=s.newPattern("check",["color",vector3( 0.2, 0.4, 0.6),"scale",0.025])


ground=s.newMaterial( "standard",[ "kc", check_ground,"kc",vector3( 1.0, 1.0, 1.0 ),"ka",check_ground ] )


#ground=s.newMaterial( "standard",[ "kc", vector3( 1, 1, 1 ) ] ) #白


s.materialBegin( plastic )

s.addObject( s.newObject( "sphere", [ "radius",1.4] ) )

s.materialEnd()


#地面groundをpatchで作成しています。高さ(z軸)を-1.4にしてぴったり球とあわせています。

s.materialBegin( ground )


s.addObject( s.newObject( "patch", [ "points",vector3( -50, -50, -1.4 ),vector3( -50, 50, -1.4 ),vector3( 50, -50, -1.4 ),vector3( 50, 50, -1.4 )] ) )


s.materialEnd()


saver = s.newImager( "tga-saver", [ "file", "sphere_glass01.tga" ] )


s.imagerBegin( saver )


camera = s.newCamera( "pinhole", [ "eye", vector3( 0, -3, 2 ), "aim", vector3( 0, 0, 0 ) ] )


s.imagerEnd()


s.render( camera, 512, 300 )
球体の質感2
映り込みの設定
"kr",vector3(0.4,0.4,0.4)
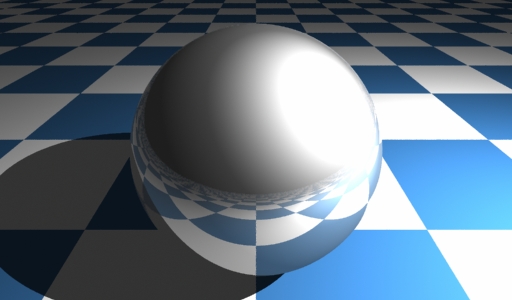
以下のサンプルファイルを参考にしてください。
#! /usr/bin/env python

from lightflowPM import *

from math import *


s = scene()


s.lightOn( s.newLight( "point", [ "position", vector3( 5.0, -2.0, 5.0 ), "color", vector3( 300.0, 300.0, 300.0 ) ] ) )


s.lightOn( s.newLight( "ambient", [ "color", vector3( 0.2, 0.2, 0.2 ) ] ) ) #環境光を加える。


plastic = s.newMaterial( "standard",[ "kc", vector3( 0.6, 0.6, 0.6 ),"kd", 0.33 ,"kr",vector3(0.4,0.4,0.4)] )


plastic2 = s.newMaterial( "standard",[ "kc", vector3( 0.6, 0.6, 0.6 ),"kd", 0.33 ] )


plastic3 = s.newMaterial( "standard",[ "kc", vector3( 0.6, 0.6, 0.6 ),"kd", 0.33 ] )


check_ground=s.newPattern("check",["color",vector3( 0.2, 0.4, 0.6),"scale",0.025])


ground=s.newMaterial( "standard",[ "kc", check_ground,"kc",vector3( 1.0, 1.0, 1.0 ),"ka",check_ground ] )


#ground=s.newMaterial( "standard",[ "kc", vector3( 1, 1, 1 ) ] ) #白


s.materialBegin( plastic )

s.addObject( s.newObject( "sphere", [ "radius",1.4] ) )

s.materialEnd()


#地面groundをpatchで作成しています。高さ(z軸)を-1.4にしてぴったり球とあわせています。

s.materialBegin( ground )


s.addObject( s.newObject( "patch", [ "points",vector3( -50, -50, -1.4 ),vector3( -50, 50, -1.4 ),vector3( 50, -50, -1.4 ),vector3( 50, 50, -1.4 )] ) )


s.materialEnd()


saver = s.newImager( "tga-saver", [ "file", "sphere_glass02.tga" ] )


s.imagerBegin( saver )


camera = s.newCamera( "pinhole", [ "eye", vector3( 0, -3, 2 ), "aim", vector3( 0, 0, 0 ) ] )


s.imagerEnd()


s.render( camera, 512, 300 )
球体の質感3
透明度を加える。
plastic = s.newMaterial( "standard",[ "kc", vector3( 0.2, 0.2, 0.2 ),"kd", 0.01 ,"kr",vector3(0.2,0.2,0.2),"kt",vector3(0.8,0.8,0.8),"IOR",1.12] )
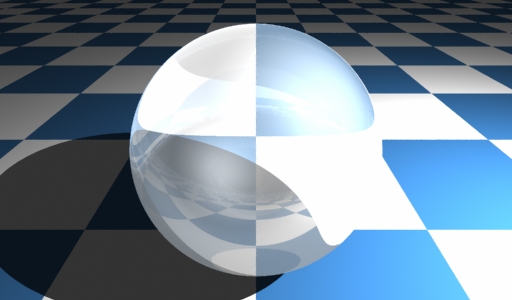
以下のサンプルファイルを参考にしてください。
#! /usr/bin/env python

from lightflowPM import *

from math import *


s = scene()


s.lightOn( s.newLight( "point", [ "position", vector3( 5.0, -2.0, 5.0 ), "color", vector3( 300.0, 300.0, 300.0 ) ] ) )


s.lightOn( s.newLight( "ambient", [ "color", vector3( 0.2, 0.2, 0.2 ) ] ) ) #環境光を加える。


plastic = s.newMaterial( "standard",[ "kc", vector3( 0.2, 0.2, 0.2 ),"kd", 0.01 ,"kr",vector3(0.2,0.2,0.2),"kt",vector3(0.8,0.8,0.8),"IOR",1.12] )


plastic2 = s.newMaterial( "standard",[ "kc", vector3( 0.6, 0.6, 0.6 ),"kd", 0.33 ] )


plastic3 = s.newMaterial( "standard",[ "kc", vector3( 0.6, 0.6, 0.6 ),"kd", 0.33 ] )


check_ground=s.newPattern("check",["color",vector3( 0.2, 0.4, 0.6),"scale",0.025])


ground=s.newMaterial( "standard",[ "kc", check_ground,"kc",vector3( 1.0, 1.0, 1.0 ),"ka",check_ground ] )


#ground=s.newMaterial( "standard",[ "kc", vector3( 1, 1, 1 ) ] ) #白


s.materialBegin( plastic )

s.addObject( s.newObject( "sphere", [ "radius",1.4] ) )

s.materialEnd()


#地面groundをpatchで作成しています。高さ(z軸)を-1.4にしてぴったり球とあわせています。

s.materialBegin( ground )


s.addObject( s.newObject( "patch", [ "points",vector3( -50, -50, -1.4 ),vector3( -50, 50, -1.4 ),vector3( 50, -50, -1.4 ),vector3( 50, 50, -1.4 )] ) )


s.materialEnd()


saver = s.newImager( "tga-saver", [ "file", "sphere_glass03.tga" ] )


s.imagerBegin( saver )


camera = s.newCamera( "pinhole", [ "eye", vector3( 0, -3, 2 ), "aim", vector3( 0, 0, 0 ) ] )


s.imagerEnd()


s.render( camera, 512, 300 )
1/2 >>