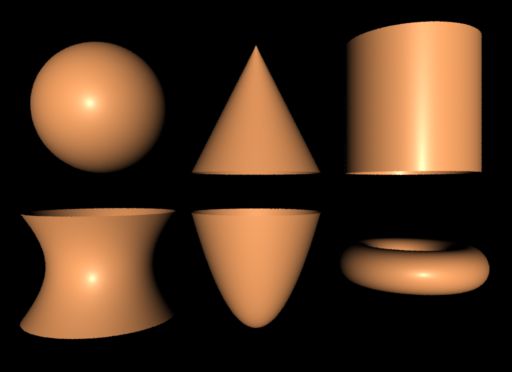
<< 2/4 >>

「実践CGへの誘い」例題をPythonで行う その9

「実践CGへの誘い」p.61
Listing 4.1

基本プリミティブの表示をします。いろいろと工夫できますね。


#list41.py
#/* Copyrighted Pixar 1989 */
#/* From the RenderMan Companion p. 61 */
#/* Listing 4.1 Routine generating quadric surfaces shown in Figure 4.1 */
#/*

import cgkit.cri
from cgkit.cgtypes import *

# Load the RenderMan API.
# Replace the library name with whatever renderer you want to use.
ri = cgkit.cri.loadRI("3delight")
cgkit.cri.importRINames(ri, globals())

def Go():
ShowQuads()

OFFSET = 1.2

def ShowQuads():
RiRotate(-90.0, 1.0, 0.0, 0.0)

RiTranslate(-OFFSET, 0.0, (OFFSET/2))
RiSphere(0.5, -0.5, 0.5, 360.0, RI_NULL) #/* Declare a sphere */

RiTranslate(OFFSET, 0.0, 0.0)
RiTranslate(0.0, 0.0, -0.5)
RiCone(1.0, 0.5, 360.0, RI_NULL) #/* Declare a cone */

RiTranslate(0.0, 0.0, 0.5)
RiTranslate(OFFSET, 0.0, 0.0)
RiCylinder(0.5, -0.5, 0.5, 360.0, RI_NULL) #/* Declare cylinder */

RiTranslate(-(OFFSET*2), 0.0, -OFFSET)
hyperpt1 =[ 0.4, -0.4, -0.4]
hyperpt2 =[ 0.4, 0.4, 0.4]

#/* Declare hyperboloid */
RiHyperboloid(hyperpt1, hyperpt2, 360.0, RI_NULL)

RiTranslate(OFFSET, 0.0, -0.5)
RiParaboloid(0.5, 0.0, 0.9, 360.0, RI_NULL) #/* Declare paraboloid */

RiTranslate(OFFSET, 0.0, 0.5)
RiTorus(.4, .15, 0.0, 360.0, 360.0, RI_NULL) #/* Declare torus */


RiBegin (RI_NULL) #/* Start Renderer */
RiDisplay("quadsmain.tiff", RI_FILE, "rgb", RI_NULL)
RiFormat( 512, 372, -1.0)
RiProjection (RI_PERSPECTIVE,RI_FOV,45)
RiTranslate (0.0, 0.0, 3.5)
RiWorldBegin ()
RiLightSource ("distantlight", RI_NULL)
RiAttributeBegin()

RiSurface ("plastic", Kd=1.0)
RiColor((0.97,0.64,0.39))
Go()
RiAttributeEnd()
RiWorldEnd()
RiEnd()


quadsmain.jpg
  • -
  • -

「実践CGへの誘い」例題をPythonで・・その10

list42.jpg
「実践CGへの誘い」p.65
Listing 4.2


#list42.py
#/* Copyrighted Pixar 1989 */
#/* From the RenderMan Companion p. 65 */
#/* Listing 4.2 Using hyperboloids to create a surface of revolution */

import cgkit.cri
from cgkit.cgtypes import *

# Load the RenderMan API.
# Replace the library name with whatever renderer you want to use.
ri = cgkit.cri.loadRI("3delight")
cgkit.cri.importRINames(ri, globals())

NPOINTS=16

points = [
[1.5000,.0000],
[1.4600,.0900],
[1.3500,.1273],
[1.2625,.1203],
[1.1750,.1047],
[1.0875,.0935],
[1.0000,.0899],
[0.9375,.0982],
[0.8625,.1236],
[0.7250,.1851],
[0.5875,.2281],
[0.4500,.2383],
[0.3375,.2255],
[0.2250,.1953],
[0.0750,.1414],
[0.0000,.1125]
]

color = (1,0.26,0.15)

def Go():
global color
RiColor(color)
RiSurface ("plastic", Kd=1.0)
RiRotate(-90.0, 1.0, 0.0, 0.0)
SurfOR(points, NPOINTS)


#/* Listing 4.2 Using hyperboloids to create a surface of revolution */

def SurfOR(points, npoints):
#/*
# * For each adjacent pair of x,y points in the outline description,
# * draw a hyperboloid by sweeping the line segment defined by
# * those points about the z axis.
# */
pp1 =[ points[0][1], 0, points[0][0]]
for pt in range(1, npoints):
pp2 =[ points[pt][1], 0, points[pt][0]]
RiHyperboloid(pp1, pp2, 360.0, RI_NULL)
tmp = pp1
pp1 = pp2
pp2 = tmp


RiBegin (RI_NULL) #/* Start Renderer */
RiDisplay("list42.tif", RI_FILE, "rgb", RI_NULL)
RiFormat( 512, 372, -1.0)
RiProjection (RI_PERSPECTIVE,RI_FOV,45)
RiTranslate (0.0, -0.75, 2.2)
RiWorldBegin ()
RiLightSource ("distantlight", RI_NULL)
RiAttributeBegin()

Go()
RiAttributeEnd()
RiWorldEnd()
RiEnd()

  • -
  • -

「実践CGへの誘い」例題をPythonで・・その11

「実践CGへの誘い」p.67
Listing 4.3
wavemain.jpg


#list43.py
#/* Copyrighted Pixar 1989 */
#/* From the RenderMan Companion p. 67 */
#/* Listing 4.3 Using RiTorus to create a wavelike pattern */

import cgkit.cri
from cgkit.cgtypes import *

# Load the RenderMan API.
# Replace the library name with whatever renderer you want to use.
ri = cgkit.cri.loadRI("3delight")
cgkit.cri.importRINames(ri, globals())

def TorusWave(nwaves, thetamax):
if nwaves < 1:
print "Need a positive number of waves\n"

#/* Divide the net radius 1.0 among the waves and the hemisphere */
innerrad = 2 / (8.0*nwaves + 2)
RiRotate(90.0, 1.0, 0.0, 0.0)
#/* Create the downward-opening hemisphere */
RiSphere(innerrad, -innerrad, 0.0, thetamax, RI_NULL)

outerrad = 0
for wave in range(1,nwaves+1):
#* Each iteration creates a downward-opening half-torus
#* and a larger upward-opening half-torus.
outerrad = outerrad + (innerrad * 2)
RiTorus(outerrad, innerrad, 0.0, 180.0, thetamax, RI_NULL)
outerrad = outerrad + (innerrad * 2)
RiTorus(outerrad, innerrad, 180.0, 360.0, thetamax, RI_NULL)

def Go():
TorusWave(4, 250.0)


RiBegin (RI_NULL) #/* Start Renderer */
RiDisplay("wavemain.tif", RI_FILE, "rgb", RI_NULL)
RiFormat( 512, 372, -1.0)
RiProjection ("perspective", RI_NULL)

RiWorldBegin ()
RiLightSource("ambientlight","intensity",0.4)
RiLightSource ("distantlight", RI_NULL)
RiAttributeBegin()
RiTranslate (-0.1, 0.0, 1.1)
RiRotate (50.0, -1.0, 1.0, 0.0)
RiColor((0.42,0.97,0.45))
RiSurface ("plastic", Kd=1.0)
Go()
RiAttributeEnd()
RiWorldEnd()
RiEnd()


wavemain2.jpg
RiProjection ("perspective", "fov", 45)
と書き換えてみた。
  • -
  • -

Depth of field

Essential RenderManから、loop.cをPythonで試してみる。
Depth of field、PixelSamples、ShadingRateを調整しています。
ありがとうございます。
loop.jpg


#/* loop.py - Create a line of Spheres */
# Essential RenderMan p.113
import cgkit.cri
from cgkit.cgtypes import *

# Load the RenderMan API.
# Replace the library name with whatever renderer you want to use.
ri = cgkit.cri.loadRI("3delight")
cgkit.cri.importRINames(ri, globals())

RiBegin(RI_NULL)
RiDisplay ("loop.tif",RI_FILE, RI_RGB)
RiFormat(320, 240,1)
RiPixelSamples( 8, 8)
RiShadingRate(0.25)
RiProjection (RI_PERSPECTIVE)
RiDepthOfField(2.8,0.100,2)
RiTranslate(0,0,0.25)
RiRotate(-10,0,1,0)
RiWorldBegin()
RiLightSource("ambientlight","intensity",0.2)
RiLightSource("distantlight", "from",[-1,1,-1])
RiTranslate(0.3,0,0)
for i in range(12):
RiSurface ("plastic")
RiColor((1.0,0.05,0.05))
RiSphere(0.25,-0.25,0.25,360,RI_NULL)
RiTranslate(-0.2,0,0.5)

RiWorldEnd()
RiEnd()


RiLightSource("distantlight", "from",[-4,1,-1])
ディスタントライトの方向を変更してみた。

#RiDepthOfField(2.8,0.1,2)
とコメントアウトすると、くっきりになる。
cgkitと3Delightを使用しました。
  • -
  • -

pythonでパーティクル

Essential RenderManから、point.cをPythonで試してみる。
パーティクルも面白くなりそうです。
記述に関しては、cgkitのritest.pyが参考になります。
ありがとうございます。レンダリングは3Delightです。
以前書いた記事、CAPIでパーティクル
point.jpg


#point.py - Create a simple Particle System
import random, math
import cgkit.cri
from cgkit.cgtypes import *


# Load the RenderMan API.
# Replace the library name with whatever renderer you want to use.
ri = cgkit.cri.loadRI("3delight")
cgkit.cri.importRINames(ri, globals())


COUNT = 1000

def jitter(scale):
val=random.random()*1000
return (val/500-1)*scale

position=[]
red=[1,0,0]
fov=30

#/*Generate Particle Postions*/
for i in range(COUNT):
x=math.sin(i*0.5)*50+jitter(2)
y=math.cos(i*0.1)*50+jitter(2)
z=math.cos(i*0.5)*100+jitter(2)
position.append(vec3(x, y, z))


RiBegin(RI_NULL)
RiDisplay ("point.tif","file","rgb",RI_NULL)
RiFormat(512, 384, -1.0)
RiPixelSamples( 4, 4)
RiShadingRate(0.5)
RiProjection ("perspective","fov",fov,RI_NULL)
RiWorldBegin()
RiTranslate(0,0,300)
RiColor(red)
RiPoints("P",position,RI_NULL)
RiWorldEnd()
RiEnd()

  • -
  • -

pythonでパーティクル その2

イギリスのbournemouth大学のサイトを参考に作成してみた。
レンダリングは3Delightです。
勉強になります。ありがとうございます。
point2.jpg


#point2.py - Create a simple Particle System
import random, math
import cgkit.cri
from cgkit.cgtypes import *
from random import uniform as ru


# Load the RenderMan API.
# Replace the library name with whatever renderer you want to use.
ri = cgkit.cri.loadRI("3delight")
cgkit.cri.importRINames(ri, globals())

points=[]
width=[]
colour=[]
normals=[]
pappend=points.append
wappend=width.append
cappend=colour.append
nappend=normals.append

for i in range(0,1500):
for ix in range(0,3):
cappend(ru(0,1))
pappend(ru(-2,2))
nappend(ru(0,1))
wappend(ru(0.01,0.2))


RiBegin(RI_NULL)
RiImager("background", "color background",(.2,.4,.6))
RiDisplay ("point2.tif","file","rgb",RI_NULL)
RiFormat(512, 384, -1.0)
RiPixelSamples( 4, 4)
RiShadingRate(1)
RiProjection ("perspective","fov",30,RI_NULL)
RiWorldBegin()
RiLightSource("ambientlight","intensity",0.4)
RiLightSource("distantlight", "from",[0,0,1])
RiTranslate(0,0,6)
RiSurface("plastic")
RiPoints("P",points,"Cs",colour,"width",width,"N",normals,RI_NULL)
RiWorldEnd()
RiEnd()


実は、3DelightのPointsは、法線N部分(,"N",normals)が無視されるようだ。図のようにdiskはカメラ方向を見ている。Prmanではdiskの面がいろいろ変わってくる。次の記事を参照してください。
  • -
  • -

pythonでパーティクル その3

cgkitとPrmanを組み合わせる。どうも3Delightとprmanでは、RiPointの仕様がちがうようです。
3Delightのマニュアルはこちらになりますが、blobbyが使えて、遊べそうです。

さてさてPrmanだと以下の通りになります。


#point2.py - Create a simple Particle System
import random, math
import cgkit.cri
from cgkit.cgtypes import *
from random import uniform as ru


# Load the RenderMan API.
# Replace the library name with whatever renderer you want to use.
ri = cgkit.cri.loadRI("C:\Program Files (x86)\Pixar\RenderManProServer-14.4\lib\libprman")
cgkit.cri.importRINames(ri, globals())

points=[]
width=[]
colour=[]
normals=[]
pappend=points.append
wappend=width.append
cappend=colour.append
nappend=normals.append

for i in range(0,1500):
for ix in range(0,3):
cappend(ru(0,1))
pappend(ru(-2,2))
nappend(ru(0,1))
wappend(ru(0.01,0.2))


RiBegin(RI_NULL)
RiImager("background", "color background",(.2,.4,.6))
RiDisplay ("point2_pr.tif","file","rgb",RI_NULL)
RiFormat(512, 384, -1.0)
RiPixelSamples( 4, 4)
RiShadingRate(1)
RiProjection ("perspective","fov",30,RI_NULL)
RiWorldBegin()
RiLightSource("ambientlight","intensity",0.4)
RiLightSource("distantlight", "from",[0,0,1])
RiTranslate(0,0,6)
RiSurface("plastic")
RiPoints("P",points,"Cs",colour,"width",width,"N",normals,RI_NULL)
RiWorldEnd()
RiEnd()


実行方法は、

>point2_pr.py |prman

point2_pr.jpg
ありがとうございます。調べて納得して、繰り返し繰り返しですね。
  • -
  • -

pythonでパーティクル その4

cgkitと3Delightでメタボールのパーティクルを設定してみた。
距離、明るさを調整した。
広がってきて面白いです。
point2_blob.jpg


#point2_blob.py - Create a simple Particle System
import random, math
import cgkit.cri
from cgkit.cgtypes import *
from random import uniform as ru


# Load the RenderMan API.
# Replace the library name with whatever renderer you want to use.
ri = cgkit.cri.loadRI("3delight")
cgkit.cri.importRINames(ri, globals())

points=[]
width=[]
colour=[]
normals=[]
pappend=points.append
wappend=width.append
cappend=colour.append
nappend=normals.append

for i in range(0,2000):
for ix in range(0,3):
cappend(ru(0,1))
pappend(ru(-2,2))
nappend(ru(0,1))
wappend(ru(0.04,0.45))


RiBegin(RI_NULL)
RiImager("background", "color background",(.2,.4,.6))
RiDisplay ("point2_blob.tif","framebuffer","rgb",RI_NULL)
RiFormat(512, 384, -1.0)
RiPixelSamples( 4, 4)
RiShadingRate(1)
RiProjection ("perspective","fov",30,RI_NULL)
RiWorldBegin()
RiLightSource("ambientlight","intensity",0.4)
RiLightSource("distantlight", "to",[1,0,1])
RiTranslate(0,0,6)
RiSurface("plastic")
RiPoints("P",points,"Cs",colour,"width",width,"uniform string type","blobby")
RiWorldEnd()
RiEnd()


  • -
  • -

pythonでパーティクル その5

prmanでパーティクル。cgkitは使わないです。
イギリスのbournemouth universityを参考にしました。ありがとうございます。Thank you.
hair_pr.jpg


#hair2.py
#set PYTHONPATH=C:\Python25;C:\Python\Scripts;%RMANTREE%\bin
import random
from random import uniform as ru
import prman
ri=prman.Ri()

points=[]
pappend=points.append
width=[]
wappend=width.append
npoints=[]
npappend=npoints.append
random.seed(129234)
ru=random.uniform
zpos=-2.0
plus=0.1
minus=-0.1
while(zpos < 2.0 ) :
xpos=-2.0
while (xpos < 2.0) :
pappend(xpos+ru(minus,plus))
pappend(0)
pappend(zpos+ru(minus,plus))

pappend(xpos+ru(minus,plus))
pappend(0.1)
pappend(zpos+ru(minus,plus))

pappend(xpos+ru(minus,plus))
pappend(0.2)
pappend(zpos+ru(minus,plus))

pappend(xpos+ru(minus,plus))
pappend(0.3+ru(-0.1,0.1))
pappend(zpos+ru(minus,plus))

wappend(0.006)
wappend(0.001)
npappend(4)
xpos+=0.02
zpos+=0.02

ri.Begin(ri.RENDER)
ri.Imager("background", {"color color":(.2,.4,.6)})
ri.Display("hair_pr.png", "file", "rgb")
ri.Format(640,480,1)
ri.Projection(ri.PERSPECTIVE, {ri.FOV: 90})
ri.Translate(0,0,2)
ri.Rotate(-25,1,0,0)
ri.WorldBegin()
ri.LightSource("distantlight", {ri.HANDLEID: "1"})
ri.LightSource("ambientlight", {ri.HANDLEID: "2", "intensity":[0.4]})
ri.Color((1,0.2,0.2))
ri.Surface("hair")
ri.Curves( "cubic",npoints,"nonperiodic",{ri.P:points, ri.WIDTH : width})
ri.WorldEnd()
ri.End()

  • -
  • -

pythonでパーティクル その6

Essential RenderManを参考に、cgkitで作成した。レンダリングは3Delightです。試してみると面白いです。ありがとうございます。
color_par.jpg


#color.py - Create Particles of different colors
import random, math
import cgkit.cri
from cgkit.cgtypes import *


# Load the RenderMan API.
# Replace the library name with whatever renderer you want to use.
ri = cgkit.cri.loadRI("3delight")
cgkit.cri.importRINames(ri, globals())


COUNT = 2000

def jitter(scale):
val=random.random()*1000
return (val/500-1)*scale

position=[]
color=[]
constantwidth=2.5
fov=30

#/*Generate Particle Postions*/
for i in range(COUNT):
x=math.sin(i*0.5)*50+jitter(2)
y=math.cos(i*0.1)*50+jitter(2)
z=math.cos(i*0.5)*100+jitter(2)
color0=jitter(0.5)+0.5
color1=jitter(0.5)+0.5
color2=jitter(0.5)+0.5
position.append(vec3(x, y, z))
color.append(vec3(color0, color1, color2))

RiBegin(RI_NULL)
RiDisplay ("color_par.tif","file","rgb",RI_NULL)
RiFormat(512, 384, -1.0)
RiPixelSamples( 4, 4)
RiShadingRate(0.5)
RiProjection ("perspective","fov",fov,RI_NULL)
RiWorldBegin()
RiLightSource("ambientlight","intensity",0.4)
RiLightSource("distantlight", "from",[0,0,1])
RiTranslate(0,0,250)
RiSurface("plastic")
RiPoints("P",position,"constantwidth", constantwidth,"Cs",color,RI_NULL)
RiWorldEnd()
RiEnd()

  • -
  • -

<< 2/4 >>