<< 3/4 >>
ÄľŔţ¤Î»ĎĹŔˇ˘˝ŞĹŔ¤ÎşÂɸ¤ňµá¤á¤ë
Metasequoia Python¤Ç
ĄáĄżĄ»ĄłĄ¤Ą˘¤ÎˇÖĚ̤κîŔ®ˇ×¤ÇˇÖĘաפňĄŻĄęĄĂĄŻ¤·ˇ˘°ěËܤÎÄľŔţ¤ňÉÁ˛č¤ą¤ëˇŁĄŞĄÖĄ¸Ą§ĄŻĄČĄŃĄÍĄë¤Çˇ˘ĄŞĄÖĄ¸Ą§ĄŻĄČĚľ¤ňobj1_light¤Č¤ą¤ëˇŁ
¤ł¤ÎÄľŔţ¤¬RenderMan¤ÎĄéĄ¤ĄČ¤Î¸ţ¤¤Ë¤·¤č¤¦¤«¤Č¸ˇĆ¤Ă档
¤˝¤ě¤Çˇ˘»ĎĹŔ¤Č˝ŞĹŔ¤ÎşÂɸ¤ň˝ĐÎϤą¤ëĄąĄŻĄęĄ×ĄČ¤ňşî¤Ă¤Ć¤ß¤żˇŁ
¤˘¤ę¤¬¤Č¤¦¤´¤¶¤¤¤Ţ¤ąˇŁ
˝ő¤«¤ę¤Ţ¤ąˇŁ
°Ę˛Ľ¤ĎMetasequoia PythonĄąĄŻĄęĄ×ĄČ¤Ç¤ąˇŁ
ĄŞĄÖĄ¸Ą§ĄŻĄČĚľ¤Ëlight¤ň´Ţ¤ŕʸ»úÎó¤Ç¤˘¤ë¤ł¤ČˇŁÄşĹŔ¤Ď2¸Ä°ĘĆâ¤Ç¤˘¤ë¤ł¤ČˇŁ¤Çˇ˘şÂɸ¤ň˝ĐÎϤ·¤Ţ¤ąˇŁ
#face_index22.py

class S(str):

	 def __contains__(self,x):

	 	for i in range(len(self)):

			if self.startswith(x,i): return 1


doc=MQSystem.getDocument()

out=MQSystem.println


#obj=doc.object[doc.currentObjectIndex]

#out(str(obj.numFace))

#out(str(obj.numVertex))

#out(str(obj.name))


num = doc.numObject


for n in range(0,num):

	obj = doc.object[n]

	out(str(obj.name))

	if obj is None: continue


	for face in obj.face:

		for aIndex in face.index:

			out(str(aIndex))


	if obj.numVertex>2: continue

	if "light" in S(str(obj.name)):

		for k in range(0,obj.numVertex):

			out(str(obj.vertex[k].pos.x)+","+str(obj.vertex[k].pos.y)+","+str(obj.vertex[k].pos.z))
ĄáĄżĄ»ĄłĄ¤Ą˘¤«¤éRIB˝ĐÎϡˇĄéĄ¤ĄČŔßÄę
ĄáĄżĄ»ĄłĄ¤Ą˘¤«¤éRenderMan¤ÎRIB·ÁĽ°¤Řˇ˘metasequoia python¤ň»Č¤Ă¤Ć˝ĐÎϸˇľÚˇŁ
şŁ˛ó¤Ďˇ˘ÄľŔţ¤ň°ú¤ĂÄĄ¤ęˇ˘distantlightĄéĄ¤ĄČ¤Î°ĚĂ֤Ȥ·¤Ć˝ĐÎϤą¤ë¤č¤¦¤ËpythonĄąĄŻĄęĄ×ĄČ¤ň˝ń¤´ą¤¨¤żˇŁĄéĄ¤ĄČ°ĚĂÖˇ˘RIB¤Ç¤ĎZ°ĚĂÖ¤Ë-1¤ň¤«¤±¤Ć˝ĐÎϤ·¤Ć¤¤¤ëˇŁ
¸ĺˇ˘ĄŞĄÖĄ¸Ą§ĄŻĄČĚľ¤Ë"no_"¤¬¤Ä¤¤¤ż¤éÄşĹŔˡŔţ¤Ď·×»»¤·¤Ę¤¤¤č¤¦¤Ë¤·¤Ć¤ß¤żˇŁĽÂ¸ł·Ż¤Ç¤ąˇŁ
şŁ¸ĺ¤Ďˇ˘ĄŞĄÖĄ¸Ą§ĄŻĄČĚľ¤Ëspotlight¤ČĆţ¤ě¤ż¤éˇ˘ĄąĄÝĄĂĄČĄéĄ¤ĄČ¤ň˝Đ¤ą¤č¤¦¤ËÄɲäǤ¤ë¤č¤¦¤Ëą©Éפ·¤Ć¤¤¤¤ż¤¤¤Č¤ł¤í¤Ç¤ąˇŁ
¤˘¤ę¤¬¤Č¤¦¤´¤¶¤¤¤Ţ¤ąˇŁ

##Renderman RIB-Structure 1.0
MakeTexture "00tex_master.tif" "00tex_master.tdl" "periodic" "periodic" "gaussian" 1 1
Display "out_scene2.tif" "file" "rgba"
Format 640 480 1
PixelSamples 4 4
PixelFilter "catmull-rom" 3 3
ShadingRate 1
Imager "background" "background" [0.2 0.4 0.6]
Sides 1
Orientation "rh"
Projection "perspective" "fov" [15.7411862756]
ConcatTransform [
0.989678789967 -0.0703824392657 -0.124828702357 0
0 0.87107923842 -0.49114250518 0
-0.143303498523 -0.486073320228 -0.862088646645 0
120.757968634 -292.714072303 3702.46738861 1
]
Scale 1 1 -1
WorldBegin
Attribute "visibility" "trace" [1]
Attribute "visibility" "transmission" ["Os"]
Attribute "visibility" "transmission" "opaque"
Attribute "light" "shadows" "on"
LightSource "distantlight" 1
"from" [714.900024414 688.590026855 -50.0]
"to" [0.0 286.878967285 -0.0]
"lightcolor" [0.800 0.800 0.800]
LightSource "ambientlight" 2
"lightcolor" [0.300 0.300 0.300]
Color 1.0 1.0 1.0
Surface "supertexmap" "string Csmapname" "00tex_master.tdl"
AttributeBegin
Scale 1 1 -1
Declare "st" "facevarying float[2]"
Attribute "identifier" "name" ["no_obj1"]
PointsPolygons
[ 3 3 3 3 3 3 3 3 3 3 3 3 3 3 3 3 3 3 3 3 3 3 3 3 3 3 3 3 3 3 3 3 3 3 3 °Ę˛ĽľĘάˇ¦ˇ¦ˇ¦ˇ¦
SpotlightŔßÄę
ĄáĄżĄ»ĄłĄ¤Ą˘¤Çşî¤Ă¤ż´Ęñ¤ĘĄ·ˇĽĄó¤ňmetasequoia python¤ÇRIB˝ĐÎϤ·¤żˇŁĄŞĄÖĄ¸Ą§ĄŻĄČ¤ĎĄąĄŕˇĽĄ¸ĄóĄ°¤ň·×»»¤ą¤ë¤·¤Ę¤¤¤ňÁŞÂň¤Ç¤¤ë¤č¤¦¤Ëˇ˘ĄŞĄÖĄ¸Ą§ĄŻĄČĚľ¤Ëno_¤ň¤Ä¤±¤Ć¤Ş¤ŻˇŁ
ĄŞĄÖĄ¸Ą§ĄŻĄČĚľ¤¬distantlight,spotlight,maya_spotlight¤Ç¤˘¤ë¤Čˇ˘3delight¤ÎĄ·Ą§ˇĽĄŔ¤ň˝ĐÎϤą¤ëˇŁ±Ć¤ĎĄěĄ¤ĄČĄěˇĽĄ·ĄóĄ°¤ňÍřÍѤǤ¤ë¤č¤¦¤ËĄąĄŻĄęĄ×ĄČ¤ňŔßÄꤷ¤żˇŁ
¤ł¤ł¤Ç¤Ďˇ˘˝ĐÎϤ·¤żĄéĄ¤ĄČ¤ÎĄ«ĄéˇĽ¤ňĘŃąą¤·¤żˇŁĚŔ¤ë¤µintensity¤âÄ´Ŕ°¤ą¤ëˇŁĹö˝éspotlight¤Îintensity¤ňÂ礤Ż¤·¤Ć¤âĘѲ˝¤·¤Ę¤«¤Ă¤ż¤¬ˇ˘µ÷ÎĄ¤ňĂĎĚ̶᤯¤Ţ¤Ç¤â¤Ă¤Ć¤¤ż¤éˇ˘¤«¤ą¤«¤Ë¸÷¤ëˇŁ˛ż¤Čintensity 700000¤Čˇ˘¤Č¤ó¤Ç¤â¤Ę¤¤żô»ú¤ňĆţ¤ě¤ż¤éˇ˘¤˝¤ě¤é¤·¤Ż¸«¤¨¤ë¤č¤¦¤Ë¤Ę¤Ă¤żˇŁ
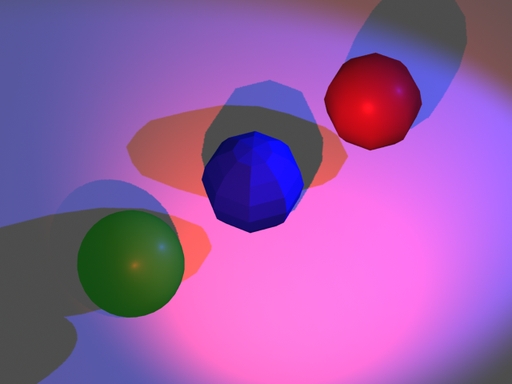
°Ę˛Ľ¤Ďˇ˘ĄéĄ¤ĄČ¤ÎŔßÄęÉôʬ¤Ç¤ąˇŁ¤Ţ¤Ŕ¤Ţ¤Ŕ˛ÝÂę¤Ď¤ż¤Ż¤µ¤ó¤˘¤ę¤Ţ¤ąˇŁ
¤˘¤ę¤¬¤Č¤¦¤´¤¶¤¤¤Ţ¤ąˇŁ
Attribute "visibility" "trace" [1]

Attribute "visibility" "transmission" ["Os"]

Attribute "visibility" "transmission" "opaque"

Attribute "light" "shadows" "on"

LightSource "spotlight" 2

		"from" [250.0 380.0 -340.0]

		"to" [0.0 0.0 -0.0]

		"lightcolor" [0.800 0.100 0.100]

		"string shadowmap" "raytrace"

		"float intensity" 400000

		"float coneangle" 0.52

		"float conedeltaangle" 0.52

LightSource "ambientlight" 3

		"lightcolor" [0.300 0.300 0.300]

LightSource "maya_spotlight" 4

		"from" [250.0 340.0 340.0]

		"to" [0.0 0.0 -0.0]

		"lightcolor" [0.100 0.100 0.800]

		"string shadowmapname" "raytrace"

		"float intensity" 1.0

		"float coneangle" 0.8

		"float penumbraangle" 0.15
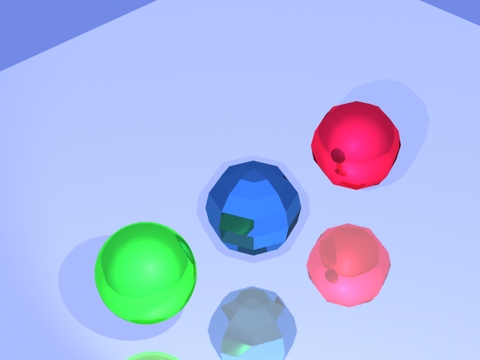
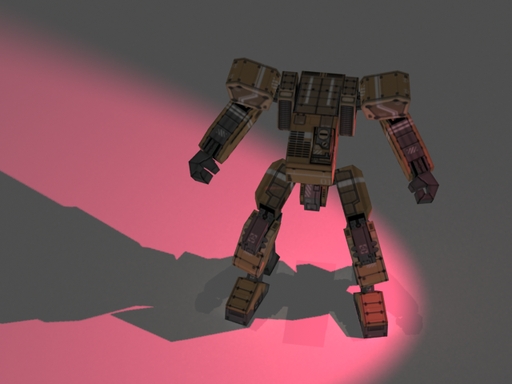
¶â°ĽÁ´¶
shinyĄ·Ą§ˇĽĄŔŔßÄę
3Delight¤ÇĄěĄóĄŔĄęĄóĄ°ˇŁ
ĄâĄÇĄë¤Ďˇ˘ĄáĄżĄ»ĄłĄ¤Ą˘¤«¤émetasequoia pythonĄąĄŻĄęĄ×ĄČ¤ňĽÂąÔ
RIB˝ĐÎϤ·¤ż¤â¤Î¤ňÄ´Ŕ°ˇŁ
BMRT¤ÎfakeskyĄ·Ą§ˇĽĄŔ¤âÍřÍѡŁĽţ°Ď¤ĎÂ礤ʵĺÂΤËfakesky¤ňłä¤ęĹö¤Ć¤ëˇŁ
·×»»˝čÍý®Ĺ٤ň¤˘¤˛¤ëą©ÉפňĽÂ¸ł¤Ç¤ą¤ÍˇŁ
¤˘¤ę¤¬¤Č¤¦¤´¤¶¤¤¤Ţ¤ąˇŁ
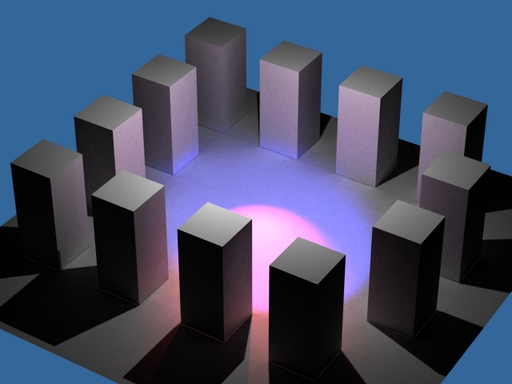
Indirectlight
3Delight¤Îindirectlight¤ňÄɲäǤ¤ë¤č¤¦¤Ë¤·¤żˇŁ
ĄáĄżĄ»ĄłĄ¤Ą˘¤ÎĄŞĄÖĄ¸Ą§ĄŻĄČĄŃĄÍĄë¤Ëidirectlight¤Č¤Ö¤Ä¤ňÄɲ䷤ơ˘
metasequoia python ĄąĄŻĄęĄ×ĄČ¤ÇRIB˝ĐÎĎ
°Ę˛Ľ¤ĎĄéĄ¤ĄČÉôʬRIBČ´żčˇ˘·ëą˝ĄěĄóĄŔĄęĄóĄ°»ţ´Ö¤«¤«¤ę¤Ţ¤ąˇŁ
Attribute "visibility" "trace" [1]

Attribute "visibility" "transmission" ["Os"]

Attribute "visibility" "transmission" "opaque"

Attribute "light" "shadows" "on"

TransformBegin

Translate 3.0 300.0 -3.0

LightSource "maya_pointlight" 1

		"lightcolor" [0.800 0.800 0.800]

		"string shadowmapname" "raytrace"

		"float intensity" 50000


TransformEnd

LightSource "spotlight" 2

		"from" [-64.2728729248 115.28918457 96.3978881836]

		"to" [-0.649001300335 10.0252351761 -12.1598510742]

		"lightcolor" [0.800 0.100 0.100]

		"string shadowmap" "raytrace"

		"float intensity" 80000

		"float coneangle" 0.52

		"float conedeltaangle" 0.52


LightSource "maya_spotlight" 3

		"from" [127.575531006 153.345001221 -69.9409103394]

		"to" [42.3550758362 20.9788990021 -12.4399051666]

		"lightcolor" [0.100 0.100 0.800]

		"string shadowmapname" "raytrace"

		"float intensity" 1.0

		"float coneangle" 0.8

		"float penumbraangle" 0.15


TransformBegin

Translate 0 10 0

LightSource "indirectlight" "ambientLightShape1"

        "uniform float intensity" [ 1 ]

        "uniform float finalgather" [ 1 ]

        "uniform float samples" [ 256 ]

        "uniform float maxdist" [ 0.99999997e36 ]

        "uniform float __nonspecular" [ 1 ]

TransformEnd
łÚ¤·¤¤¤Ç¤ą¤ÍˇŁ
Tkinter»Č¤¨¤Ę¤¤??
ĄáĄżĄ»ĄłĄ¤Ą˘python¤ÇTkinterĽÂ¸ł·ŻˇŁ
ñ¤ËĄ¦Ą¤ĄóĄÉĄ¦¤ňÉ˝Ľ¨¤·¤č¤¦¤Č¤·¤ż¤¬ˇ˘¤¦¤Ţ¤Ż¤¤¤«¤Ę¤¤ˇŁ
def p(*args):
"""
Ą×ĄęĄóĄČ´Řżô
ĘŁżô¤Î°úżô¤ňĹϤ»¤ëˇŁ
"""
if len(args)==0:
# ˛ţąÔ¤µ¤»¤ë
MQSystem.println("")
return
for arg in args:
MQSystem.println(str(arg))
import traceback
import sys
from Tkinter import *
try:
r=Tk()
except:
info=sys.exc_info()
p(info[0])
p(info[1])
p(*traceback.extract_tb(info[2]))
Ą¨ĄéˇĽ¤Ď°Ę˛Ľ¤Î¤Č¤Ş¤ęˇ¦ˇ¦ˇ¦ˇ¦»ÄÇ°??
exceptions.AttributeError
'module' object has no attribute 'argv'
('C:\\Users\\makura\\Documents\\tk_error.py', 19, '?', 'r=Tk()')
('c:\\Python22jp\\Lib\\lib-tk\\Tkinter.py', 1507, '__init__', 'baseName = os.path.basename(sys.argv[0])')
ʸ»úÎóÁŕşî
ĄáĄżĄ»ĄłĄ¤Ą˘¤ÎPython¤ň»Č¤¨¤ë¤č¤¦¤Ë¤Ę¤ë¤ż¤á¤ËˇŁ
python 2.2.3Ą¤ĄóĄżĄéĄŻĄĆĄŁĄÖĄâˇĽĄÉ¤Çʸ»úÎóÁŕşî¤ň¸ˇľÚ¤·¤Ć¤ß¤żˇŁ
>>> tex="texture01.jpg"
>>> print tex[:-4]
texture01
>>> print tex[-4:]
.jpg
>>> print tex[:-4]+".tif"
texture01.tif
>>>
¤ł¤ě¤Çˇ˘ĄĆĄŻĄąĄÁĄăĚľ¤ÎĘŃąą¤Ç¤¤Ţ¤ą¤ÍˇŁ¤˘¤ę¤¬¤Č¤¦¤´¤¶¤¤¤Ţ¤ąˇŁ
metasequoia python RenderMan Export
ĄáĄżĄ»ĄłĄ¤Ą˘ˇˇPythonĄąĄŻĄęĄ×ĄČ¤ň»Č¤Ă¤Ćˇ˘RIB˝ĐÎϡ˘ĄéĄ¤ĄČ¤ň¤¤¤í¤¤¤í¤Č¤Ä¤±¤é¤ě¤ë¤č¤¦¤Ëą©Éפ·¤Ţ¤·¤żˇŁ
1.ambientlight,spotlight,maya_spotlight,indirectlight,maya_pointlight,distantlight¤ňĄŞĄÖĄ¸Ą§ĄŻĄČĄŃĄÍĄë¤Ë˝ń¤ąţ¤ŕ¤Čˇ˘˝ĐÎϤą¤ëˇŁ
¤˝¤ÎşÝˇ˘Ęý¸ţ¤Ďˇ˘Ě̤κîŔ®¤ÎĘŐ¤ň»Č¤Ă¤ĆŔţʬ¤ňşî¤ę¤Ţ¤ąˇŁ
2.ĘŁżô¤ÇĄąĄÝĄĂĄČĄéĄ¤ĄČ¤ňŔߤ±¤ż¤¤¤Č¤¤Ďˇ˘ĄŞĄÖĄ¸Ą§ĄŻĄČĚľ¤ËČÖąć¤ň¤Ä¤±¤Ć¤Ş¤¤Ţ¤ąˇŁ
spotlight1
spotlight2
3.ĄéĄ¤ĄČ¤Îż§ĘŃąą¤Ďˇ˘ĄŢĄĆĄęĄ˘Ąë¤ň¤Ä¤Ż¤ęˇ˘ĄéĄ¤ĄČĄŞĄÖĄ¸Ą§ĄŻĄČ¤ňÁŞÂň¤·łä¤ęĹö¤Ć¤Ţ¤ąˇŁ
4.ĄŢĄĆĄęĄ˘Ąë¤ËĄĆĄŻĄąĄÁĄă¤¬¤˘¤ë¤Čˇ˘supertexmapĄ·Ą§ˇĽĄŔ¤ňłä¤ęĹö¤Ć¤Ţ¤ąˇŁĚ̤´¤Č¤ÎĄŢĄĆĄęĄ˘Ąë¤Ë¤ĎČóÂбţˇŁ1ĄŞĄÖĄ¸Ą§ĄŻĄČ¤Ë1ĄŢĄĆĄęĄ˘ĄëŔßÄę¤Ë¤Ę¤ę¤Ţ¤ąˇŁ
maya_spotlight,indirectlight¤ňÍřÍѤ·¤żˇŁ
ĄĆĄŻĄąĄÁĄăĄŢĄĂĄ×¤Ďˇ˘ĄěĄóĄŔĄęĄóĄ°Á°¤Ëtif¤ËĘŃąą¤·¤Ć¤Ş¤¤Ţ¤ąˇŁ
maya_spotlightż§ĘŃąą,indirectlight¤ňÍřÍѤ·¤żˇŁ
¤ą¤Ů¤Ćˇ˘3Delight¤ÇĄěĄóĄŔĄęĄóĄ°¤·¤Ţ¤·¤żˇŁ
»Č¤¤¤ä¤ą¤Ż¤Ę¤Ă¤Ć¤¤Ţ¤·¤żˇŁĚĚÇň¤¤¤Ç¤ąˇŁ¤˘¤ę¤¬¤Č¤¦¤´¤¶¤¤¤Ţ¤ąˇŁ
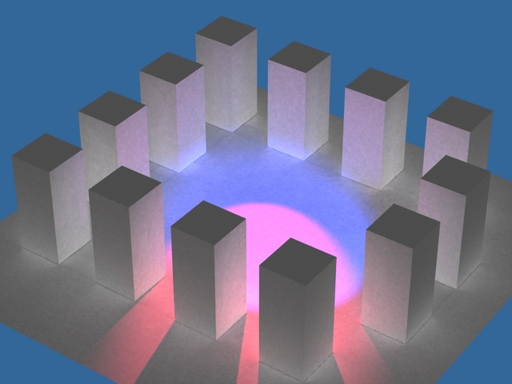
RIB˝ĐÎϸˇľÚ¤˝¤Î6
metasequoia pythonĄąĄŻĄęĄ×ĄČ¤ň»Č¤Ă¤ĆRenderMan RIB˝ĐÎϤ¬ĚĚÇň¤¤ˇŁĄĄăĄéĄŻĄżˇĽ¤ÎĄěĄóĄŔĄęĄóĄ°¤ňşĆĹ٤ä¤Ă¤Ć¤ß¤żˇŁ
3DelightĄ·Ą§ˇĽĄŔ¤Îmaya_spotlight¤ň2¤ÄĆţ¤ě¤Ćˇ˘indirectlight¤ĎÄ´Ŕ°¤·¤Ţ¤·¤żˇŁ°Ę˛Ľ¤ĎlightÉôʬ¤ÎRIBÁ°Čľ¤Ç¤ąˇŁ
##Renderman RIB-Structure 1.0
Display "nanase01.tif" "file" "rgba"
Format 640 480 1
PixelSamples 4 4
PixelFilter "catmull-rom" 3 3
ShadingRate 1
Imager "background" "background" [0.2 0.4 0.6]
Sides 1
Orientation "rh"
Projection "perspective" "fov" [16.8611511458]
ConcatTransform [
0.682221487495 0.0292391623782 0.730560684258 0
0 0.999200044373 -0.0399908905246 0
0.731145568269 -0.0272826448199 -0.681675740577 0
30.1351455113 10.4167089142 1500.00002977 1
]
Scale 1 1 -1
WorldBegin
Attribute "visibility" "trace" [1]
Attribute "visibility" "transmission" ["Os"]
Attribute "visibility" "transmission" "opaque"
Attribute "light" "shadows" "on"
LightSource "ambientlight" 3
"lightcolor" [0.600 0.600 0.600]
LightSource "maya_spotlight" 4
"from" [143.23878479 383.181335449 -243.087921143]
"to" [-11.150762558 152.709259033 -47.7991714478]
"lightcolor" [0.898039221764 0.933333337307 1.0]
"string shadowmapname" "raytrace"
"float intensity" 1.0
"float coneangle" 0.8
"float penumbraangle" 0.15
LightSource "maya_spotlight" 5
"from" [-128.688598633 -72.6545791626 -299.763641357]
"to" [-11.5170631409 152.373718262 -24.4289131165]
"lightcolor" [0.898039221764 0.933333337307 1.0]
"string shadowmapname" "raytrace"
"float intensity" 1.0
"float coneangle" 0.8
"float penumbraangle" 0.15
TransformBegin
Translate 0 10 0
LightSource "indirectlight" 6
"uniform float intensity" [ 0.6 ]
"uniform float finalgather" [ 1 ]
"uniform float samples" [ 256 ]
"uniform float maxdist" [ 0.99999997e36 ]
"uniform float __nonspecular" [ 1 ]
TransformEnd
Color 1.0 1.0 1.0
MakeTexture "nanase._tex.tif" "nanase._tex.tdl" "periodic" "periodic" "gaussian" 1 1
Surface "supertexmap" "string Csmapname" "nanase._tex.tdl"
AttributeBegin
Scale 1 1 -1
Declare "st" "facevarying float[2]"
Attribute "identifier" "name" ["body"]
PointsPolygons
[ 3 3 3 3 3 3 3 3 3 3 3 3 3 3 3 3 3 3 3 3 3 3 3 3 3 3 3 3 3 3 °Ę˛ĽľĘά
Ä´Ŕ°¤·¤Ć¤¤¤Ż¤ČĚĚÇň¤Ż¤Ę¤ę¤Ţ¤ą¤ÍˇŁ¤˘¤ę¤¬¤Č¤¦¤´¤¶¤¤¤Ţ¤ąˇŁ

1ˇÁ20¤Ţ¤Ç˝ĹĘŁ¤·¤Ę¤¤ÍđżôÉ˝Ľ¨ ¤˝¤Î2
VBScript¤ň»˛ąÍ¤Ë°ěĂפ·¤Ę¤¤Íđżô¤ňÉ˝Ľ¨¤ą¤ëĄąĄŻĄęĄ×ĄČ¤ňąÍ¤¨¤Ć¤ß¤żˇŁ
Á°˛ó¤Îµ»ö¤Č¤Ď¤Ţ¤ż°ă¤Ă¤Ć¤¤¤ëˇŁ
#naraberu4.py

import random

a=[]

for i in range(1,21):

	a.append(i)


for i in range(1000):

	idx01=int(random.random()*20)

	idx02=int(random.random()*20)

	temp=a[idx01]

	a[idx01]=a[idx02]

	a[idx02]=temp


print a

print sorted(a)
¤˘¤ę¤¬¤Č¤¦¤´¤¶¤¤¤Ţ¤ąˇŁ
<< 3/4 >>