ri.Points({ri.P:points,ri.CS:colour,ri.CONSTANTWIDTH:size})
TypeError: Problem parsing parameterlist entry: varying color Cs
とエラーが出ていたが、pointsのリスト表記を[[1,2,3],[4,5,6],・・・]としていたのが原因だった。[1,2,3,4,5,6,・・・]となるように書き換えた。
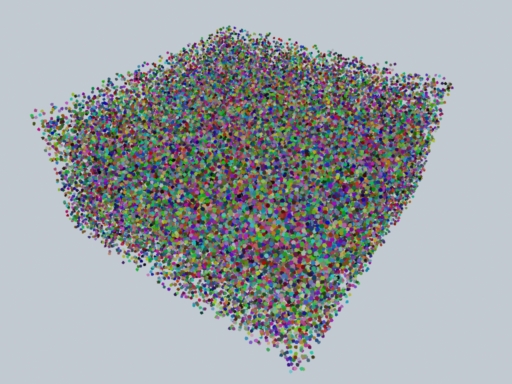
Pointsを50000個、直方体に配置してみました。さらに勉強します。
#rectangularbox_pr2.py

#Modified from RenderMan Procedural Primitives/ Randomness Examples

# in CG References & Tutorials(fundza.com)


#set PYTHONPATH=C:\Python25;C:\Python\Scripts;%RMANTREE%\bin

import getpass

import time

# import the python renderman library

import prman


import random,math


def randBetween(min, max):

    return random.random() * (max - min) + min


def length(x, y, z):

    return math.sqrt(x*x + y*y + z*z)


def normalize(x, y, z):

    len = length(x, y, z)

    return x/len, y/len, z/len


def scaleVector(x, y, z, sc):

    return x*sc, y*sc, z*sc


def box(width, height, depth, num, size):

    points=[]

    pappend=points.append

    for n in range(num):

        x = randBetween(-width/2, width/2)

        y = randBetween(-height/2, height/2)

        z = randBetween(-depth/2, depth/2)

        pappend(x)

        pappend(y)

        pappend(z)

    colour=[]

    for n in range(num):

        r = randBetween(0, 1)

        g = randBetween(0, 1)

        b = randBetween(0, 1)

        colour.append(r)

        colour.append(g)

        colour.append(b)


    ri.Points({ri.P:points,ri.CS:colour,ri.CONSTANTWIDTH:size})


ri = prman.Ri() # create an instance of the RenderMan interface

ri.Option("rib", {"string asciistyle": "indented"})


filename = "rectangularbox.rib"

ri.Begin(ri.RENDER)

#ri.Begin(filename)

# ArchiveRecord is used to add elements to the rib stream in this case comments

# note the function is overloaded so we can concatinate output

ri.ArchiveRecord(ri.COMMENT, 'File ' +filename)

ri.ArchiveRecord(ri.COMMENT, "Created by " + getpass.getuser())

ri.ArchiveRecord(ri.COMMENT, "Creation Date: " +time.ctime(time.time()))


# now we add the display element using the usual elements

# FILENAME DISPLAY Type Output format

ri.Display("rectangularbox.png", "file", "rgb")

ri.Format(512, 384, -1.0)

ri.Imager("background", {"color color":(.76,.79,.82)})

# now set the projection to perspective

ri.Projection(ri.PERSPECTIVE,{ri.FOV:50})


# now we start our world

ri.WorldBegin()

ri.LightSource("distantlight", {ri.HANDLEID: "1","to":[0,1,1]})

ri.LightSource("ambientlight", {ri.HANDLEID: "2", "intensity":[0.4]})


ri.Translate(0,0.25,3)

ri.Rotate(-40,1,0,0)

ri.TransformBegin()

ri.Rotate(35,0,1,0)

ri.Surface("plastic")

box(2.0, 1.0, 2.0, 50000, 0.02)

ri.TransformEnd()

ri.WorldEnd()

ri.End()
- -
- -