サーバ移行
- -
- by yuichirou yokomakura
- 2009.02.05 Thursday 23:22
データ移行試行期間。
ありがとうございます。
ありがとうございます。
- -
- -
日々、3DCGの世界は進歩しています。勉強して理解したことをまとめていきます。RenderMan互換レンダラーやグローバル・イルミネーション。いろんなことに好奇心を持って、面白くなる。目指せShader書き!!
ありがとうございます。
#rensyu.py
# -*- coding: utf-8 -*-
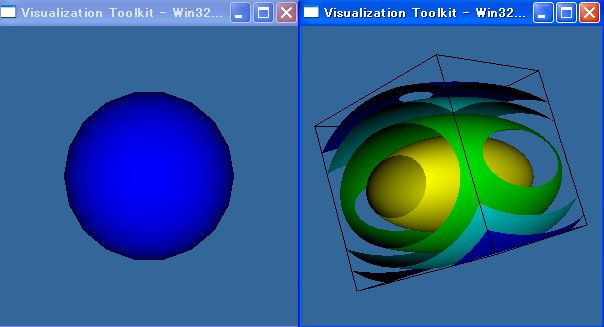
#qを押すと2つ目のウインドウがでる。
import vtk
sphere=vtk.vtkSphereSource()
sphere.SetRadius(1.0)
sphere.SetThetaResolution(18)
sphere.SetPhiResolution(18)
map = vtk.vtkPolyDataMapper()
map.SetInput(sphere.GetOutput())
aSphere = vtk.vtkActor()
aSphere.SetMapper(map)
aSphere.GetProperty().SetColor(0,0,1)
ren1 = vtk.vtkRenderer()
renWin= vtk.vtkRenderWindow()
renWin.AddRenderer(ren1)
iren = vtk.vtkRenderWindowInteractor()
iren.SetRenderWindow(renWin)
ren1.AddActor(aSphere)
ren1.SetBackground(0.2,0.4,0.6)
renWin.Render() #球体が表示される
iren.Start() #マウスで動かせる
quadric = vtk.vtkQuadric()
quadric.SetCoefficients(0.5,1,0.2,0,0.1,0,0,0.2,0,0)
sample = vtk.vtkSampleFunction()
sample.SetSampleDimensions(50,50,50)
sample.SetImplicitFunction(quadric)
contours = vtk.vtkContourFilter()
contours.SetInput(sample.GetOutput())
contours.GenerateValues(5,0.0,1.2)
contMapper = vtk.vtkPolyDataMapper()
contMapper.SetInput(contours.GetOutput())
contMapper.SetScalarRange(0.0,1.2)
contActor = vtk.vtkActor()
contActor.SetMapper(contMapper)
outline = vtk.vtkOutlineFilter()
outline.SetInput(sample.GetOutput())
outlineMapper = vtk.vtkPolyDataMapper()
outlineMapper.SetInput(outline.GetOutput())
outlineActor = vtk.vtkActor()
outlineActor.SetMapper(outlineMapper)
outlineActor.GetProperty().SetColor(0,0,0)
ren2 = vtk.vtkRenderer()
renWin2 = vtk.vtkRenderWindow()
renWin2.AddRenderer(ren2)
iren2 = vtk.vtkRenderWindowInteractor()
iren2.SetRenderWindow(renWin2)
ren2.AddActor(contActor)
ren2.AddActor(outlineActor)
ren2.SetBackground(0.2,0.4,0.6)
renWin2.Render()
iren2.Start()