1/4 >>

Procedural "RunProgram" その1

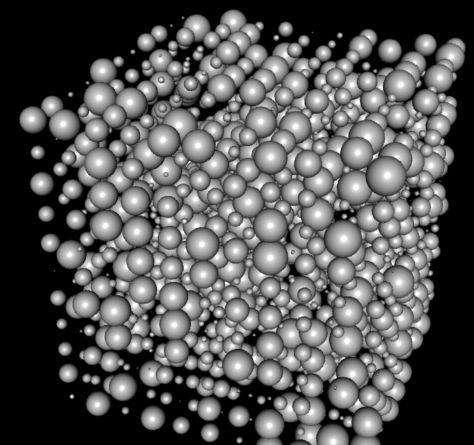
PythonプログラムをRenderMan RIBで実行するテスト
RIBの出力:

import sys

args = sys.stdin.readline()

while args:
values = args.split()
pixels = float(values[0])
rad = float(values[1])
print 'TransformBegin'
print 'Sphere %s %s %s 360' % (rad, -rad, rad)
print 'TransformEnd'

sys.stdout.write('\377')
sys.stdout.flush()

# read the next set of inputs
args = sys.stdin.readline()


RunProgram例:

Display "untitled" "framebuffer" "rgb"
Format 400 400 1
Projection "perspective" "fov" 30
ShadingRate 5

LightSource "distantlight" 1 "intensity" 1.5 "from" [0 0 0] "to" [0 0 1]

Translate 0 0 5
Rotate -30 1 0 0
Rotate 20 0 1 0
Scale 1 1 -1

WorldBegin
TransformBegin
Surface "plastic" "Ks" 0.6
Procedural "RunProgram" ["python pytest.py" "1.0"] [-1 1 -1 1 -1 1]
TransformEnd
WorldEnd


ケッソン先生のサイト参考になります。ありがとうございます。
  • -
  • -

Procedural "RunProgram" その2

RIBの出力:


#sp_rect2.py
import sys
import random

while sys.stdin.readline():

dist = 1
x = 0.0
distx = 10.0
disty = 10.0
distz = 10.0
while x <= distx:
z = 0.0
while z <= distz:
y = 0.0
while y <= disty:
r = random.random() * .5
sys.stdout.write("TransformBegin\n")
sys.stdout.write("Translate " + str(x - 5.0) + " " + str(y - 5.0) + " " + str(z - 5.0) + "\n")
sys.stdout.write('Sphere [' + str(r) + ' -1 1 360]\n')
sys.stdout.write("TransformEnd\n")
y += dist
z += dist
x += dist
sys.stdout.write('\377')
sys.stdout.flush()


いろいろと調整してみる。実行RIB:

Display "untitled" "framebuffer" "rgb"
Format 640 480 1
Projection "perspective" "fov" 30
ShadingRate 5

LightSource "distantlight" 1 "intensity" 1.5 "from" [0 0 0] "to" [0 0 1]

Translate 0 0 30
Rotate -30 1 0 0
Rotate 20 0 1 0
Scale 1 1 -1

WorldBegin
TransformBegin
Surface "plastic" "Ks" 0.6
Procedural "RunProgram" ["python sp_rect2.py" ""] [-9.91912 9.91912 -9.91912 9.91912 -9.91912 9.91912]
TransformEnd
WorldEnd


sp_rect2_2.jpg
CGkitも勉強。面白いところです。(2008.8/4記事)
別ブログが転居するので転載しました。ありがとうございます。感謝しています。
  • -
  • -

displacementbound

cgkitへRIBを呼び出す。

r=RIBArchive(
filename = 'butu.rib', pos = (0,0,0) )
r.rib='Color 0.9 0.9 1.0\nSurface "plastic"' #r.rib='Surface "check_ref'

t=RIBArchive(
filename = 'butu.rib', pos = (0.5,0,0) )
t.rib='Color 1 0.9 0.9\nSurface "plastic"'

Plane(
lx = 50, ly = 50, pos = (0,0,0.6), material = GLMaterial(diffuse=(0.8, 0.7, 0.7)) )
Plane(
lx = 50, ly = 50, pos = (0,-0.44,0), rot= mat3().fromEulerXYZ(radians(90), 0, 0), material = GLMaterial(diffuse=(0.8, 0.6, 0.6)) )
s=RIBArchive(
filename = 'butu.rib', pos = (-0.5,0,0) )
s.rib='ShadingRate 0.25\nAttribute "trace" "int displacements" [1]\nAttribute "displacementbound" "float sphere" [0.001] "string cordinatesystem" ["shader"]\nDeclare "Km" "uniform float"\nDisplacement "dented" "Km" 0.05\nSurface "metal" "Ks" [1.5] "roughness" [1.0]\nColor [ 0.8 0.8 0.8 ]'

ありがとうございます。。(2009.8/16記事)
0612.jpg
  • -
  • -

RibFilter II

1995年に開発され、ニフティ、MACグラフィックスフォーラム、(コーシングラフィックス)で公開されたフリーウェアですが、使ってみました。MacOS8.6でやってみました。
編集したいRIBファイル中の Attribute をオブジェクトとして認識します。
オブジェクトに対するオプションの付加は、その Attribute の Identfier に対して識別子をつけることによって行い、identifer name とidentifer shadinggroup を区別せず、どちらも等価なオブジェクトとして扱います。

たとえば、スポットライト(pixarのshadowspot)として配置したいconeは、次のように定義して書き込んでおきます。
AttributeBegin
Attribute "identifier" "name" [ "lgt_LS_n1_i30_a40_d10_z1024" ]
TransformBegin
Translate -1 1 0
Rotate -45 0 0 1
Rotate 90 0 1 0
Cone 0.4 0.125 360
TransformEnd
AttributeEnd
cone8.jpg
_LS_n1_i30_a20_z1024 とすると、光源識別番号1、光源強度 30、  光源アングル 40(20x2)、シャドウマップサイズ 1024x1024 のスポット光源を生成 します。
_d10は光源アングルのデルタ値を10にします。(Deg. で指定、_LS のみ有効)

RibFiliterにRIBを読み込むとシャドーマップ生成RIBとメインRIBを出力してくれます。

■シャドーマップ生成RIB
Display "cone.rib.sdwMap.n1" "shadow" "z"
Format 1024 1024 1
ShadingRate 1.000000
Option "limits" "texturememory" [4096]
Projection "perspective" "fov" [120]
# applying multiple transformations

Rotate -45 1 0 0
Rotate -90 0 1 0
Translate 1 -1 -0
WorldBegin
・・・・・
・・・・・

■メインRIB
Option "limits" "zthreshold" [5 5 5]
#Option "shadow" "bias0" [30] "bias1" [10]
Option "limits" "texturememory" [4096]
Shutter 1 2
Display "cone8.tif" "framebuffer" "rgb"
Projection "perspective" "fov" 40
Format 320 240 1
Translate 0 0 3
Rotate -40 1 0 0
Rotate -20 0 1 0
WorldBegin

LightSource "shadowspot" 1 "from" [-1 1 0] "to" [-0.292893 0.292893 6.12323e-17] "lightcolor" [1 1 1] "intensity" [2] "coneangle" [1.0472] "conedeltaangle" [0.174533] "width" [2] "float samples" [32] "string shadowname" ["cone.rib.sdwMap.n1"]
LightSource "ambientlight" 2 "intensity" [0.2]
・・・・・
・・・・・
最初、影が表示されないなと試行錯誤していたら、原因は以下をコメントアウトしたら
動きました。
#Option "shadow" "bias0" [30] "bias1" [10]
cone8air.jpg
Airでも動かしてみました。うまくうごかないなとやっていましたが、
#Option "limits" "zthreshold" [5 5 5]
#Option "shadow" "bias0" [30] "bias1" [10]
をコメントアウトするのと、改行コードをMacからWindowsにしておかなければなりません。

いろいろと実験してみて、勉強ですね。ありがとうございます。
Ribfilter感謝しています。
Ribfilterはこちらにあります。 MacOS8.6で動きました。
  • -
  • -

RibFilter II ポイントライトを使う

shadowpointを利用するために以下のように定義した。
Attribute "identifier" "name" [ "lgt_LP_n1_i50_z256" ]
intensity50は明るすぎた。材質はmatteとplastic
デフォルトのままだときちんと影が出ないから確認が必要です。
ambientlight を追加して、MacRenderManでレンダリングした。
以下は、shadowpointの例、シャドーマップは256。
Macだと何やらやわらかい画質になっているちょっとほっとする感じがする。
LP.jpg

MacRenderManでshadowspotを利用してみた。
LS.jpg

#Option "shadow" "bias0" [30] "bias1" [10] はコメントアウトしておく。
Ribfilterを使って、オブジェクトをライトに置き換える方法
なかなか面白いですね。ありかどうございます。
  • -
  • -

jrManで試してみる。

RibFilterで出力したRIBをjrManでレンダリングしようとしたら、うんともすんとも反応しない。ctrl+Cで中止して調べてみた。Macの改行コードが原因ですね。Windows改行にエディタで変換した。

シャドウマップ生成は
Format 1024 1024 1
Display "conesdwMap.shdw" "file" "z"
PixelSamples 1 1
とする。
PixelSamples 1 1は記入しておかないとダメ。


以下、コメントアウト
#Option "limits" "zthreshold" [5 5 5]
#Option "shadow" "bias0" [30] "bias1" [10]
#Option "limits" "texturememory" [4096]

その他、シェーダ部分を書き換える。
shadowspotは"shadowspotlight"に変更。"string shadowname"は、"string shadowmap"に変更した。

基礎基本ですね。ありがとうございます。
shspotlight.jpg

残念、shadowpointはjrManには実装されておりません。
ソースサンプル参考にして、地道にやるしかありませんね。
  • -
  • -

RibFilter II その3 LightSourceを記述

元ファイルとなるRIB内に
LightSource "shadowspot" 1 "intensity" [1] "from" [-1 1 0] "to" [-0.292893 0.292893 0] "coneangle" [1.0472] "conedeltaangle" [0.174533]
スポットライト位置とコーンアングルを記述した。
環境光も
LightSource "ambientlight" 2 "intensity" [0.15]
と入れておく。

Attribute "identifier" "name" [ "lgt_LS_n1_i50_a60_d10_z1024" ]と書いてしまうと2つあるとして変換するようだ。こちらは記述しない。

RibFilterで出力すると
シャドーマップ生成は
Display "coneT2.rib.sdwMap.1" "shadow" "z"
Format 512 512 1
ShadingRate 1.000000
#Option "limits" "texturememory" [4096]
Projection "perspective" "fov" [120]
# applying multiple transformations

Rotate -90 0.707107 0.707107 0
Translate 1 -1 -0
WorldBegin
・・・・・

ライトは書き換えてくれてます。
LightSource "shadowspot" 1 "intensity" [1] "from" [-1 1 0] "to" [-0.292893 0.292893 0] "coneangle" [1.0472] "conedeltaangle" [0.174533] "width" [2] "float samples" [32] "string shadowname" ["coneT2.rib.sdwMap.1"]
LightSource "ambientlight" 2 "intensity" [0.15]

同じ条件で比較
MacRenderMan
coneT2.jpg

prman (Windows)
coneT.jpg

微妙な違いありますね。
感謝しています。ありがとうございます。
  • -
  • -

Photo 3D

MacRenderManとの組み合わせで、Silver Creek Softwareから出ていたPhoto 3D 2.0デモ版をMacOS8.6で触ってみた。
便利なところはシャドーマップの自動生成、システムフォルダにあるシェーダを割り当てられるところ。カメラ、シーンのインターフェイスがキーボードを使ってやるところが面倒。
1990年から1999年あたりまで活動していたようだ。
国内では、インフォマティークが販売していたようです。

反射マップの自動生成もできるようだが、簡易マニュアルしかないのとデモ版だから、ちょっとうまく動いてくれません。
RIB出力していじっているところです。面白いですね。
ありがとうございます。
check.jpg
  • -
  • -

simpleFaceシェーダ

MacRenderManと一緒に動く、VIDI Presenter3Dのサイトで見つけた変顔シェーダ、コンパイルエラーになるところは、書き直した。
prmanで動きました。
以下、ソースです。ありがとうございます。
sphereFace.jpg
sphereFace2.jpg

/* simpleFace5.sl
* copyright(c) 1995 - dsward "at_mark" aol.com
* generate a simple face - two eyes and a mouth
* Parameters (usually in range 0.0 to 1.0)
* Mouth controls -
* mouthLevel - placement of center of the mouth
* mouthWidth - width of mouth
* mouthOffset - vertical offset of edges from center,
* positive=smile, negative=frown
* mouthOpen - mouth opening size
* mouthOpacity - opacity 0=transparent, 1=opaque mouthColor
* Eye controls - a pupil, eye and ring
* eyeLevel - placement of the eyes
* eyeOffset - distance from faceCenter to center of each eye
* eyeRadius - radius of the ring around the eye
* pupilAngle - angle of pupil from center of eye, typically from 0 to pi*2
* pupilOffset - distance between center of pupil and center of eye
* Colors -
* mouthColor, pupilColor, eyeColor, ringColor
* General controls -
* faceCenter - the center for eye and mouth placement
* mapCode - 0 = default
* 1 = invert s
* 2 = invert t
* 3 = invert s and t
* 4 = swap s and t
* 5 = swap s and t, invert s
* 6 = swap s and t, invert t
* 7 = swap s and t, invert s and t
* scaleS - scaling factor for aspect ratio (may be greater than 1.0)
* fuzz - anti-aliasing factor
* Ka, Kd - the usual meanings for matte shading
*
* thanks to the Renderman Repository, the Musgrave site and the Steve May site
* for information and examples of procedural shaders.
*/

surface simpleFace5(
float mouthLevel = 0.35; float mouthOffset = 0.05;
float mouthWidth = 0.5; float mouthOpen = 0.02; float mouthOpacity = 1.0;
float eyeLevel = 0.55; float eyeOffset = 0.09; float eyeRadius = 0.05;
float pupilAngle = 0.0; float pupilOffset = 0.0; float pupilRadius = 0.025;
color mouthColor = color(0, 0, 0);
color pupilColor = color(0, 0, 1);
color eyeColor = color(1, 1, 1);
color ringColor = color(0, 0, 0);
float faceCenter = 0.5;
float mapCode = 0.0;
float scaleS = 2.0;
float fuzz = 0.0025;
float Ka = 1.0;
float Kd = 1.0;
)
{
color inkColor;
float inkOpacity;
point eyeCenter;
point pupilCenter;
float width;
point mouthPosition;
float mouthPoint, mouthEdge;
float halfOpen, halfWidth;
float d, d1,d2;
point p2;
float interceptLower, interceptUpper;
color currentColor, finalColor;
color currentOpacity;
point currentPosition;
normal Nf;
float eyeLoop;
float invertS = 0;
float invertT = 0;
float mapST = mapCode;
width = eyeRadius / 8; /* width of ring around eye */

/* convert current s,t to a point for distance calculations */
if (mapST < 4.0)
{
currentPosition = ((1 - s) * scaleS, 1 - t, 0);
}
else
{
mapST = mapST - 4;
currentPosition = ((1 - t) * scaleS, 1 - s, 0); /* swap s, t mapping */
}

/* invert s, t mappings if specified */
if (mapST == 1) invertS = 1.0;
if (mapST == 2) invertT = 1.0;
if (mapST == 3)
{
invertS = 1.0;
invertT = 1.0;
}

if (invertS != 0)
{
setxcomp(currentPosition, 1 - xcomp(currentPosition));
}

if (invertT != 0)
{
setycomp(currentPosition, 1 - ycomp(currentPosition));
}

currentOpacity = Os;
currentColor = Cs;
inkColor = Cs;
inkOpacity = 0;

/* two eyes */
for (eyeLoop = 0; eyeLoop < 2; eyeLoop = eyeLoop + 1)
{
if (eyeLoop == 0.0)
{
/* left eye */
eyeCenter = ((faceCenter + eyeOffset), eyeLevel, 0);
}
else
{
/* right eye */
eyeCenter = ((faceCenter - eyeOffset), eyeLevel, 0);
}

d = distance(eyeCenter, currentPosition);

/* check for wrap around */
if (d > eyeRadius + width)
{
p2= point (xcomp(eyeCenter) + scaleS, eyeLevel, 0);
d = distance(p2, currentPosition);
if (d <= eyeRadius + width)
eyeCenter = ((xcomp(eyeCenter) + scaleS), eyeLevel, 0);
}

if (d > eyeRadius + width)
{
p2= point (xcomp(eyeCenter) + scaleS, eyeLevel, 0);
d = distance(p2, currentPosition);
if (d <= eyeRadius + width)
eyeCenter = ((xcomp(eyeCenter) - scaleS), eyeLevel, 0);
}

if (d <= eyeRadius + width)
{
if (d <= eyeRadius)
{
pupilCenter = eyeCenter;
setxcomp(pupilCenter, xcomp(pupilCenter) +
(cos(pupilAngle) * pupilOffset));
setycomp(pupilCenter, ycomp(pupilCenter) +
(sin(pupilAngle) * pupilOffset));
d1 = distance(pupilCenter, currentPosition);
if (d1 <= pupilRadius)
{
currentColor = pupilColor;
inkColor = eyeColor;
inkOpacity = smoothstep(pupilRadius - fuzz, pupilRadius, d1);
}
else
{
currentColor = eyeColor;
inkColor = ringColor;
inkOpacity = smoothstep( (eyeRadius - width / 2) - fuzz,
(eyeRadius - width / 2) + fuzz, d) -
smoothstep( (eyeRadius + width / 2) - fuzz,
(eyeRadius + width / 2) + fuzz, d);
}
}
else
{
currentColor = Cs;
inkColor = ringColor;
inkOpacity = smoothstep( (eyeRadius - width / 2) - fuzz,
(eyeRadius - width / 2) + fuzz, d) -
smoothstep( (eyeRadius + width / 2) - fuzz,
(eyeRadius + width / 2) + fuzz, d);
}
}
}

/* mouth */
halfOpen = mouthOpen / 2;
halfWidth = mouthWidth / 2;
mouthPosition = currentPosition;

/* check for wrap-around */
if (faceCenter - halfWidth < 0.0)
{
if (xcomp(mouthPosition) + faceCenter + halfWidth > scaleS)
{
setxcomp(mouthPosition, xcomp(mouthPosition) - scaleS);
}
}

if (faceCenter + halfWidth > scaleS)
{
if (xcomp(mouthPosition) < scaleS - faceCenter)
{
setxcomp(mouthPosition, xcomp(mouthPosition) + scaleS);
}
}

if (xcomp(mouthPosition) >= faceCenter - halfWidth)
{
if (xcomp(mouthPosition) <= faceCenter + halfWidth)
{
mouthPoint = (xcomp(mouthPosition) -
(faceCenter - halfWidth))/ mouthWidth;
mouthEdge = mouthLevel + mouthOffset;
interceptLower = float spline(mouthPoint, mouthEdge, mouthEdge,
mouthLevel - halfOpen, mouthEdge, mouthEdge);
if (ycomp(mouthPosition) >= interceptLower)
{
interceptUpper = float spline(mouthPoint,
mouthEdge, mouthEdge,
mouthLevel + halfOpen,
mouthEdge, mouthEdge);
if (ycomp(mouthPosition) <= interceptUpper)
{
currentColor = Cs;
inkColor = mouthColor;
inkOpacity = smoothstep(interceptLower - fuzz,
interceptLower + fuzz,
ycomp(mouthPosition)) -
smoothstep(interceptUpper - fuzz,
interceptUpper + fuzz,
ycomp(mouthPosition));
currentOpacity = 1.0 -
(inkOpacity * (1.0 - mouthOpacity));
}
}
}
}

finalColor = mix(currentColor, inkColor, inkOpacity);

Nf = faceforward(normalize(N),I);
Ci = Os * finalColor * ( Ka*ambient() + Kd*diffuse(Nf) ) ;
Oi = currentOpacity;
}


こちらはRIBファイルです。
いろいろとパラメータをいじって顔をつくりましょう。

##RenderMan RIB_Structure 1.1
##Scene sphereFace.PICT
##Creator VIDI/Pug, version 0
##CreationDate Tuesday, October 31, 1995 11:20:37 AM
##Frames 1

version 3.03

ShadingRate 0.25
Option "limits" "gridsize" [64]
Option "limits" "bucketsize" [8 16]
PixelSamples 2 2
Hider "hidden" "jitter" [1]
CropWindow [0 1 0 1]
Exposure 1 1
Quantize "rgba" 255 0 255 0
PixelFilter "gaussian" 2 2
ShadingInterpolation "constant"
Format 480 360 1
Display "sphereFace.tif" "file" "rgba"
Projection "perspective" "fov" 35

##CameraOrientation 0.210725 0.27862 -0.648311 -0.28959 0.276892 0.35717
Identity
Rotate 0 0 0 1
Rotate -0.0881412 1 0 0
Rotate 26.4544 0 1 0
Translate -0.210725 -0.27862 0.648311
Rotate 0 0 1 0

Surface "matte"
LightSource "ambientlight" 1 "intensity" [0.1] "lightcolor" [1 1 1]
LightSource "distantlight" 2 "intensity" [1] "lightcolor" [1 1 1] "from" [-1.05748 0.968282 -1.17083] "to" [-0.239685 0.1981 0.534688]

WorldBegin
Sides 2
AttributeBegin
Attribute "identifier" "name" "Design"
Surface "plastic" "Ka" [1] "Kd" [1] "Ks" [0] "roughness" [0.1] "specularcolor" [1 1 1]
AttributeBegin
Attribute "identifier" "shadinggroup" "Sphere 1"
TransformBegin
Transform [1 0 0 0
0 7e-07 1 0
0 -1 7e-07 0
0 0.61 0.61 1]
Surface "simpleFace5"
"float mouthLevel" [0.35]
"float mouthOffset" [0.1]
"float mouthWidth" [0.3]
"float mouthOpen" [0.1]
"float mouthOpacity" [0.5]
"float eyeLevel" [0.55]
"float eyeOffset" [0.09]
"float eyeRadius" [0.05]
"float pupilAngle" [0]
"float pupilOffset" [0]
"float pupilRadius" [0.025]
"color mouthColor" [0 0 0]
"color pupilColor" [0.2 0.4 0.65]
"color eyeColor" [1 0.8 0.8]
"color ringColor" [0 0 0]
"float faceCenter" [0.5]
"float scaleS" [2]
"Ka" [1]
"Kd" [1]
ConcatTransform [1 0 0 0
0 1 0 0
0 0 1 0
0.1 0 0.11 1]
Color [1 0.880062 0.215674]
TransformBegin
Translate -0.5 0 0.23
Sphere [0.39 -0.39 0.39 360]
TransformEnd
TransformEnd
AttributeEnd
AttributeEnd
WorldEnd

面白いですね。感謝しています。
Thank You!!
  • -
  • -

RibFilter その4 環境マップ生成

RMRサイトのサンプルを参考にRibFilterで環境マップとポイントライト3つ分のシャドーマップを出力してみた。
envr01.jpg

元RIBは以下の通りに設定

#env01.rib
Display "envr_kyu.tiff" "file" "rgb"
Projection "perspective" "fov" [25 ]
Rotate 24.094801 1 0 0
Rotate -26.5651 0 1 0
Translate 2.5 2.5 5
WorldBegin
LightSource "ambientlight" 1 "intensity" [0.05 ]
LightSource "pointlight" 2 "intensity" [40 ] "from" [-4 -5 -7]
LightSource "pointlight" 3 "intensity" [40 ] "from" [3.5 6.5 -6]
LightSource "pointlight" 4 "intensity" [10 ] "from" [4 7 6]
AttributeBegin
Attribute "identifier" "name" [ "_EV_n1" ]
Surface "shinymetal" "string texturename" ["env"]
Translate 0 0 0
Sphere 1 -1 1 360
AttributeEnd
Surface "plastic"
TransformBegin
Scale 20 20 20
Color [1 0 0]
Polygon "P" [-0.5 -0.5 0.5 0.5 -0.5 0.5 0.5 -0.5 -0.5 -0.5 -0.5 -0.5 ]
Color [0 0 1]
Polygon "P" [-0.5 -0.5 0.5 -0.5 -0.5 -0.5 -0.5 0.5 -0.5 -0.5 0.5 0.5 ]
Color [0 1 0]
Polygon "P" [0.5 0.5 -0.5 0.5 0.5 0.5 -0.5 0.5 0.5 -0.5 0.5 -0.5 ]
Color [1 0 1]
Polygon "P" [0.5 0.5 -0.5 0.5 -0.5 -0.5 0.5 -0.5 0.5 0.5 0.5 0.5 ]
Color [1 1 0]
Polygon "P" [0.5 -0.5 0.5 -0.5 -0.5 0.5 -0.5 0.5 0.5 0.5 0.5 0.5 ]
Color [0.6 0.6 0.6]
Polygon "P" [-0.5 0.5 -0.5 -0.5 -0.5 -0.5 0.5 -0.5 -0.5 0.5 0.5 -0.5 ]
TransformEnd
WorldEnd

球体に周囲の環境を映り込ませる。
pointlightは、shadowpointに変換された。
シャドーマップ生成RIBが3つ
env01.rib.sdwRib.2
env01.rib.sdwRib.3
env01.rib.sdwRib.4

T02001 {ERROR} Can't open texture "env" [ Object: _EV_n1 Shader: shinymetal] (System Error: No such file or directory)
と出るが、無視してシャドーマップ作成。

次に環境マップ生成、シャドーマップを利用して6面作成する。
影も映ります。こんな感じ・・・
FrameBegin 1
#env01.rib

Display "env01.rib.envImg.1px" "file" "rgb"
Format 128 128 1
ShadingRate 1.000000
Option "limits" "zthreshold" [0.5 0.5 0.5]
Option "shadow" "bias0" [0.15] "bias1" [0.2]
Option "limits" "texturememory" [4096]
Projection "perspective" "fov" [92]
Rotate -90 0 1 0
Translate 0 0 0
Translate -0 -0 -0
WorldBegin
LightSource "ambientlight" 1 "intensity" [0.05 ]
LightSource "shadowpoint" 2 "intensity" [40 ] "from" [-4 -5 -7] "width" [2] "float samples" [32] "string sfpx" ["env01.rib.sdwMap.2px"] "string sfpy" ["env01.rib.sdwMap.2py"] "string sfpz" ["env01.rib.sdwMap.2pz"] "string sfnx" ["env01.rib.sdwMap.2nx"] "string sfny" ["env01.rib.sdwMap.2ny"] "string sfnz" ["env01.rib.sdwMap.2nz"]
LightSource "shadowpoint" 3 "intensity" [40 ] "from" [3.5 6.5 -6] "width" [2] "float samples" [32] "string sfpx" ["env01.rib.sdwMap.3px"] "string sfpy" ["env01.rib.sdwMap.3py"] "string sfpz" ["env01.rib.sdwMap.3pz"] "string sfnx" ["env01.rib.sdwMap.3nx"] "string sfny" ["env01.rib.sdwMap.3ny"] "string sfnz" ["env01.rib.sdwMap.3nz"]
LightSource "shadowpoint" 4 "intensity" [10 ] "from" [4 7 6] "width" [2] "float samples" [32] "string sfpx" ["env01.rib.sdwMap.4px"] "string sfpy" ["env01.rib.sdwMap.4py"] "string sfpz" ["env01.rib.sdwMap.4pz"] "string sfnx" ["env01.rib.sdwMap.4nx"] "string sfny" ["env01.rib.sdwMap.4ny"] "string sfnz" ["env01.rib.sdwMap.4nz"]
AttributeBegin
Attribute "identifier" "name" [ "_EV_n1" ]
Surface "shinymetal" "string texturename" ["env"]
Translate 0 0 0
AttributeEnd
Surface "plastic"
TransformBegin
Scale 20 20 20
Color [1 0 0]
Polygon "P" [-0.5 -0.5 0.5 0.5 -0.5 0.5 0.5 -0.5 -0.5 -0.5 -0.5 -0.5 ]
Color [0 0 1]
Polygon "P" [-0.5 -0.5 0.5 -0.5 -0.5 -0.5 -0.5 0.5 -0.5 -0.5 0.5 0.5 ]
Color [0 1 0]
Polygon "P" [0.5 0.5 -0.5 0.5 0.5 0.5 -0.5 0.5 0.5 -0.5 0.5 -0.5 ]
Color [1 0 1]
Polygon "P" [0.5 0.5 -0.5 0.5 -0.5 -0.5 0.5 -0.5 0.5 0.5 0.5 0.5 ]
Color [1 1 0]
Polygon "P" [0.5 -0.5 0.5 -0.5 -0.5 0.5 -0.5 0.5 0.5 0.5 0.5 0.5 ]
Color [0.6 0.6 0.6]
Polygon "P" [-0.5 0.5 -0.5 -0.5 -0.5 -0.5 0.5 -0.5 -0.5 0.5 0.5 -0.5 ]
TransformEnd
WorldEnd
FrameEnd
・・・・・

最後にレンダリング
env01.rib.scnRib
コメントアウトとサイズを加える。
#Option "limits" "zthreshold" [0.5 0.5 0.5]
#Option "shadow" "bias0" [0.15] "bias1" [0.2]
#Option "limits" "texturememory" [4096]
Format 640 480 1
Display "envr01.tiff" "file" "rgb"

ポイントライトの影が出たのはうれしい。なかなか面白いところ、ほかにも実験してみます。
ありがとうございます。
  • -
  • -

1/4 >>