Lightflowインストール
- Lightflow
- by yuichirou yokomakura
- 2009.11.01 Sunday 00:03
mixiのLightflowコミュで自分が書き込んだ記事を掲載します。::
■Lightflow インストール
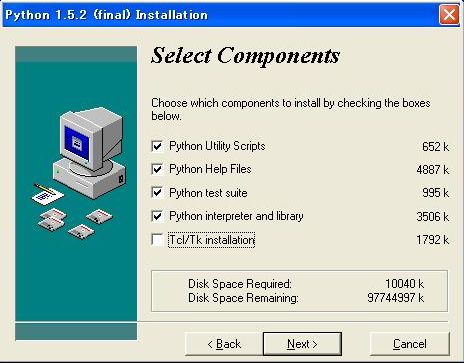
まず,Lightflowの本家で配っているPython1.5.1はXPで起動しませんでした。そこで,Pythonの本家でPython1.5.2をダウンロードします。
・Python 1.5.2 installer for Windows (5.0 MB)
http://www.python.org/download/releases/1.5/
・Tcl/Tkモジュールはインストールできなかったので,最初のインストール時にチェックを外してインストールします。
C:\Lightflowディレクトリをつくり,ダウンロードしたLightFlowをおきます。
・Python1.5.2はc:\program files\pythonにインストールされているので,この中のDllsフォルダにLightflowPM.dllを置きます。 (Windows7でも動きます。64bitだと、Pythonのインストールと実行先は、C:\Program Files (x86)\Pythonになる。)
・次にWindowsディレクトリのsystemフォルダにLightflow.dllを置きます。
マイコンピュータのアイコンを右クリックし,詳細設定→環境変数を開き,
新規をクリックして,変数名PYTHONPATH 変数値C:\Program files\Pythonを入れます。
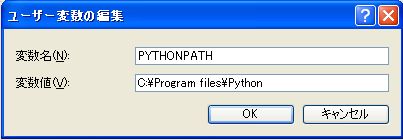
既に別のPythonをインストールしている場合はセミコロンを入れてパスを加えます。
同じように新規で以下のものを加えます。
LIGHTFLOWPATH
LIGHTFLOW_SE_MEMORYとLIGHTFLOW_VE_MEMORY
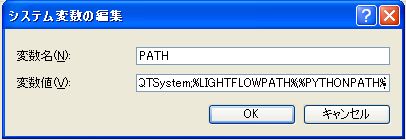
注意!! PATHはすでに書いてあるものを間違って消さないように、一番後ろに追加します。
まとめると、以下のものを環境変数に加えます。
変数名を正確に入れてください。またコピーして入れる場合など空白スペースが入っていたりします。半角スペース1つ入っているだけで、エラーで動きませんから、注意してください。
すべて記入したら,OK,OKを押します。
一度,再起動して,
スタート→アクセサリ→コマンドプロンプトを右クリックしてコピーします。
C:\Lightflowディレクトリを開いて,
C:\Lightflow\PM\Examplesフォルダを開き,右クリックして「貼り付け」をします。コマンドプロンプトが作成されます。
このコマンドプロンプトアイコンを右クリックして「プロパティ」を開けます。
作業フォルダの欄にC:\Lightflow\PM\Examplesと入れます。
OKを押します。
コマンドプロンプトアイコンをダブルクリックして,
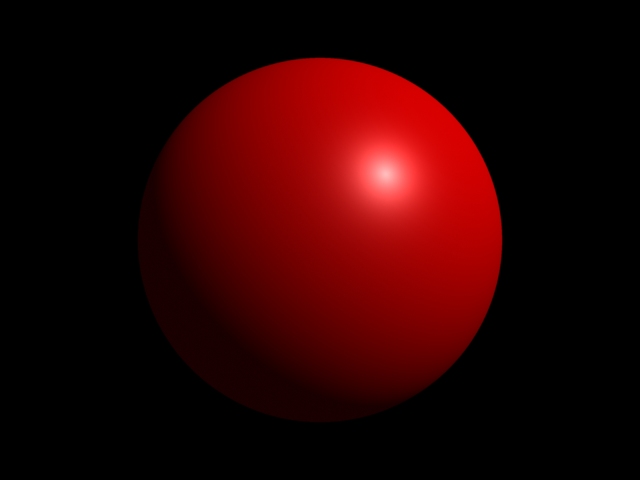
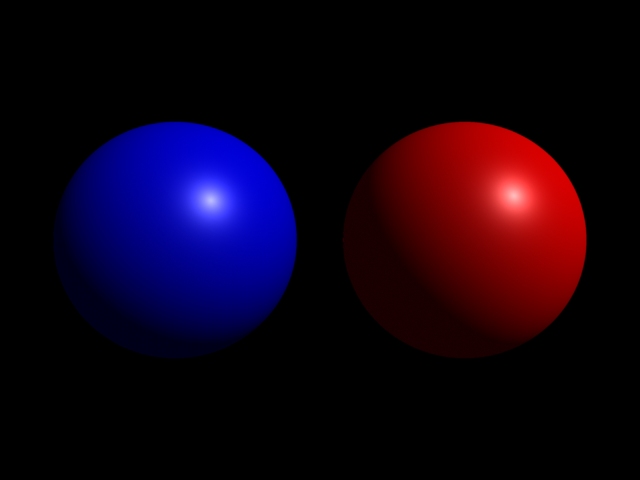
>"c:\program files\python\python" ball1.py
と打ち込んで,レンダリングが始まれば,できました。
■下記のエラーメッセージの場合
c:\Lightflow\PM\Examples>python ball1.py
Traceback (innermost last):
File "ball1.py", line 3, in ?
from lightflowPM import *
ImportError: No module named lightflowPM
Python1.5.2のc:\program files\pythonのDllsフォルダにLightflowPM.dllをコピーしてください。
レンダリング後にTGA画像が作成されています。
CPUの処理速度が上がった分。速くなりましたね。
閉鎖したサイトにあったものをまとめました。大変役に立ちます。ありがとうございます。
■Lightflow インストール Linuxでのインストール方法
http://rman.sakura.ne.jp/sfx/lf_man/lightflow-install.html
Windows7 64bitにVirtualBox 64bitをインストールし、VirtualBoxの中にDebian6.0.3をインストール、LightFlowをインストールしてみました。
2012年1月9日
http://rman.sakura.ne.jp/sb/log/eid440.html
■Lightflow インストール
まず,Lightflowの本家で配っているPython1.5.1はXPで起動しませんでした。そこで,Pythonの本家でPython1.5.2をダウンロードします。
・Python 1.5.2 installer for Windows (5.0 MB)
http://www.python.org/download/releases/1.5/
・Tcl/Tkモジュールはインストールできなかったので,最初のインストール時にチェックを外してインストールします。
C:\Lightflowディレクトリをつくり,ダウンロードしたLightFlowをおきます。
・Python1.5.2はc:\program files\pythonにインストールされているので,この中のDllsフォルダにLightflowPM.dllを置きます。 (Windows7でも動きます。64bitだと、Pythonのインストールと実行先は、C:\Program Files (x86)\Pythonになる。)
・次にWindowsディレクトリのsystemフォルダにLightflow.dllを置きます。
マイコンピュータのアイコンを右クリックし,詳細設定→環境変数を開き,
新規をクリックして,変数名PYTHONPATH 変数値C:\Program files\Pythonを入れます。
既に別のPythonをインストールしている場合はセミコロンを入れてパスを加えます。
同じように新規で以下のものを加えます。
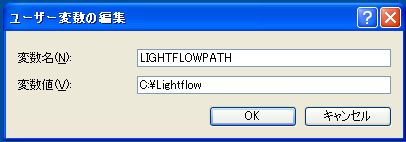
LIGHTFLOWPATH
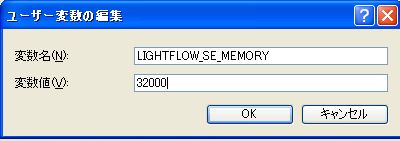
LIGHTFLOW_SE_MEMORYとLIGHTFLOW_VE_MEMORY
注意!! PATHはすでに書いてあるものを間違って消さないように、一番後ろに追加します。
まとめると、以下のものを環境変数に加えます。
変数名を正確に入れてください。またコピーして入れる場合など空白スペースが入っていたりします。半角スペース1つ入っているだけで、エラーで動きませんから、注意してください。
変数名 変数値
PYTHONPATH C:\Program files\Python ユーザ環境変数欄に追加
LIGHTFLOWPATH C:\Lightflow ユーザ環境変数欄に追加
LIGHTFLOW_SE_MEMORY 32000 ユーザ環境変数欄に追加
LIGHTFLOW_VE_MEMORY 32000 ユーザ環境変数欄に追加
PATH ;%LIGHTFLOWPATH%;%PYTHONPATH% を追加する。システム環境変数
すべて記入したら,OK,OKを押します。
一度,再起動して,
スタート→アクセサリ→コマンドプロンプトを右クリックしてコピーします。
C:\Lightflowディレクトリを開いて,
C:\Lightflow\PM\Examplesフォルダを開き,右クリックして「貼り付け」をします。コマンドプロンプトが作成されます。
このコマンドプロンプトアイコンを右クリックして「プロパティ」を開けます。
作業フォルダの欄にC:\Lightflow\PM\Examplesと入れます。
OKを押します。
コマンドプロンプトアイコンをダブルクリックして,
>"c:\program files\python\python" ball1.py
と打ち込んで,レンダリングが始まれば,できました。
■下記のエラーメッセージの場合
c:\Lightflow\PM\Examples>python ball1.py
Traceback (innermost last):
File "ball1.py", line 3, in ?
from lightflowPM import *
ImportError: No module named lightflowPM
Python1.5.2のc:\program files\pythonのDllsフォルダにLightflowPM.dllをコピーしてください。
レンダリング後にTGA画像が作成されています。
CPUの処理速度が上がった分。速くなりましたね。
閉鎖したサイトにあったものをまとめました。大変役に立ちます。ありがとうございます。
■Lightflow インストール Linuxでのインストール方法
http://rman.sakura.ne.jp/sfx/lf_man/lightflow-install.html
Windows7 64bitにVirtualBox 64bitをインストールし、VirtualBoxの中にDebian6.0.3をインストール、LightFlowをインストールしてみました。
2012年1月9日
http://rman.sakura.ne.jp/sb/log/eid440.html
- -
- -