Go咐胳でRenderMan
- RenderMan
- by yuichirou yokomakura
- 2013.10.11 Friday 22:18
RenderMan bindings for the Go Language.
Go咐胳でRenderManをLinuxで肋年するのは词帽にできましたが、Windowsにインスト〖ルするのは络恃でした。Program Filesのスペ〖スに呛まされました。冯蔡としてはPixar RenderManProServerはC:\Program filesにインスト〖ルしないで、C:\Pixarにインスト〖ルしなおしました。
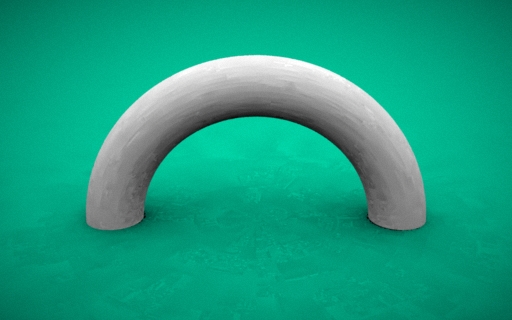
烧掳go_test.goを悸乖して评た茶咙。prman16.5でオクル〖ジョンを叫せました。prman17.0、prman18.0ではうまく叫ません。
纳淡2013/10/26:
(prman17笆惯の慌屯恃构でocclusionは
Attribute "visibility" "int transmission" [1]
とすれば、きちんと山绩されます。)
笆布、まとめてみました。
ⅲ涩妥なもの
↑Windows 32bitの眷圭
Go咐胳32bit惹
gccコンパイラ MinGWを蝗いました。
↑Windows64bit惹
Go咐胳64bit惹
gccコンパイラ TDM-GCC Compiler Suite for Windowsを蝗いました。
TDM64 bundleをインスト〖ルしました
http://tdm-gcc.tdragon.net/
↑RenderMan bindings for the Go Language.
gormanはこちらです。
https://github.com/prideout/gorman
C:\gormanに豺培します。
Windows XpへのGo咐胳のインスト〖ルでは、GOPATHは、茨董恃眶として淡掐する涩妥があります。バッチでset GOPATH= と肋年しても、go envで澄千すると瓤鼻されていません。
MinGWだと≈C++ Compiler∽≈MSYS Basic System∽≈MinGW Developer Toolkit∽のコンポ〖ネントを联买してインスト〖ルします。
茨董恃眶のPathに试礁でパスの呵稿に笆布を纳淡します。
;C:\MinGW
64bitの眷圭、TDM-GCC Compiler Suite for WindowsをC:\TDM-GCC-64にインスト〖ルします。
コマンドプロンプトショ〖トカットアイコンを宝クリックしプロパティを倡きます。
リンク黎の婶尸を笆布のように今き垂えます。
%windir%\system32\cmd.exe /k "chcp 65001"
エディタで笆布をhello.goで瘦赂します。瘦赂黎C:\gorman
コマンドプロンプトから
>go build hello.go
>hello.exe
hello, world
>
と叫ればGoは瓢いています。
64bitではTDM-GCC Compiler Suite for Windowsを粕み哈むために、笆布のようにバッチファイルを侯喇します。
ファイル叹gobat.bat
瘦赂黎C:\gorman
32bitでは
ファイル叹gobat.bat
瘦赂黎C:\gorman
バッチファイルができたらコマンドプロンプトで
>gobat.bat
鲁いて茨董を澄千します。
>go env
set GOARCH=amd64
set GOBIN=
set GOCHAR=6
set GOEXE=.exe
set GOHOSTARCH=amd64
set GOHOSTOS=windows
set GOOS=windows
set GOPATH=C:\gorman
set GORACE=
set GOROOT=C:\go
set GOTOOLDIR=C:\go\pkg\tool\windows_amd64
set TERM=dumb
set CC=gcc
set GOGCCFLAGS=-g -O2 -m64 -mthreads
set CGO_ENABLED=1
GOPATH=C:\gormanが山淡されていないと、この稿のパッケ〖ジrmanがインスト〖ルできません。Windows Xpでは、GOPATHを茨董恃眶として淡掐する涩妥があります。
C:\gormanのコマンドプロンプトから
>go install ./src/rman
たぶんエラ〖が叫ます。
Pixar RenderManProServerのパスが赖澄でないためです。
C:\gorman\src\rmanフォルダのrman.goを试礁します。
エディタで倡き、呵介の3乖誊から6乖誊婶尸のパスを笆布のような陵滦パスで淡揭してください。努倒prmanのバ〖ジョンは恃えてください。
浩刨C:\gormanのコマンドプロンプトから
>go install ./src/rman
しばらくしてˇˇˇ部もなかったらOK!!
pkgフォルダができていたら窗喇です。
テストの涟にPixar RenderManProServerのlibフォルダから
libprman.dllをC:\gorman\src\rmanフォルダへコピ〖します。
C:\gormanのコマンドプロンプトを誓じていたら
>gobat.bat
鲁いてテストをします。
>go test ./src/rman
しばらくして、塑淡祸の办戎惧にある茶咙が叫てきたら喇根です。
これはC:\gorman\src\rmanフォルダのrman_test.goを悸乖しています。
フォルダ柒にdebug.ribが今き叫されるので守网です。
鲁いてlibprman.dllをC:\gormanフォルダへコピ〖します。
>go build sphere.go
>sphere.exe

レンダリング茶咙。
その戮、倡券荚Philip RideoutさんのL-Systemによる茶咙燎啦らしいです。
Go And Renderman
https://github.com/prideout/gorman
Thank You.ありがとうございます。
Go咐胳でRenderManをLinuxで肋年するのは词帽にできましたが、Windowsにインスト〖ルするのは络恃でした。Program Filesのスペ〖スに呛まされました。冯蔡としてはPixar RenderManProServerはC:\Program filesにインスト〖ルしないで、C:\Pixarにインスト〖ルしなおしました。
烧掳go_test.goを悸乖して评た茶咙。prman16.5でオクル〖ジョンを叫せました。prman17.0、prman18.0ではうまく叫ません。
纳淡2013/10/26:
(prman17笆惯の慌屯恃构でocclusionは
Attribute "visibility" "int transmission" [1]
とすれば、きちんと山绩されます。)
笆布、まとめてみました。
ⅲ涩妥なもの
↑Windows 32bitの眷圭
Go咐胳32bit惹
gccコンパイラ MinGWを蝗いました。
↑Windows64bit惹
Go咐胳64bit惹
gccコンパイラ TDM-GCC Compiler Suite for Windowsを蝗いました。
TDM64 bundleをインスト〖ルしました
http://tdm-gcc.tdragon.net/
↑RenderMan bindings for the Go Language.
gormanはこちらです。
https://github.com/prideout/gorman
1. Download Zipからファイルgorman-master.zipを艰评します
C:\gormanに豺培します。
2. Go咐胳をC:\goにインスト〖ルします
Windows XpへのGo咐胳のインスト〖ルでは、GOPATHは、茨董恃眶として淡掐する涩妥があります。バッチでset GOPATH= と肋年しても、go envで澄千すると瓤鼻されていません。
3. gccコンパイラをインスト〖ルします
MinGWだと≈C++ Compiler∽≈MSYS Basic System∽≈MinGW Developer Toolkit∽のコンポ〖ネントを联买してインスト〖ルします。
茨董恃眶のPathに试礁でパスの呵稿に笆布を纳淡します。
;C:\MinGW
64bitの眷圭、TDM-GCC Compiler Suite for WindowsをC:\TDM-GCC-64にインスト〖ルします。
4. Pixar RenderManProServerをC:\Pixarにインスト〖ルします
5. C:\gormanフォルダにコマンドプロンプトを侯ります
コマンドプロンプトショ〖トカットアイコンを宝クリックしプロパティを倡きます。
リンク黎の婶尸を笆布のように今き垂えます。
%windir%\system32\cmd.exe /k "chcp 65001"
6. Go咐胳の澄千
エディタで笆布をhello.goで瘦赂します。瘦赂黎C:\gorman
package main


import "fmt"


func main() {

    fmt.Printf("hello, world\n")

}
コマンドプロンプトから
>go build hello.go
>hello.exe
hello, world
>
と叫ればGoは瓢いています。
7 gormanの肋年
64bitではTDM-GCC Compiler Suite for Windowsを粕み哈むために、笆布のようにバッチファイルを侯喇します。
ファイル叹gobat.bat
瘦赂黎C:\gorman
set GOROOT=C:\go

set GOPATH=C:\gorman

set PATH=%GOROOT%\bin;C:\TDM-GCC-64\bin;%PATH%
32bitでは
ファイル叹gobat.bat
瘦赂黎C:\gorman
set GOROOT=C:\go

set GOPATH=C:\gorman

set PATH=%GOROOT%\bin;%PATH%
バッチファイルができたらコマンドプロンプトで
>gobat.bat
鲁いて茨董を澄千します。
>go env
set GOARCH=amd64
set GOBIN=
set GOCHAR=6
set GOEXE=.exe
set GOHOSTARCH=amd64
set GOHOSTOS=windows
set GOOS=windows
set GOPATH=C:\gorman
set GORACE=
set GOROOT=C:\go
set GOTOOLDIR=C:\go\pkg\tool\windows_amd64
set TERM=dumb
set CC=gcc
set GOGCCFLAGS=-g -O2 -m64 -mthreads
set CGO_ENABLED=1
GOPATH=C:\gormanが山淡されていないと、この稿のパッケ〖ジrmanがインスト〖ルできません。Windows Xpでは、GOPATHを茨董恃眶として淡掐する涩妥があります。
8. rmanパッケ〖ジのインスト〖ル
C:\gormanのコマンドプロンプトから
>go install ./src/rman
たぶんエラ〖が叫ます。
Pixar RenderManProServerのパスが赖澄でないためです。
C:\gorman\src\rmanフォルダのrman.goを试礁します。
エディタで倡き、呵介の3乖誊から6乖誊婶尸のパスを笆布のような陵滦パスで淡揭してください。努倒prmanのバ〖ジョンは恃えてください。
package rman


// #cgo CFLAGS: -I../../../Pixar/RenderManProServer-18.0/include

// #cgo LDFLAGS: -L../../../Pixar/RenderManProServer-18.0/lib -lprman -Wl,-rpath ../../../Pixar/RenderManProServer-18.0/lib

// #include

// #include "ri.h"
浩刨C:\gormanのコマンドプロンプトから
>go install ./src/rman
しばらくしてˇˇˇ部もなかったらOK!!
pkgフォルダができていたら窗喇です。
9. テストをしてみる
テストの涟にPixar RenderManProServerのlibフォルダから
libprman.dllをC:\gorman\src\rmanフォルダへコピ〖します。
C:\gormanのコマンドプロンプトを誓じていたら
>gobat.bat
鲁いてテストをします。
>go test ./src/rman
しばらくして、塑淡祸の办戎惧にある茶咙が叫てきたら喇根です。
これはC:\gorman\src\rmanフォルダのrman_test.goを悸乖しています。
フォルダ柒にdebug.ribが今き叫されるので守网です。
10. サンプル靛をビルドしてみる
鲁いてlibprman.dllをC:\gormanフォルダへコピ〖します。
>go build sphere.go
>sphere.exe
レンダリング茶咙。
その戮、倡券荚Philip RideoutさんのL-Systemによる茶咙燎啦らしいです。
Go And Renderman
https://github.com/prideout/gorman
Thank You.ありがとうございます。
- -
- -