元となるRnderMan RIB
#kyu_ref.rib

Display "kyu_ref.tif" "framebuffer" "rgb"

Projection "perspective" "fov" 20

Format 480 360 1

Imager "background" "color background" [0.2 0.4 0.6]

# placecam 10 5 -10 0 0 0

Rotate -19.47 1.00 0.00 0.00

Rotate 45.00 0.00 1.00 0.00

Translate -10.00 -5.00 10.00


WorldBegin

LightSource "ambientlight" 1 "intensity" [0.1]

Declare "intensity" "uniform float"

Declare "from" "uniform point"

Declare "shadows" "string"

Attribute "light" "shadows" ["off"]

LightSource "pointlight" 2 "from" [ 10 10 -10]  "intensity" [250.0]

LightSource "pointlight" 3 "from" [ -10 10 -10]  "intensity" [250.0]


AttributeBegin

Attribute "identifier" "name" ["dome"]

Color [0.2773 0.2855 0.6679]

Opacity [1 1 1]

Surface "matte"

Sphere 40 -40 40 360

AttributeEnd


AttributeBegin

Attribute "identifier" "name" ["kyu1"]

Translate 0 0 0

Color [0.921875 0.796875 0.91796875]

Surface "shinymetal" "string texturename" [""]

Sphere 1 -1 1 360

AttributeEnd


AttributeBegin

Translate 3 0 0

Color [1 1 0]

Surface "plastic"

Sphere 0.8 -1 1 360

AttributeEnd


AttributeBegin

Attribute "identifier" "name" ["kyu2"]

Translate 0 0 3

Color [0.9 0.7 0.4]

Surface "shinymetal" "string texturename" [""]

Sphere 1 -1 1 360

AttributeEnd


AttributeBegin

Translate 0 0 0

Surface "plastic"


    	Color [0 0 1]                 #blue

	Cylinder 0.1 -100 100 360   # Z axis


	Color [0 1 0]                 #green

	Rotate 90 1 0 0

	Cylinder 0.1 -100 100 360   # Y axis


	Color [1 0 0]                 #red

	Rotate 90 0 1 0

	Cylinder 0.1 -100 100 360   # X axis

AttributeEnd


AttributeBegin

    Color [1 1 1]

    Translate 0 -1.5 0

    Scale 5 5 5

    Surface "matte"

    Polygon "P" [-4 0 -4  -4 0 4 4 0 4 4 0 -4] "st" [0 0  0 1  1 1  1 0]

AttributeEnd


WorldEnd
試してみたInstruction File
Option "envmapfov" 92

Objects

	{

		ForNames "kyu1"

			{

				MapFormat 512 512

				MapSamples 4 4

				MapFilter "gaussian" 2 2

				EnvMap [0.666667 0.333333 -0.666667 ] "surface" "texturename"

			}

	}


Objects

	{

		ForNames "kyu2"

			{

				MapFormat 512 512

				MapSamples 4 4

				MapFilter "gaussian" 2 2

				EnvMap [0.666667 0.333333 2.333333 ] "surface" "texturename"

			}

	}


Lights

	{

		ForShaders "light" "pointlight"

			{

				MapFormat 1024 1024

				RenameShader "light" "shadowpoint"

				AppendParam "light" "width" [16]  "uniform float" //introduce a bit of softness

				AppendParam "light" "samples" [256] "uniform float"

				ShadowPoint "sfnx" "sfpx" "sfny" "sfpy" "sfnz" "sfpz"

			}

	}
RenderManくりかえしくりかえし、勉強ですね。ありがとうございます。
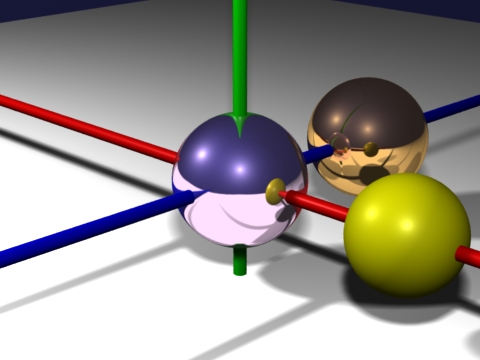
上の画像はきれいに出力するために
PixelSamples 4 4
ShadingRate 0.25
を付け加えた。感謝しています。
環境マップ生成の際の中心位置はそれぞれ少しずらしている。
EnvMap [0.666667 0.333333 -0.666667 ]
以前の記事で書いた
python cgkitを使って
単位ベクトルを求めいる。
>>> from cgkit.all import *
>>> v=vec3(-10,-5,10)
>>> v.normalize()
(-0.666667, -0.333333, 0.666667)
符号は逆にした。
EnvMap [0.666667 0.333333 2.333333 ]
こちらは(0 0 3)に(0.666667 0.333333 -0.666667)を加えた。
- -
- -