<< 5/7 >>
pythonでパーティクル その6
Essential RenderManを参考に、cgkitで作成した。レンダリングは3Delightです。試してみると面白いです。ありがとうございます。

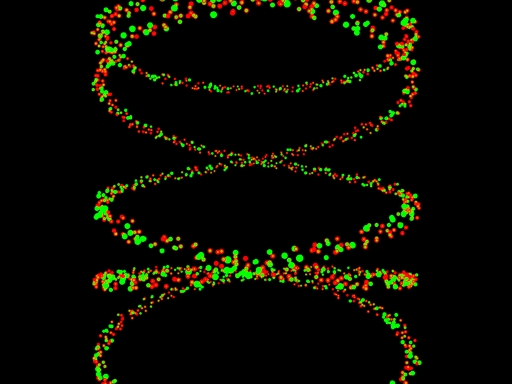
#color.py - Create Particles of different colors

import random, math

import cgkit.cri

from cgkit.cgtypes import *


# Load the RenderMan API.

# Replace the library name with whatever renderer you want to use.

ri = cgkit.cri.loadRI("3delight")

cgkit.cri.importRINames(ri, globals())


COUNT = 2000


def jitter(scale):

    val=random.random()*1000

    return (val/500-1)*scale


position=[]

color=[]

constantwidth=2.5

fov=30


#/*Generate Particle Postions*/

for i in range(COUNT):

    x=math.sin(i*0.5)*50+jitter(2)

    y=math.cos(i*0.1)*50+jitter(2)

    z=math.cos(i*0.5)*100+jitter(2)

    color0=jitter(0.5)+0.5

    color1=jitter(0.5)+0.5

    color2=jitter(0.5)+0.5

    position.append(vec3(x, y, z))

    color.append(vec3(color0, color1, color2))


RiBegin(RI_NULL)

RiDisplay ("color_par.tif","file","rgb",RI_NULL)

RiFormat(512, 384, -1.0)

RiPixelSamples( 4, 4)

RiShadingRate(0.5)

RiProjection ("perspective","fov",fov,RI_NULL)

RiWorldBegin()

RiLightSource("ambientlight","intensity",0.4)

RiLightSource("distantlight", "from",[0,0,1])

RiTranslate(0,0,250)

RiSurface("plastic")

RiPoints("P",position,"constantwidth", constantwidth,"Cs",color,RI_NULL)

RiWorldEnd()

RiEnd()
pythonでパーティクル その7
Essential RenderManを参考に、cgkitを利用して、Pointsのwidthを調整してみる。レンダリングは3Delightです。ありがとうございます。
RenderMan Procedual Primitives
#width.py - Create Particles of different sizes

import random, math

import cgkit.cri

from cgkit.cgtypes import *


# Load the RenderMan API.

# Replace the library name with whatever renderer you want to use.

ri = cgkit.cri.loadRI("3delight")

cgkit.cri.importRINames(ri, globals())


COUNT = 2000


def jitter(scale):

    val=random.random()*1000

    return (val/500-1)*scale


position=[]

constantwidth=0.5

fov=30

red=[1,0,0]

green=[0,1,0]

width=[]

constantwidth=1.0

fov=30


#/*Generate Particle Postions*/

for i in range(COUNT):

    x=math.sin(i*0.5)*50+jitter(2)

    y=math.cos(i*0.1)*50+jitter(2)

    z=math.cos(i*0.5)*100+jitter(2)

    w=jitter(1.0)+0.5

    position.append(vec3(x, y, z))

    width.append(w)


RiBegin(RI_NULL)

RiDisplay ("width.tiff","file","rgb",RI_NULL)

RiFormat(512, 384, -1.0)

RiPixelSamples( 4, 4)

RiShadingRate(0.5)

RiProjection ("perspective","fov",fov,RI_NULL)

RiWorldBegin()

RiLightSource("ambientlight","intensity",0.4)

RiLightSource("distantlight", "from",[0,0,1])

RiTranslate(0,0,250)

RiSurface("plastic")

RiColor(red)

RiPoints("P",position,"constantwidth", constantwidth,RI_NULL)

RiColor(green)

RiPoints("P",position,"width",width,RI_NULL)

RiWorldEnd()

RiEnd()
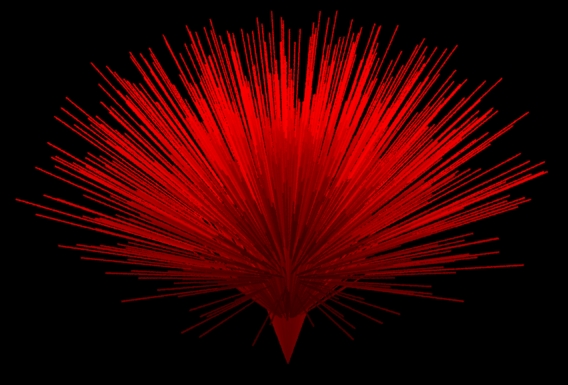
RiCurves その2
3Delightとcgkitを使って、RiCurvesの表示の仕方を試してみる。スクリプトの#コメントアウトしている方法でも、表示はOK。cgkit便利ですね。
ありがとうございます。

#curves_test.py

import cgkit.cri

from cgkit.cgtypes import *


# Load the RenderMan API.

# Replace the library name with whatever renderer you want to use.

ri = cgkit.cri.loadRI("3delight")

cgkit.cri.importRINames(ri, globals())


red=(1,0,0)

curveWidth=0.3

fov=30


RiBegin(RI_NULL)

RiDisplay ("curves_test.tiff","framebuffer","rgb",RI_NULL)

RiProjection ("perspective","fov",fov,RI_NULL)

RiFormat(512, 384, -1.0)

RiWorldBegin()

RiTranslate(0,0,2)

RiColor(red)

RiRotate(45,1,0,0)

points=[-0.5,-0.5,0, 0.5,0.5,0]

curveWidth=0.1

RiCurves("linear",[2],"nonperiodic","P",points,"constantwidth",curveWidth,"Cs",[(1,0,0), (0,0,1)],RI_NULL)

#RiCurves(RI_LINEAR, [2], RI_NONPERIODIC, P=[-0.5,-0.5,0, 0.5,0.5,0], constantwidth=0.1, Cs=[(1,0,0), (0,0,1)])

RiWorldEnd()

RiEnd()
RiCurves その3
Essential RenderManのサンプルを参照して、Python cgkitで試してみました。RiCurvesの表記の仕方がわからなくて、最初エラーが出てしまいました。
RiCurves("linear",COUNT,"nonperiodic","P",points,"constantwidth",curveWidth
RI_NULL)
・・・
TypeError: 'int' object is not iterable
原因はCOUNTはいらないということでしょうか。スクリプト書き直したら、できました。ありがとうございます。
#/* curves2.py - create a set of curves */

import random, math

import cgkit.cri

from cgkit.cgtypes import *


# Load the RenderMan API.

# Replace the library name with whatever renderer you want to use.

ri = cgkit.cri.loadRI("3delight")

cgkit.cri.importRINames(ri, globals())


COUNT = 1000


def jitter(scale):

    val=random.random()*1000

    return (val/500-1)*scale


points=[]

pappend=points.append

nverts=[]

red=(1,0,0)

curveWidth=0.3

fov=30


#/*Generate Curve Postions*/

for i in range(COUNT):

    tx=(math.sin(i*0.3)*i*50)/COUNT+jitter(5)

    ty=(math.cos(i*0.3)*i*50)/COUNT+jitter(5)


    pappend(0)

    pappend(0)

    pappend(50)


    pappend(0.1*tx)

    pappend(0.1*ty)

    pappend(25)


    pappend(0.4*tx)

    pappend(0.4*ty)

    pappend(0)


    pappend(tx)

    pappend(ty)

    pappend(-25)


    nverts.append(4)


RiBegin(RI_NULL)

RiDisplay ("curves2.tiff","framebuffer","rgb",RI_NULL)

RiProjection ("perspective","fov",fov,RI_NULL)

RiWorldBegin()

RiTranslate(0,0,200)

RiColor(red)

RiRotate(45,1,0,0)


RiCurves("linear",nverts,"nonperiodic","P",points,"constantwidth",curveWidth,RI_NULL)


RiWorldEnd()

RiEnd()
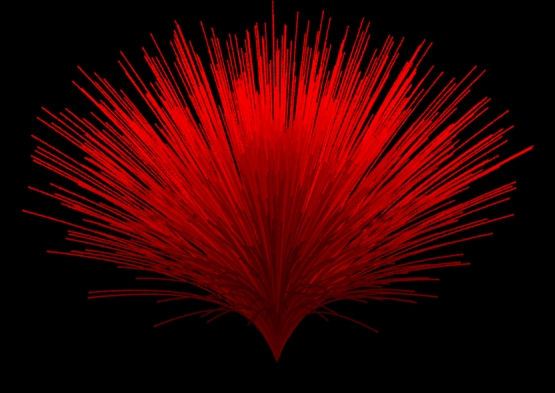
RiCurves その4
cubicに書き換えてみました。
RiCurves("cubic",nverts,"nonperiodic","P",points,"constantwidth",curveWidth,RI_NULL)
勉強ですね。ありがとうございます。
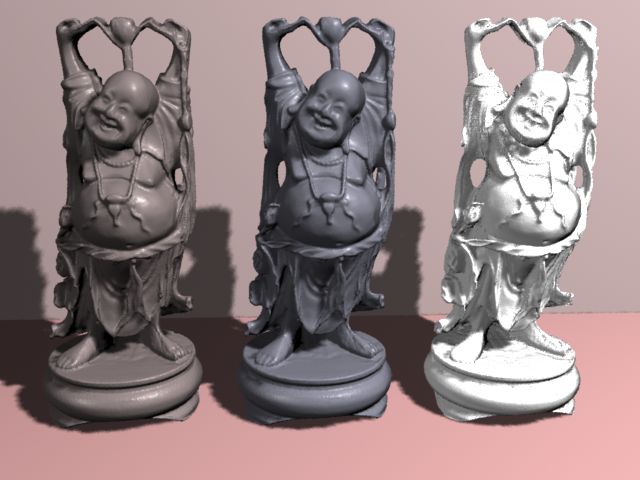
displacementbound
cgkitへRIBを呼び出す。
r=RIBArchive(

filename = 'butu.rib', pos = (0,0,0) )

r.rib='Color 0.9 0.9 1.0\nSurface "plastic"' #r.rib='Surface "check_ref'


t=RIBArchive(

filename = 'butu.rib', pos = (0.5,0,0) )

t.rib='Color 1 0.9 0.9\nSurface "plastic"'


Plane(

lx = 50, ly = 50, pos = (0,0,0.6), material = GLMaterial(diffuse=(0.8, 0.7, 0.7)) )

Plane(

lx = 50, ly = 50, pos = (0,-0.44,0), rot= mat3().fromEulerXYZ(radians(90), 0, 0), material = GLMaterial(diffuse=(0.8, 0.6, 0.6)) )

s=RIBArchive(

filename = 'butu.rib', pos = (-0.5,0,0) )

s.rib='ShadingRate 0.25\nAttribute "trace" "int displacements" [1]\nAttribute "displacementbound" "float sphere" [0.001] "string cordinatesystem" ["shader"]\nDeclare "Km" "uniform float"\nDisplacement "dented" "Km" 0.05\nSurface "metal" "Ks" [1.5] "roughness" [1.0]\nColor [ 0.8 0.8 0.8 ]'
ありがとうございます。。(2009.8/16記事)
Mac OS X 10.6.6(Snow Leopard)にcgkitインストール
Mac OS Xに入っているPythonは、
Leopard → 2.5.1、
Snow Leopard → 2.5.5、2.6.1、
Lion → 2.5.5、2.6.6、2.7.1 が最初からインストールされています。
cgkitをダウンロードしインストール設定してみました。参考にしたのは下記のサイトです。
ありがとうございます。
Python cgkit 2.o on (Snow) Leopard
http://sites.google.com/site/lefranckcom/home/pythoncgkit2oonsnowleopard
■http://www.macports.org/install.phpからMacPorts-2.0.3.pkgをダウンロード
し、インストールします。
■ターミナルを開き、
$ sudo port install python26 scons boost +python26
と入力します。管理者パスワードを入れるとダウンロードがはじまります。
boost_python libraryなどコンパイルされインストールがはじまります。とても長く、しばらく時間がかかります。python27もインストールされました。
cgkitを使うためには、新たにインストールしたpython2.6を使っていきます。サポートライブラリをコンパイルするためです。以下PATHの設定を書き換えます。
$ cd ~
でホームディレクトリに行き、ls -aで.bash_profileがあるか確認します。
$ nano .bash_profile
でnanoエディタを開き
#PATH="/Library/Frameworks/Python.framework/Versions/Current/bin:${PATH}"
PATH=/opt/local/bin/python2.6:$PATH
export PATH
これをなるべく上の行に書き加えます。保存して終了します。
PATHを反映させるために
$ source .bash_profile
$ echo $PATH
で書き加えたPATHが入っているか確認します。
$ python2.6
と打つとビルドした日付が出ます。
$ which python2.6
/opt/local/bin/python2.6
■Compiling the support library
cgkitを入手します。
http://sourceforge.net/projects/cgkit/files/cgkit/
cgkit-2.0.0alpha9.tar.gzをダウンロードします。
cgkit-2.0.0alpha9-py2.5-macosx10.4.dmgは使えません。
cgkit-2.0.0alpha9.tar.gzを解凍します。
$ cd cgkit-2.0.0alpha9/
$ cd supportlib/
$ cd src/
$ nano polyhedrongeom.cpp
line 401行目,
typedef GLvoid (CALLBACK *TessCallback)(...);
以下のように書き換えて保存します。
typedef GLvoid (CALLBACK *TessCallback)();
$ cd ..
一つ上に上がり、
$ nano SConstruct
SConstruct を開きline 38行目:
env.Append(CCFLAGS = ["-arch", "i386", "-arch", "ppc"])
を
env.Append(CCFLAGS = ["-arch", "x86_64"])
に書き換えます。64ビットでコンパイルできるようにします。
$ scons
と入力するとサポートライブラリのコンパイルがはじまります。
$ cd ..
一つ上に上がり、
$ cp config_template.cfg config.cfg
コピーをつくります。
config.cfgを開き
46行目:
BOOST_LIB = "boost_python"
のコメント#を消します。
118, 119行目を次のようにします。
INC_DIRS += ["/opt/local/include"]
LIB_DIRS += ["/opt/local/lib"]
以上を変更保存します。次にビルドします。
$ python2.6 setup.py build
続いて
$ sudo python2.6 setup.py install
以上でcgkitできあがりです。
チェックしてみましょう。
$ cd utilities/
$ python2.6 checkenv.py
-------------------------------------------------------------------
Python 2.6.7 (r267:88850, Jan 13 2012, 17:06:12)
[GCC 4.2.1 (Apple Inc. build 5666) (dot 3)]
Platform: darwin
-------------------------------------------------------------------
Python version: 2.6........... OK
PyProtocols................... is installed
PyOpenGL...................... is installed
PIL........................... is installed
pygame........................ is installed
PyODE......................... is installed
PySerial...................... is installed
cgkit (base).................. 2.0.0alpha9 (Jan 24 2012, 00:13)
cgkit (C++ lib)............... OK
cgkit (all)................... OK
cgkitでOKが出ていれば成功です。
ところで、上記のPyProtocols...PyOpenGL...PIL..pygame...PyODE..PySerial..はmissingになっていると思います。まだ完全にcgkitは動いてくれません。後ほどMacPortsを使ってPyProtocols以外は、インストールすることができます。
続いて複数のpythonが入っているように設定を変えます。
現在切り替えられるpythonを確認するために
$ port select --list python
とすると、
Available versions for python:
none
python25-apple
python26
python26-apple
python27
複数のpythonがでてきます。現在activeなのはありません。バージョンを切り替えるには、
$ sudo port select --set python python26
で切り替わります。
Available versions for python:
none
python25-apple
python26 (active)
python26-apple
python27
PILはいくつかのライブラリに依存しています。Python Imaging Libraryインストール
$ port search py26-pil
$ port deps py26-pil
$ sudo port install py26-pil
PyOpenGLインストール
$ port deps py26-opengl
$ sudo port install py26-opengl
PyODEインストール
$ port search py26-ode
$ port deps py26-ode
$ sudo port install py26-ode
pygameインストール
$ port search py26-game
$ port deps py26-game
$ sudo port install py26-game
PySerialインストール
$ port search py26-serial
$ port deps py26-serial
$ sudo port install py26-serial
PyProtocolsインストール
PyProtocols-0.9.3をダウンロード
http://peak.telecommunity.com/
PyProtocols-0.9.3フォルダに移動し、
$ python2.6 setup.py --without-speedups install
RenderManレンダラ
3delight-10.0.4-Darwin-Universal.pkgをインストールし、
cgkitサイトのチュートリアルから
demo1.py
demo2.py
demo3.py
を保存します。
サンプルファイルがある場所で
$ viewer.py demo1.py
で動作するか確かめます。
さらに
$ render.py -r3delight demo1.py
Exporting main.rib...
1 passes...
Compiling shaders...
Preprocessing time: 0s
Rendering "out.tif" (frame 0)...
3DL ERROR: Two different displays can't write to the same file (will keep 'file' and ignore 'framebuffer')
Rendering time: 0s
$ $ i-display out.tif
cgkit install under Debian
1. pygame install
libsdl-image1.2_1.2.10-2+b2_i386.deb
libmikmod2_3.1.11-a-6.3_i386.deb
libsmpeg0_0.4.5+cvs20030824-2.2_i386.deb
libsdl-mixer1.2_1.2.8-6.3_i386.deb
libsdl-ttf2.0-0_2.0.9-1_i386.deb
python-pygame_1.8.1release-2+b1_i386.deb
2. freeglut3-dev
xtrans-dev_1.2.5-1_all.deb
x11proto-core-dev_7.0.16-1_all.deb
x11proto-input-dev_2.0-2_all.deb
libxdmcp-dev_1.0.3-2_i386.deb
libxau-dev_1.0.6-1_i386.deb
libpthread-stubs0_0.3-2_i386.deb
libpthread-stubs0-dev_0.3-2_i386.deb
libxcb1-dev_1.6-1_i386.deb
x11proto-kb-dev_1.0.4-1_all.deb
libx11-dev_1.3.3-4_i386.deb
mesa-common-dev_7.7.1-5_i386.deb
linux-libc-dev_2.6.32-39squeeze1_i386.deb
libc-dev-bin_2.11.2-10_i386.deb
libc6-dev_2.11.2-10_i386.deb
libgl1-mesa-dev_7.7.1-5_i386.deb
libglu1-mesa-dev_7.7.1-5_i386.deb
libice-dev_1.0.6-2_i386.deb
libsm-dev_1.1.1-1_i386.deb
libxt-dev_1.0.7-1_i386.deb
x11proto-xext-dev_7.1.1-2_all.deb
libxext-dev_1.1.2-1_i386.deb
freeglut3-dev_2.6.0-1_i386.deb
3. python-pyode
libode1_0.11.1-3_i386.deb
python-pyode_1.2.0-4+cvs20090320+b1_i386.deb
4. scons_2.0.0-1_all.deb
5.Synaptic package install
select libstdc++6.4.4-dev
binutils
g++-4.4
gcc-4.4
libstdc++6-4.4-dev
6. boost
libboost1.42-dev_1.42.0-4_i386.deb
zlib1g-dev_1.2.3.4.dfsg-3_i386.deb
libssl0.9.8_0.9.8o-4squeeze7_i386.deb
libssl-dev_0.9.8o-4squeeze7_i386.deb
python2.6-dev_2.6.6-8+b1_i386.deb
libboost-python1.42.0_1.42.0-4_i386.deb
gcc_4.4.5-1_i386.deb
g++_4.4.5-1_i386.deb
gccxml_0.9.0+cvs20100501-2_i386.deb
python-dev_2.6.6-3+squeeze6_all.deb
libboost-python1.42-dev_1.42.0-4_i386.deb
7. python-imaging_1.1.7-2_i386.deb
8. pyserial-2.6.tar.gz
9. PyProtocols-0.9.3.zip
10. cgkit
POV-Rayのdefault cameraのangleを求める
以下、Pov-rayでは未検証ですが、計算してみました。
パースペクティブ・カメラの主なディフォルト設定(省略するとこの設定値が使用されている。)
camera {
perspective
location <0,0,0>
direction <0,0,1>
right <1.33,0,0>
sky <0,1,0>
up <0,1,0>
look_at <0,0,1>
}
画角(angle)
angle、right、directionの関係は次式で表される(right_lengthとdirection_lengthはそれぞれrightとdirectionベクトルの長さ)。
direction_length = 0.5 * right_length / tan(angle / 2)
デフォルトカメラのangleは、
1=0.5*1.33/ tan(angle / 2)
tan(angle / 2)=0.5*1.33
angle / 2=atan(0.5*1.33)
angle=2*atan(0.5*1.33)
で求められるので、以下python cgkitで求めてみました。
>python
Python 2.6.5 (r265:79096, Mar 19 2010, 18:02:59) [MSC v.1500 64 bit (AMD64)
win32 Type "help", "copyright", "credits" or "license" for more information.
>>> from cgkit.all import *
>>> right=vec3(1.33,0,0)
>>> right.length()
1.3300000000000001
>>> direction=vec3(0,0,1)
>>> direction.length()
1.0
>>> import math
コサイン60度を求めてみる。1/2になるかな。
>>> math.cos(math.radians(60))
0.50000000000000011
アークタンジェント:atan(x) を求める。
>>> 2*math.atan(1.33*0.5)
1.1736957392994543
ラジアンを度に変換する。
>>> math.degrees(2*math.atan(1.33*0.5))
67.247812294345678
>>> angle=math.degrees(2*math.atan(1.33*0.5))
>>> angle
67.247812294345678
ということで67度となりましたが、あっているかどうかは
実際POV-RAYで検証しなくてはなりません。
Python CgkitでのTransform
Aqsisのサンプルが参考になったのでPythonインタラクティブモードで確認してみました。
localhost ~]$ python
Python 2.6.6 (r266:84292, Sep 11 2012, 08:28:27)
[GCC 4.4.6 20120305 (Red Hat 4.4.6-4)] on linux2
Type "help", "copyright", "credits" or "license" for more information.
>>> from cgkit.cgtypes import *
>>> from cgkit.ri import *
>>> from math import *
>>> transm = mat4 ( 1 )
>>> transm = transm.lookAt( (10,10,10), (0,0,0) )
>>> transm
[0.707107, -0.408248, -0.57735, 10]
[-0.707107, -0.408248, -0.57735, 10]
[-8.94467e-18, 0.816497, -0.57735, 10]
[0, 0, 0, 1]
>>> transm = transm.inverse()
>>> transm
[0.707107, -0.707107, 0, -0]
[-0.408248, -0.408248, 0.816497, 0]
[-0.57735, -0.57735, -0.57735, 17.3205]
[-0, 0, -0, 1]
>>> RiTransform ( transm )
Transform [0.707106781187 -0.408248290464 -0.57735026919 -0.0 -0.707106781187 -0.408248290464 -0.57735026919 0.0 0.0 0.816496580928 -0.57735026919 -0.0 -0.0 0.0 17.3205080757 1.0]
>>>
<< 5/7 >>