1/1
Lightflow質感設定 Standard材質その1
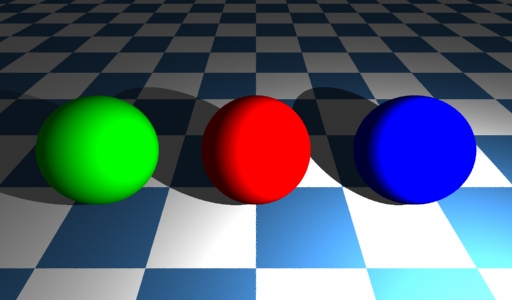
Lightflowの使い方として、微妙な質感を調整することができる。
基本となる反射色kcをそれぞれ、赤、緑、青の色に設定した。
#! /usr/bin/env python

#sphere01.py


from lightflowPM import *

from math import *


s = scene()


s.lightOn( s.newLight( "point", [ "position", vector3( 5.0, -5.0, 4.0 ), "color", vector3( 300.0, 300.0, 300.0 ) ] ) )


s.lightOn( s.newLight( "ambient", [ "color", vector3( 0.2, 0.2, 0.2 ) ] ) ) #環境光を加える。


plastic = s.newMaterial( "standard",[ "kc", vector3( 1, 0, 0 ) ] ) #赤


plastic2 = s.newMaterial( "standard",[ "kc", vector3( 0, 1, 0 )] ) #緑


plastic3 = s.newMaterial( "standard",[ "kc", vector3( 0, 0, 1 )] ) #青


check_ground=s.newPattern("check",["color",vector3( 0.2, 0.4, 0.6 ),"scale",0.025])


ground=s.newMaterial( "standard",[ "kc", check_ground,"kc",vector3( 1.0, 1.0, 1.0 ),"ka",check_ground ] )


#ground=s.newMaterial( "standard",[ "kc", vector3( 1, 1, 1 ) ] ) #白


s.materialBegin( plastic )

s.addObject( s.newObject( "sphere", [ "radius",1.4] ) )

s.materialEnd()


s.materialBegin( plastic2 )

s.transformBegin( transform().translation( vector3(-4.0,0,0)))


s.addObject( s.newObject( "sphere", [ "radius",1.4] ) )


s.transformEnd()

s.materialEnd()


s.materialBegin( plastic3 )

s.transformBegin( transform().translation( vector3(4.0,0,0)))


s.addObject( s.newObject( "sphere", [ "radius",1.4] ) )


s.transformEnd()

s.materialEnd()


#地面groundをpatchで作成しています。高さ(z軸)を-1.4にしてぴったり球とあわせています。

s.materialBegin( ground )


s.addObject( s.newObject( "patch", [ "points",vector3( -50, -50, -1.4 ),vector3( -50, 50, -1.4 ),vector3( 50, -50, -1.4 ),vector3( 50, 50, -1.4 )] ) )


s.materialEnd()


saver = s.newImager( "tga-saver", [ "file", "sphere01.tga" ] )


s.imagerBegin( saver )


camera = s.newCamera( "pinhole", [ "eye", vector3( 0, -6, 5 ), "aim", vector3( 0, 0, 0 ) ] )


s.imagerEnd()


s.render( camera, 512, 300 )
Lightflow質感設定 Standard材質その2
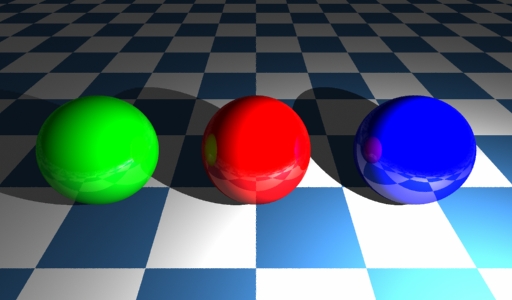
"kr",vector3 | pattern kr [レイトレース反射色]
レイトレース反射色です。映り込みをします。
kr 0.2にしました。
#! /usr/bin/env python

#sphere02.py

from lightflowPM import *

from math import *


s = scene()


s.lightOn( s.newLight( "point", [ "position", vector3( 5.0, -5.0, 4.0 ), "color", vector3( 300.0, 300.0, 300.0 ) ] ) )


s.lightOn( s.newLight( "ambient", [ "color", vector3( 0.2, 0.2, 0.2 ) ] ) ) #環境光を加える。


plastic = s.newMaterial( "standard",[ "kc", vector3( 1, 0, 0 ),"kr",vector3(0.2,0.2,0.2) ] ) #赤, レイトレース反射色kr追加


plastic2 = s.newMaterial( "standard",[ "kc", vector3( 0, 1, 0 ),"kr",vector3(0.2,0.2,0.2) ] ) #緑, レイトレース反射色kr追加


plastic3 = s.newMaterial( "standard",[ "kc", vector3( 0, 0, 1 ),"kr",vector3(0.2,0.2,0.2) ] ) #青, レイトレース反射色kr追加


check_ground=s.newPattern("check",["color",vector3( 0.2, 0.4, 0.6 ),"scale",0.025])


ground=s.newMaterial( "standard",[ "kc", check_ground,"kc",vector3( 1.0, 1.0, 1.0 ),"ka",check_ground ] )


#ground=s.newMaterial( "standard",[ "kc", vector3( 1, 1, 1 ) ] ) #白


s.materialBegin( plastic )

s.addObject( s.newObject( "sphere", [ "radius",1.4] ) )

s.materialEnd()


s.materialBegin( plastic2 )

s.transformBegin( transform().translation( vector3(-4.0,0,0)))


s.addObject( s.newObject( "sphere", [ "radius",1.4] ) )


s.transformEnd()

s.materialEnd()


s.materialBegin( plastic3 )

s.transformBegin( transform().translation( vector3(4.0,0,0)))


s.addObject( s.newObject( "sphere", [ "radius",1.4] ) )


s.transformEnd()

s.materialEnd()


#地面groundをpatchで作成しています。高さ(z軸)を-1.4にしてぴったり球とあわせています。

s.materialBegin( ground )


s.addObject( s.newObject( "patch", [ "points",vector3( -50, -50, -1.4 ),vector3( -50, 50, -1.4 ),vector3( 50, -50, -1.4 ),vector3( 50, 50, -1.4 )] ) )


s.materialEnd()


saver = s.newImager( "tga-saver", [ "file", "sphere02.tga" ] )


s.imagerBegin( saver )


camera = s.newCamera( "pinhole", [ "eye", vector3( 0, -6, 5 ), "aim", vector3( 0, 0, 0 ) ] )


s.imagerEnd()


s.render( camera, 512, 300 )
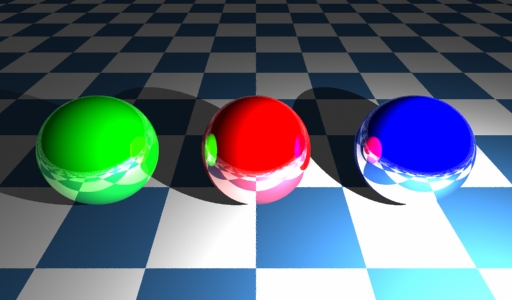
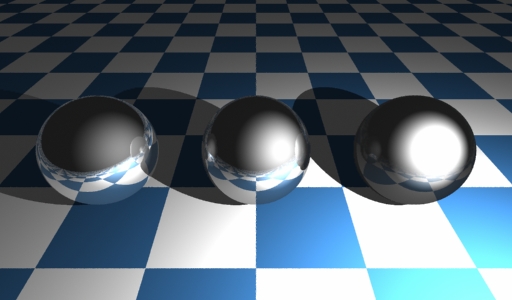
Lightflow質感設定その3 レイトレース反射色
レイトレース反射色krを0.95にしてみた。
plastic = s.newMaterial( "standard",[ "kc", vector3( 1, 0, 0 ),"kr",vector3(0.95,0.95,0.95) ] ) #赤
plastic2 = s.newMaterial( "standard",[ "kc", vector3( 0, 1, 0 ),"kr",vector3(0.95,0.95,0.95) ] ) #緑
plastic3 = s.newMaterial( "standard",[ "kc", vector3( 0, 0, 1 ),"kr",vector3(0.95,0.95,0.95) ] ) #青
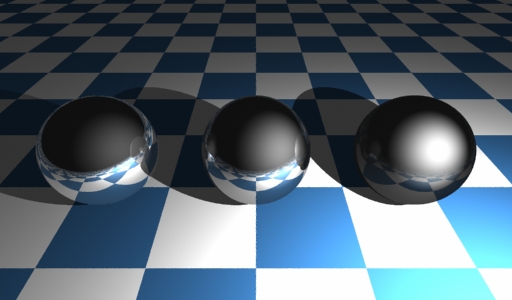
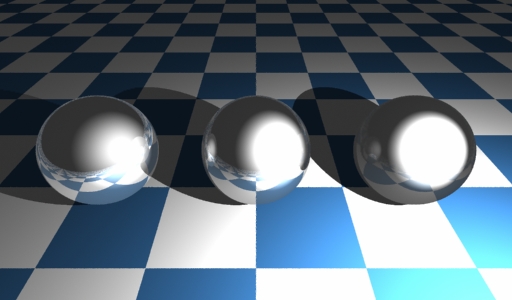
Lightflow質感設定その4 レイトレース反射色
"kd",float | pattern kd [拡散量]0.01を追加しておき、レイトレース反射色krを右の球から0.1、0.5、0.95に設定した。
・反射色kc 0.3
plastic = s.newMaterial( "standard",[ "kc", vector3( 0.3, 0.3, 0.3 ),"kd", 0.01
,"kr",vector3(0.5,0.5,0.5) ] )
plastic2 = s.newMaterial( "standard",[ "kc", vector3( 0.3, 0.3, 0.3 ),"kd", 0.01
,"kr",vector3(0.95,0.95,0.95) ] )
plastic3 = s.newMaterial( "standard",[ "kc", vector3( 0.3, 0.3, 0.3 ),"kd", 0.01
,"kr",vector3(0.1,0.1,0.1) ] )
 ・反射色kc 0.5
plastic = s.newMaterial( "standard",[ "kc", vector3( 0.5, 0.5, 0.5 ),"kd", 0.01
,"kr",vector3(0.5,0.5,0.5) ] )
plastic2 = s.newMaterial( "standard",[ "kc", vector3( 0.5, 0.5, 0.5 ),"kd", 0.01
,"kr",vector3(0.95,0.95,0.95) ] )
plastic3 = s.newMaterial( "standard",[ "kc", vector3( 0.5, 0.5, 0.5 ),"kd", 0.01
,"kr",vector3(0.1,0.1,0.1) ] )
 ・反射色kc 0.95
plastic = s.newMaterial( "standard",[ "kc", vector3( 0.95, 0.95, 0.95 ),"kd", 0.01
,"kr",vector3(0.5,0.5,0.5) ] )
plastic2 = s.newMaterial( "standard",[ "kc", vector3( 0.95, 0.95, 0.95 ),"kd", 0.01
,"kr",vector3(0.95,0.95,0.95) ] )
plastic3 = s.newMaterial( "standard",[ "kc", vector3( 0.95, 0.95, 0.95 ),"kd", 0.01
,"kr",vector3(0.1,0.1,0.1) ] )
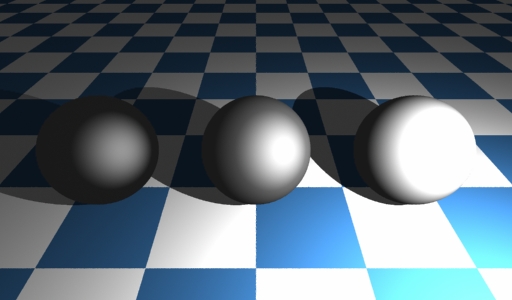
Lightflow質感設定その5 拡散量
"kd",float | pattern kd [拡散量]
どのくらい光が拡散するかを決めます。1に近づくほど拡散します。透明な材質を作りたい場合はおもいきり下げたほうが良いでしょう。通常kdを記入しなければ(省略した場合)、"1.0"になっています(デフォルト)。ちょっと抑えてあげたほうがよいかもしれません。
plastic = s.newMaterial( "standard",[ "kc", vector3( 0.5, 0.5, 0.5 ),"kd", 0.5 ] ) #真ん中の球
plastic2 = s.newMaterial( "standard",[ "kc", vector3( 0.5, 0.5, 0.5 ),"kd", 0.01 ] ) #左の球
plastic3 = s.newMaterial( "standard",[ "kc", vector3( 0.5, 0.5, 0.5 ) ] ) #右の球,"kd", 1.0と同じです。
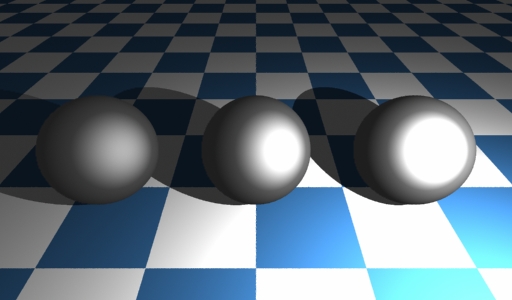
Lightflow質感設定その6 拡散量
拡散量がたとえ同じであっても、光源の位置で表情は変わりますね。
kdを0.33としてみた。
plastic = s.newMaterial( "standard",[ "kc", vector3( 0.6, 0.6, 0.6 ),"kd", 0.33 ] )
plastic2 = s.newMaterial( "standard",[ "kc", vector3( 0.6, 0.6, 0.6 ),"kd", 0.33 ] )
plastic3 = s.newMaterial( "standard",[ "kc", vector3( 0.6, 0.6, 0.6 ),"kd", 0.33 ] )
1/1