<< 3/6 >>
Metasequoia Python 面インデックスと座標
メタセコイア Pythonを使って、面をきめるインデックス番号と頂点座標位置を表示する。
metasequoia pythonスクリプトとしては、基本となる。
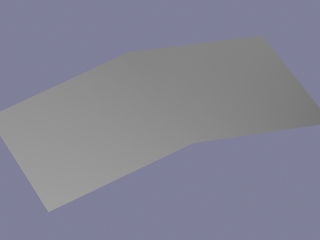
あらかじめ、物体を作っておき、オブジェクトパネルで選択されていること。
以下のスクリプトまだきれいではありませんが、確認できます。ありがとうございます。
#face_index.py

doc=MQSystem.getDocument()

out=MQSystem.println


obj=doc.object[doc.currentObjectIndex]

out(str(obj.name))


for face in obj.face:

	for aIndex in face.index:

		out(str(aIndex))


for vert in obj.vertex:

	pos=vert.getPos()

	out(str(pos.x)+","+str(pos.y)+","+str(pos.z))
続きを読む>>
面法線と頂点法線 その4
前の記事のmetasequoia pythonで面のインデックスと頂点座標を求めてみた。これでRIBエクスポートが何とかかけそう。三角、四角、どうやって判別するか・・・・勉強します。
ありがとうございます。
obj1
1
3
2
1
2
0
4
5
1
4
1
0
-50.0,20.0,0.0
50.0,20.0,0.0
-50.0,0.0,100.0
50.0,0.0,100.0
-50.0,0.0,-100.0
50.0,0.0,-100.0
MetasequoiaとPython 面情報
サンプルのobj出力を元に、選択したオブジェクトの面情報を出力できるように工夫してみました。あまり、きれいではありませんが、面白いです。ありがとうございます。
#face_index3.py

doc=MQSystem.getDocument()

out=MQSystem.println


obj=doc.object[doc.currentObjectIndex]

out(str(obj.name))


count=obj.numFace

out("面の数:"+str(count))

ten=[]

for k in range(0,obj.numVertex):

	out(str(obj.vertex[k].pos.x)+","+str(obj.vertex[k].pos.y)+","+str(obj.vertex[k].pos.z))

	ten.append((obj.vertex[k].pos.x,obj.vertex[k].pos.y,obj.vertex[k].pos.z))


for i in range(0,count):

	out("面のindex:"+str(obj.getFaceIndexFromUniqueID(i+1)))

	out("頂点数"+str(str(obj.face[i].numVertex)))

	for j in range(0,obj.face[i].numVertex):

		out(str(obj.face[i].index[j])+":"+str(ten[obj.face[i].index[j]]))
■出力情報
plane_-1
面の数:2
-50.0,0.0,-100.0
50.0,0.0,-100.0
50.0,0.0,0.0
-50.0,0.0,0.0
-50.0,0.0,100.0
50.0,0.0,100.0
面のindex:0
頂点数4
0:(-50.0, 0.0, -100.0)
1:(50.0, 0.0, -100.0)
2:(50.0, 0.0, 0.0)
3:(-50.0, 0.0, 0.0)
面のindex:1
頂点数4
2:(50.0, 0.0, 0.0)
5:(50.0, 0.0, 100.0)
4:(-50.0, 0.0, 100.0)
3:(-50.0, 0.0, 0.0)
mqo2rib(metared)
b2oxさん開発のRIBエクスポータ、webarchiveで探してダウンロードしました。
メタセコイアをRIBに変換しようとコマンドプロンプトから、打ったらエラー。
>mqo2rib.exe men_test.mqo
"men_test.mqo" is now loading and converting... Format Error at line 13, column 1 in "men_test.mqo".
complete! (Elapsed time: 0.0s)
検索したら、mqoファイル内にマテリアルが設定されていないからということがわかりました。メタセコイアで開いて、材質パネルで新規mat1を設けて上書き保存。こんどはできました。
3Delightでレンダリングしました。
mqo2rib.cfgをエディタで開き、コメントアウトを外す
RIB[:Renderer] = '3Delight'
付属のシェーダdistantlight2.slは、
shaderdl distantlight2.sl
でコンパイルしておきます。
レンダリングすると、下記のエラー
3DL ERROR P1107: [.../men_test.rib:27]: user p
arameter 'shadowname' has an unknown type
タイプを記述しておきました。
typeはshaderinfoでしらべるとわかります。
LightSource "distantlight2" 1
"uniform string shadowname" ["raytrace"]
"from" [0.236593 1.226111 -0.110574]
"uniform float shadowpower" [0.5]
"to" [0.000000 0.000000 0.000000]
"lightcolor" [1.000 1.000 1.000]
"uniform float blur" [0.03]
"uniform float samples" [10]
後、法線の計算で8点計算されて出力されました。
3DL WARNING P1104: [men_test_mdl.rib:13]:
array of 'normal's has wrong size, expected 18 'normal'(s), but given 24
"N" [0.000000 1.000000 -0.000000
0.000000 1.000000 -0.000000
0.000000 0.980581 -0.196116
0.000000 0.980581 -0.196116
0.000000 1.000000 -0.000000
0.000000 0.980581 0.196116
0.000000 0.980581 0.196116
0.000000 1.000000 -0.000000]
5行目
0.000000 1.000000 -0.000000
と8行目
0.000000 1.000000 -0.000000
を削除した。
レンダリングでエラーが出なくなった。
mqo2rib使ってみます。
ありがとうございます。
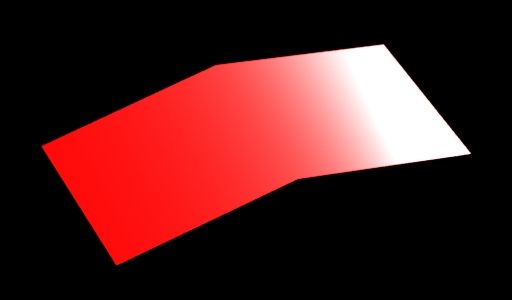
面法線と頂点法線 その5
出力したRIBの調整。
場合によっては、コンバータで出力した面が裏向きなっていて、いくらライトのintensityをあげても明るくならなかったり、plasticなどのシェーダを入れておかないといけませんが、記述していないと明るくなりません。裏向きの場合、Scale 1 1 -1とWorldBeginの前に記入してみて実験してみるとわかります。
以下は、メタセコイアから出力した面。plasticシェーダを割り当てているので、ライトが強いとハイライトができます。
##RenderMan RIB-Structure 1.0

version 3.03

Format 512 300 1

PixelSamples 3 3

ShadingRate 1

Display "test_men2.tif" "file" "rgb"

Projection "perspective" "fov" 5.963

ConcatTransform [

0.423401210556  -0.592993260602  -0.684901750458  0

0  0.756010361246  -0.654559648686  0

-0.905942280115  -0.277141347635  -0.320095702145  0

-4.13227435274e-005  5.57033550876e-005  1499.99997798  1

]


WorldBegin

LightSource "ambientlight" 0 "intensity" [ 0.8 ] "lightcolor" [ 1 1 1 ]

LightSource "distantlight" 1 "intensity" [ 3 ] "lightcolor" [ 1 1 1 ] "from" [ -1 1 -1 ] "to" [ 0 0 0 ]

LightSource "distantlight" 2 "intensity" [ 0.8 ] "lightcolor" [ 1 1 1 ] "from" [ 1 1 2.5 ] "to" [ 0 0 0 ]


AttributeBegin

Attribute "identifier" "name" ["obj1"]

Color [1 0 0]

Surface "plastic"

PointsPolygons [ 3 3 3 3 ] [ 0 1 2 0 2 3 4 5 0 4 0 3 ]

"P" [

50 20 0

50 0 -100

-50 0 -100

-50 20 -0

-50 0 100

50 0 100

 ]

"N" [ 0 1 0

0 0.980581 -0.196116

0 0.980581 -0.196116

0 1 0

0 0.980581 0.196116

0 0.980581 0.196116 ] "st" [ 1 0 1 1 0 1 1 0 0 1 0 0 ]


AttributeEnd


WorldEnd
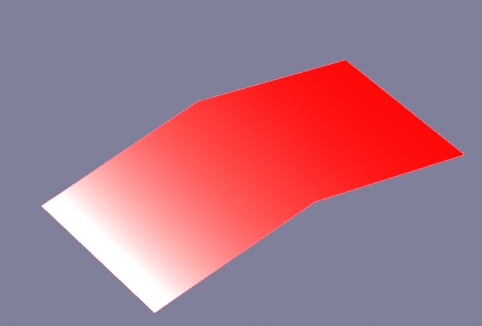
面法線と頂点法線 その6
metared(mqo2rib)で変換したものを調整した。頂点法線が多いので削除。
勉強します。
3Delightでレンダリングした。
モデルデータ
##Renderman RIB-Structure 1.0

## filename: men_mdl.rib

##------------ obj1 ------------##

AttributeBegin

	Declare "st" "facevarying float[2]"

	### MaterialName: Default

	Color [1 0 0]

	Surface "plastic"

	PointsPolygons

		[3 3 3 3]

		[0 1 2 0 2 3 4 5 2 4 2 1]

		"P" [50.000000 0.000000 100.000000

50.000000 20.000000 0.000000

-50.000000 20.000000 0.000000

-50.000000 0.000000 100.000000

50.000000 0.000000 -100.000000

-50.000000 0.000000 -100.000000]

		"N" [0.000000 0.980581 0.196116

0.000000 1.000000 0.000000

0.000000 1.000000 0.000000

0.000000 0.980581 0.196116

0.000000 0.980581 -0.196116

0.000000 0.980581 -0.196116]

		"st" [0 0 0 0 0 0 0 0 0 0 0 0 0 0 0 0 0 0 0 0 0 0 0 0]

AttributeEnd

##------------ obj1 ------------##
ライトをとても明るくした。
##Renderman RIB-Structure 1.0

Display "men.tif" "file" "rgba"

Display "+men.tif" "framebuffer" "rgba"


Format 640 480 1

PixelSamples 4 4

PixelFilter "catmull-rom" 3 3

ShadingRate 1


Imager "background" "background" [0.500 0.500 0.600]


Sides 1

Orientation "lh"

Projection "perspective" "fov" [9.52728338145235]

Rotate -40.8862682605356 1 0 0	# pich

Rotate 52.9183819582828 0 1 0	# head

Translate -90.469199 -98.183947 68.375702

Scale 0.1 0.1 0.1

WorldBegin

	Attribute "visibility" "trace" [1]

	Attribute "visibility" "transmission" ["Os"]

	Attribute "visibility" "transmission" "opaque"

	Attribute "light" "shadows" "on"

	Attribute "trace" "displacements" [1]

	LightSource "ambientlight" 0 "intensity" [ 0.1 ] "lightcolor" [ 1 1 1 ]

	LightSource "distantlight" 1 "intensity" [ 100 ] "lightcolor" [ 1 1 1 ] "from" [ -1 1 -1 ] "to" [ 0 0 0 ]

	LightSource "distantlight" 2 "intensity" [ 3 ] "lightcolor" [ 1 1 1 ] "from" [ 1 1 2.5 ] "to" [ 0 0 0 ]

	ReadArchive "men_mdl.rib"

WorldEnd
辞書と正規化
メタセコイアのPythonを使うために、
辞書と関数について検証してみました。
勉強になります。ありがとうございます。
C:\Python22jp>python
Python 2.2.3 (SJIS enhanced) (#42, Jun 8 2003, 01:46:45) [MSC 32 bit (Intel)] o
n win32
Type "help", "copyright", "credits" or "license" for more information.
>>> c={}
>>> for i in range(5):
... c[i]=[]
...
>>> c
{0: [], 1: [], 2: [], 3: [], 4: []}
>>> c[0]=[1,2,3]
>>> c
{0: [1, 2, 3], 1: [], 2: [], 3: [], 4: []}
>>> def add(a,b):
... return [a[i]+b[i] for i in range(len(a))]
...
>>> c[1]=[3,2,1]
>>> add(c[0],c[1])
[4, 4, 4]
>>> c
{0: [1, 2, 3], 1: [3, 2, 1], 2: [], 3: [], 4: []}
>>> c[2]=add(c[0],c[1])
>>> c
{0: [1, 2, 3], 1: [3, 2, 1], 2: [4, 4, 4], 3: [], 4: []}
>>> import math
>>> def normalize(x,y,z):
... s=math.sqrt(x*x+y*y+z*z)
... if s==0:s=1
... else: s=1.0/s
... return x*s,y*s,z*s
...
>>> c[0]
[1, 2, 3]
>>> normalize(1,2,3)
(0.2672612419124244, 0.53452248382484879, 0.80178372573727319)
>>> normalize(c[0])
Traceback (most recent call last):
File "
", line 1, in ?
TypeError: normalize() takes exactly 3 arguments (1 given)
>>> normalize(*c[0])
(0.2672612419124244, 0.53452248382484879, 0.80178372573727319)
>>> normalize(4,4,4)
(0.57735026918962584, 0.57735026918962584, 0.57735026918962584)
>>> normalize(*add(c[0],c[1]))
(0.57735026918962584, 0.57735026918962584, 0.57735026918962584)
>>>
頂点法線 vertex normalを求める
PointsPolygonを求めたいので、各頂点の法線ベクトルを順に辞書に格納していき、空でなければ、加えていくようにしました。
最後に正規化をかけて、できあがり。グローシェーディングの求め方です。本来ならば、外積など関連するものはモジュール化してしまえばよいのですが、まだまだ修行がたりません。
出力したものをエディタ使ってRIBにしてみたら、面が表示されず、頂点indexの順番をreverse()したら、表示されました。理屈で攻めていかなければならないところですが、泥臭いところです。法線を求められたのは、ちょっとうれしいです。佐藤義雄先生の「実習グラフィックス」、メタセコイアマスターガイドを参考にしました。後、LilyEightのアプリBも参考になりました。PolygonからPointsPolygonにするRIB to RIBがあります。
先駆者の資料は役立ちます。
metasequoia python interfaceの中にホントはもっと簡単に求められる方法があるのかもしれません。
まだまだ自己満足なところですが、レンダリング結果はこんな感じでした。
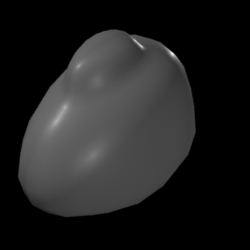
サンプルスクリプトです。もう一歩前にすすみたいところです。ありがとうございます。
#norm03.py

import math

doc=MQSystem.getDocument()

out=MQSystem.println


def normalize(x,y,z):

	s=math.sqrt(x*x+y*y+z*z)

	if s==0.0:s=1

	else: s=1.0/s

	return x*s,y*s,z*s


def add(a,b):

	return [ a[i]+b[i] for i in range(len(a)) ]


obj=doc.object[doc.currentObjectIndex]

out(str(obj.name))


count=obj.numFace

out("面の数:"+str(count))


v=[]

f=[]

for i in range(0,count):

	v.append(obj.face[i].numVertex)


	for j in range(0,obj.face[i].numVertex):

		f.append(obj.face[i].index[j])


v.reverse()

f.reverse()


out(str(list(v)))

out(str(list(f)))


ten=[]

c={}

for k in range(0,obj.numVertex):

	out(str(obj.vertex[k].pos.x)+", "+str(obj.vertex[k].pos.y)+", "+str(obj.vertex[k].pos.z))

	ten.append((obj.vertex[k].pos.x,obj.vertex[k].pos.y,obj.vertex[k].pos.z))

	c[k]=[]


for i in range(0,count):

	#out("面のindex:"+str(obj.getFaceIndexFromUniqueID(i+1)))

	#out("頂点数"+str(str(obj.face[i].numVertex)))


	#out(str(faceid))

	for j in range(0,obj.face[i].numVertex):

		#out(str(obj.face[i].index[j])+":"+str(ten[obj.face[i].index[j]]))

		x1=ten[obj.face[i].index[j-1]][0]

		y1=ten[obj.face[i].index[j-1]][1]

		z1=ten[obj.face[i].index[j-1]][2]

		x2=ten[obj.face[i].index[j]][0]

		y2=ten[obj.face[i].index[j]][1]

		z2=ten[obj.face[i].index[j]][2]

		#out("j+1 "+str(j+1))

		if j+1==obj.face[i].numVertex:

			x3=ten[obj.face[i].index[0]][0]

			y3=ten[obj.face[i].index[0]][1]

			z3=ten[obj.face[i].index[0]][2]

		else:

			x3=ten[obj.face[i].index[j+1]][0]

			y3=ten[obj.face[i].index[j+1]][1]

			z3=ten[obj.face[i].index[j+1]][2]

		nx=(y2-y1)*(z3-z2)-(z2-z1)*(y3-y2)

		ny=(z2-z1)*(x3-x2)-(x2-x1)*(z3-z2)

		nz=(x2-x1)*(y3-y2)-(y2-y1)*(x3-x2)

		if c[obj.face[i].index[j]]==[]:

			c[obj.face[i].index[j]]=[-1*nx,-1*ny,-1*nz]

		else:

			c[obj.face[i].index[j]]=add(c[obj.face[i].index[j]],[-1*nx,-1*ny,-1*nz])

		#out(str(c[obj.face[i].index[j]]))

		#out(str(normalize(*c[obj.face[i].index[j]])))


for k in range(0,obj.numVertex):

	out(str(k)+":"+str(normalize(*c[k])))
UV座標のリストを表示する
coord UV座標のリスト
メタセコイアpythonを使って求める
これがst座標になるかはまた検証です。
勉強します。
doc=MQSystem.getDocument()

out=MQSystem.println


obj=doc.object[doc.currentObjectIndex]

out(str(obj.name))


count=obj.numFace

out("面の数:"+str(count))


for face in obj.face:

	faceid=list(face.index)


for x in range(0,count):

		for y in range(0,obj.face[x].numVertex):

			out(str(obj.face[x].index[y])+":"+str(obj.face[x].coord[y]))
出力結果
obj1
面の数:4
1:[0.9957, 0.4946]
3:[0.9957, 0.9754]
2:[0.5149, 0.9754]
1:[0.9930, 0.4892]
2:[0.5122, 0.9700]
0:[0.5122, 0.4892]
4:[0.5203, 0.0004]
5:[1.0011, 0.0004]
1:[1.0011, 0.4811]
4:[0.5203, 0.0058]
1:[1.0011, 0.4865]
0:[0.5203, 0.4865]
UVをリストにする その2
参考・・・検討、日々考える。
st=[]

for x in range(0,count):

		for y in range(0,obj.face[x].numVertex):

			st.append(obj.face[x].coord[y])

			out(str(obj.face[x].index[y])+":"+str(obj.face[x].coord[y]))


out(str(list(st)))
<< 3/6 >>