<< 3/4 >>

pythonでパーティクル その7

Essential RenderManを参考に、cgkitを利用して、Pointsのwidthを調整してみる。レンダリングは3Delightです。ありがとうございます。
width.jpg
RenderMan Procedual Primitives


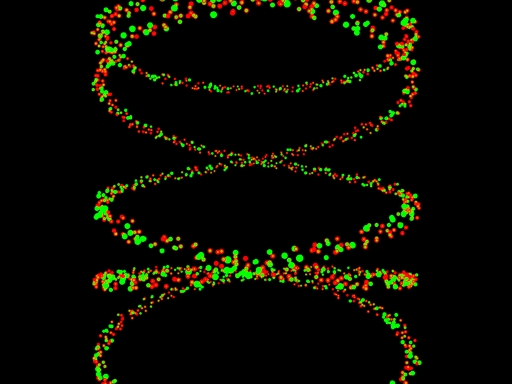
#width.py - Create Particles of different sizes
import random, math
import cgkit.cri
from cgkit.cgtypes import *

# Load the RenderMan API.
# Replace the library name with whatever renderer you want to use.
ri = cgkit.cri.loadRI("3delight")
cgkit.cri.importRINames(ri, globals())

COUNT = 2000

def jitter(scale):
val=random.random()*1000
return (val/500-1)*scale

position=[]
constantwidth=0.5
fov=30
red=[1,0,0]
green=[0,1,0]
width=[]
constantwidth=1.0
fov=30


#/*Generate Particle Postions*/
for i in range(COUNT):
x=math.sin(i*0.5)*50+jitter(2)
y=math.cos(i*0.1)*50+jitter(2)
z=math.cos(i*0.5)*100+jitter(2)
w=jitter(1.0)+0.5
position.append(vec3(x, y, z))
width.append(w)

RiBegin(RI_NULL)
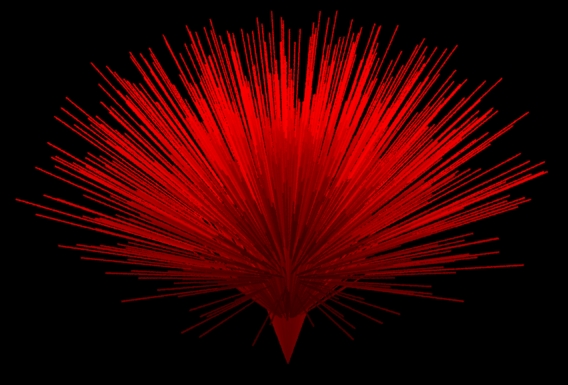
RiDisplay ("width.tiff","file","rgb",RI_NULL)
RiFormat(512, 384, -1.0)
RiPixelSamples( 4, 4)
RiShadingRate(0.5)
RiProjection ("perspective","fov",fov,RI_NULL)
RiWorldBegin()
RiLightSource("ambientlight","intensity",0.4)
RiLightSource("distantlight", "from",[0,0,1])
RiTranslate(0,0,250)
RiSurface("plastic")
RiColor(red)
RiPoints("P",position,"constantwidth", constantwidth,RI_NULL)
RiColor(green)
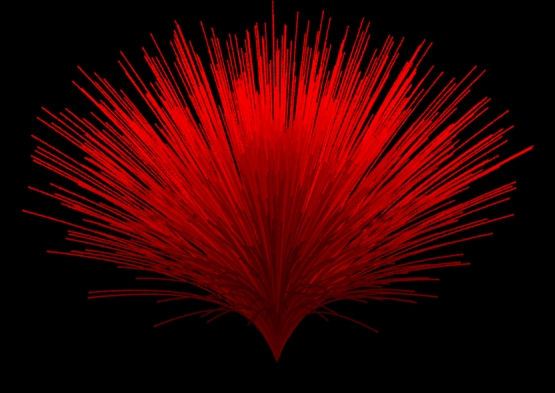
RiPoints("P",position,"width",width,RI_NULL)
RiWorldEnd()
RiEnd()

  • -
  • -

renderWiki

じっくり読んで、勉強します。
繰り返し繰り返しですね。
ありがとうございます。

In depth renderman
  • -
  • -

RiCurves その1

イギリスのbournemouth universityを参考にしました。ありがとうございます。Thank you.
import prman使ってます。
ricurve_pr.jpg


#ricurve_pr.py
#set PYTHONPATH=C:\Python25;C:\Python\Scripts;%RMANTREE%\bin
import prman
ri=prman.Ri()

filename="ricurve_pr.rib"

ri.Begin(ri.RENDER)
ri.Imager("background", {"color color":(.2,.4,.6)})
ri.Display ("ricurve_pr.png","file","rgb")
ri.Format(512, 384, -1.0)
ri.PixelSamples( 4, 4)
ri.ShadingRate(1)
ri.Projection(ri.PERSPECTIVE, {ri.FOV: 90})
ri.WorldBegin()
ri.LightSource("distantlight", {ri.HANDLEID: "1","to":[0,0,1]})
ri.LightSource("ambientlight", {ri.HANDLEID: "2", "intensity":[0.4]})
ri.Translate(0,0,1.8)
ri.Surface("plastic")

ri.Color([1,0,0])
points= [0, 0, 0 ,-1, -.5 ,1 ,2 ,.5 ,1 ,1 ,0, -1 ]
width=[0.01,0.04]
ri.Curves( "cubic",[4],"nonperiodic",{ri.P:points, ri.WIDTH : width})

ri.Color([0,0,1])
points2=[0,0,0,3,4,5,-1,-.5,1,2,.5,1,1,0,-1]
ri.Curves("linear",[5],"nonperiodic",{ ri.P:points2 , ri.CONSTANTWIDTH:[0.075]})

ri.WorldEnd()
ri.End()


  • -
  • -

RiCurves その2

3Delightとcgkitを使って、RiCurvesの表示の仕方を試してみる。スクリプトの#コメントアウトしている方法でも、表示はOK。cgkit便利ですね。
ありがとうございます。
curves_test.jpg


#curves_test.py
import cgkit.cri
from cgkit.cgtypes import *

# Load the RenderMan API.
# Replace the library name with whatever renderer you want to use.
ri = cgkit.cri.loadRI("3delight")
cgkit.cri.importRINames(ri, globals())

red=(1,0,0)
curveWidth=0.3
fov=30

RiBegin(RI_NULL)
RiDisplay ("curves_test.tiff","framebuffer","rgb",RI_NULL)
RiProjection ("perspective","fov",fov,RI_NULL)
RiFormat(512, 384, -1.0)
RiWorldBegin()
RiTranslate(0,0,2)
RiColor(red)
RiRotate(45,1,0,0)
points=[-0.5,-0.5,0, 0.5,0.5,0]
curveWidth=0.1
RiCurves("linear",[2],"nonperiodic","P",points,"constantwidth",curveWidth,"Cs",[(1,0,0), (0,0,1)],RI_NULL)
#RiCurves(RI_LINEAR, [2], RI_NONPERIODIC, P=[-0.5,-0.5,0, 0.5,0.5,0], constantwidth=0.1, Cs=[(1,0,0), (0,0,1)])
RiWorldEnd()
RiEnd()

  • -
  • -

RiCurves その3

Essential RenderManのサンプルを参照して、Python cgkitで試してみました。RiCurvesの表記の仕方がわからなくて、最初エラーが出てしまいました。
RiCurves("linear",COUNT,"nonperiodic","P",points,"constantwidth",curveWidth
RI_NULL)
・・・
TypeError: 'int' object is not iterable

原因はCOUNTはいらないということでしょうか。スクリプト書き直したら、できました。ありがとうございます。
curves2.jpg


#/* curves2.py - create a set of curves */
import random, math
import cgkit.cri
from cgkit.cgtypes import *

# Load the RenderMan API.
# Replace the library name with whatever renderer you want to use.
ri = cgkit.cri.loadRI("3delight")
cgkit.cri.importRINames(ri, globals())

COUNT = 1000

def jitter(scale):
val=random.random()*1000
return (val/500-1)*scale

points=[]
pappend=points.append
nverts=[]
red=(1,0,0)
curveWidth=0.3
fov=30

#/*Generate Curve Postions*/
for i in range(COUNT):
tx=(math.sin(i*0.3)*i*50)/COUNT+jitter(5)
ty=(math.cos(i*0.3)*i*50)/COUNT+jitter(5)

pappend(0)
pappend(0)
pappend(50)

pappend(0.1*tx)
pappend(0.1*ty)
pappend(25)

pappend(0.4*tx)
pappend(0.4*ty)
pappend(0)

pappend(tx)
pappend(ty)
pappend(-25)

nverts.append(4)


RiBegin(RI_NULL)
RiDisplay ("curves2.tiff","framebuffer","rgb",RI_NULL)
RiProjection ("perspective","fov",fov,RI_NULL)
RiWorldBegin()
RiTranslate(0,0,200)
RiColor(red)
RiRotate(45,1,0,0)

RiCurves("linear",nverts,"nonperiodic","P",points,"constantwidth",curveWidth,RI_NULL)

RiWorldEnd()
RiEnd()

  • -
  • -

RiCurves その4

cubicに書き換えてみました。
RiCurves("cubic",nverts,"nonperiodic","P",points,"constantwidth",curveWidth,RI_NULL)
勉強ですね。ありがとうございます。
curves2_cubic.jpg
  • -
  • -

PythonからRenderMan その3

イギリスのbournemouth universityを参考にしました。ありがとうございます。Thank you.
RenderManProServer-14からついているimport prmanを利用してます。
cubeを作成しました。
cube_pr.jpg


#cube_pr.py
#set PYTHONPATH=C:\Python25;C:\Python\Scripts;%RMANTREE%\bin
import getpass
import time
# import the python renderman library
import prman

def Cube(width,height,depth) :
w=width/2.0
h=height/2.0
d=depth/2.0
ri.ArchiveRecord(ri.COMMENT, 'Cube Generated by Cube Function')
#rear
face=[-w,-h,d,-w,h,d,w,-h,d,w,h,d]
ri.Patch("bilinear",{'P':face})
#front
face=[-w,-h,-d,-w,h,-d,w,-h,-d,w,h,-d]
ri.Patch("bilinear",{'P':face})
#left
face=[-w,-h,-d,-w,h,-d,-w,-h,d,-w,h,d]
ri.Patch("bilinear",{'P':face})
#right
face=[w,-h,-d,w,h,-d,w,-h,d,w,h,d]
ri.Patch("bilinear",{'P':face})
#bottom
face=[w,-h,d,w,-h,-d,-w,-h,d,-w,-h,-d]
ri.Patch("bilinear",{'P':face})
#top
face=[w,h,d,w,h,-d,-w,h,d,-w,h,-d]
ri.Patch("bilinear",{'P':face})
ri.ArchiveRecord(ri.COMMENT, '--End of Cube Function--')


ri = prman.Ri() # create an instance of the RenderMan interface
ri.Option("rib", {"string asciistyle": "indented"})

filename = "Cube.rib"
# this is the begining of the rib archive generation we can only
# make RI calls after this function else we get a core dump
ri.Begin("__render") #filename)
# ArchiveRecord is used to add elements to the rib stream in this case comments
# note the function is overloaded so we can concatinate output
ri.ArchiveRecord(ri.COMMENT, 'File ' +filename)
ri.ArchiveRecord(ri.COMMENT, "Created by " + getpass.getuser())
ri.ArchiveRecord(ri.COMMENT, "Creation Date: " +time.ctime(time.time()))

# now we add the display element using the usual elements
# FILENAME DISPLAY Type Output format
ri.Display("cube_pr.png", "file", "rgb")
ri.Format(512, 384, -1.0)
ri.PixelSamples( 4, 4)
ri.ShadingRate(1)
# now set the projection to perspective
ri.Projection(ri.PERSPECTIVE,{ri.FOV:50})

# now we start our world
ri.WorldBegin()
ri.LightSource("distantlight", {ri.HANDLEID: "1","to":[0,0,1]})
ri.LightSource("ambientlight", {ri.HANDLEID: "2", "intensity":[0.4]})

ri.Surface("plastic")
ri.Translate(0,0,5)

ri.TransformBegin()
ri.Translate(-2,0,0)
ri.Rotate(25,0,1,0)
ri.Color([0,0,1])
Cube(1,1,1)
ri.TransformEnd()

ri.TransformBegin()
ri.Translate( 0,0,0)
ri.Rotate( 25,1,1,0)
ri.Color([1,0,0])
Cube(1,1,1)
ri.TransformEnd()

ri.TransformBegin()
ri.Translate(2,0,0)
ri.Rotate(-25,1,1,1)
ri.Color([0,1,0])
Cube(0.2,2,0.2);
ri.TransformEnd()

ri.WorldEnd()
ri.End()

  • -
  • -

PythonからRenderMan その4

イギリスのbournemouth universityを参考にしてます。ありがとうございます。Thank You.
RenderManProServer-14からついているimport prmanを利用します。
InlineArchive.jpg


#inlinearchive_pr.py
#set PYTHONPATH=C:\Python25;C:\Python\Scripts;%RMANTREE%\bin
import getpass
import time
# import the python renderman library
import prman

ri = prman.Ri() # create an instance of the RenderMan interface
ri.Option("rib", {"string asciistyle": "indented"})

filename = "InlineArchive.rib"

ri.Begin(ri.RENDER)

ri.ArchiveBegin("Wave")
ri.Rotate(90,1,0,0)
ri.Sphere(0.030303,-0.030303,0,360)
ri.Torus(0.0606061,0.030303,0,180,360)
ri.Torus(0.121212,0.030303,180,360,360)
ri.Torus(0.181818,0.030303,0,180,360)
ri.Torus(0.242424,0.030303,180,360,360)
ri.Torus(0.30303,0.030303,0,180,360)
ri.Torus(0.363636,0.030303,180,360,360)
ri.Torus(0.424242,0.030303,0,180,360)
ri.Torus(0.484848,0.030303,180,360,360)
ri.Torus(0.545455,0.030303,0,180,360)
ri.Torus(0.606061,0.030303,180,360,360)
ri.Torus(0.666667,0.030303,0,180,360)
ri.Torus(0.727273,0.030303,180,360,360)
ri.Torus(0.787879,0.030303,0,180,360)
ri.Torus(0.848485,0.030303,180,360,360)
ri.ArchiveEnd()

#ArchiveRecord is used to add elements to the rib stream in this case comments
# note the function is overloaded so we can concatinate output
ri.ArchiveRecord(ri.COMMENT, 'File ' +filename)
ri.ArchiveRecord(ri.COMMENT, "Created by " + getpass.getuser())
ri.ArchiveRecord(ri.COMMENT, "Creation Date: " +time.ctime(time.time()))

# now we add the display element using the usual elements
# FILENAME DISPLAY Type Output format
ri.Display("InlineArchive.png", "file", "rgb")
ri.Format(512, 384, -1.0)
ri.Projection(ri.PERSPECTIVE,{ri.FOV:30})

# now we start our world
colours ={
"red":[1,0,0],
"white":[1,1,1],
"green":[0,1,0],
"blue":[0,0,1],
"black":[0,0,0],
"yellow":[1,1,0]
}

# start our world
ri.WorldBegin()
ri.LightSource("distantlight", {ri.HANDLEID: "1","to":[0,0,1]})
ri.LightSource("ambientlight", {ri.HANDLEID: "2", "intensity":[0.4]})

ri.Translate(0,0,9) #move the global view position
ri.Surface("plastic")

ri.TransformBegin()
ri.Rotate(40,1,0,0)
ri.Color(colours["red"])
ri.Attribute ("identifier",{"name": "Wave1"})
ri.ReadArchive("Wave")
ri.TransformEnd()

ri.TransformBegin()
ri.Rotate(55,1,0,0)
ri.Color(colours["green"])
ri.Translate(2.2,0,0)
ri.Attribute( "identifier",{ "name" :"Wave2"})
ri.ReadArchive("Wave")
ri.TransformEnd()

ri.TransformBegin()
ri.Rotate(35,1,0,0)
ri.Color(colours["blue"])
ri.Translate(-2.2,0,0)
ri.Attribute("identifier",{ "name" : "Wave3"})
ri.ReadArchive("Wave")
ri.TransformEnd()
#end our world

ri.WorldEnd()
ri.End()

  • -
  • -

PythonからRenderMan その5

引き続き、イギリスのbournemouth universityを参考にしてます。ありがとうございます。勉強になります。Csを球にセットしてます。
RenderManProServer-14からついているimport prmanを利用します。
Param.jpg


#param_pr.py
#set PYTHONPATH=C:\Python25;C:\Python\Scripts;%RMANTREE%\bin
import getpass
import time
# import the python renderman library
import prman

ri = prman.Ri() # create an instance of the RenderMan interface
ri.Option("rib", {"string asciistyle": "indented"})

filename = "Param.rib"
ri.Begin(ri.RENDER)
# ArchiveRecord is used to add elements to the rib stream in this case comments
# note the function is overloaded so we can concatinate output
ri.ArchiveRecord(ri.COMMENT, 'File ' +filename)
ri.ArchiveRecord(ri.COMMENT, "Created by " + getpass.getuser())
ri.ArchiveRecord(ri.COMMENT, "Creation Date: " +time.ctime(time.time()))

# now we add the display element using the usual elements
# FILENAME DISPLAY Type Output format
ri.Display("Param.png", "file", "rgb")
ri.Format(512, 384, -1.0)
# now set the projection to perspective
ri.Projection(ri.PERSPECTIVE,{ri.FOV:50})

# now we start our world
ri.WorldBegin()
ri.LightSource("distantlight", {ri.HANDLEID: "1","to":[0,-1,1]})
ri.LightSource("ambientlight", {ri.HANDLEID: "2", "intensity":[0.4]})

ri.Translate(0,0,3)
ri.TransformBegin()
colours=[1,0,0,0,0,1,1,0,0,0,1,0]
ri.Rotate(90,1,1,1)
ri.Surface("plastic")
ri.Sphere(1,-1,1,360,{"Cs":colours})
ri.TransformEnd()
ri.WorldEnd()
ri.End()

  • -
  • -

PythonからRenderMan その6

ケッソン先生のCG References & Tutorials(fundza.com)の RenderMan Procedural Primitives、Randomnessのサンプルをimport prmanでできるようにしてみた。ありがとうございます。
ri.Points({ri.P:points,ri.CS:colour,ri.CONSTANTWIDTH:size})
TypeError: Problem parsing parameterlist entry: varying color Cs
とエラーが出ていたが、pointsのリスト表記を[[1,2,3],[4,5,6],・・・]としていたのが原因だった。[1,2,3,4,5,6,・・・]となるように書き換えた。
rectangularbox.jpg
Pointsを50000個、直方体に配置してみました。さらに勉強します。


#rectangularbox_pr2.py
#Modified from RenderMan Procedural Primitives/ Randomness Examples
# in CG References & Tutorials(fundza.com)

#set PYTHONPATH=C:\Python25;C:\Python\Scripts;%RMANTREE%\bin
import getpass
import time
# import the python renderman library
import prman

import random,math

def randBetween(min, max):
return random.random() * (max - min) + min

def length(x, y, z):
return math.sqrt(x*x + y*y + z*z)

def normalize(x, y, z):
len = length(x, y, z)
return x/len, y/len, z/len

def scaleVector(x, y, z, sc):
return x*sc, y*sc, z*sc

def box(width, height, depth, num, size):
points=[]
pappend=points.append
for n in range(num):
x = randBetween(-width/2, width/2)
y = randBetween(-height/2, height/2)
z = randBetween(-depth/2, depth/2)
pappend(x)
pappend(y)
pappend(z)
colour=[]
for n in range(num):
r = randBetween(0, 1)
g = randBetween(0, 1)
b = randBetween(0, 1)
colour.append(r)
colour.append(g)
colour.append(b)


ri.Points({ri.P:points,ri.CS:colour,ri.CONSTANTWIDTH:size})


ri = prman.Ri() # create an instance of the RenderMan interface
ri.Option("rib", {"string asciistyle": "indented"})

filename = "rectangularbox.rib"
ri.Begin(ri.RENDER)
#ri.Begin(filename)
# ArchiveRecord is used to add elements to the rib stream in this case comments
# note the function is overloaded so we can concatinate output
ri.ArchiveRecord(ri.COMMENT, 'File ' +filename)
ri.ArchiveRecord(ri.COMMENT, "Created by " + getpass.getuser())
ri.ArchiveRecord(ri.COMMENT, "Creation Date: " +time.ctime(time.time()))

# now we add the display element using the usual elements
# FILENAME DISPLAY Type Output format
ri.Display("rectangularbox.png", "file", "rgb")
ri.Format(512, 384, -1.0)
ri.Imager("background", {"color color":(.76,.79,.82)})
# now set the projection to perspective
ri.Projection(ri.PERSPECTIVE,{ri.FOV:50})

# now we start our world
ri.WorldBegin()
ri.LightSource("distantlight", {ri.HANDLEID: "1","to":[0,1,1]})
ri.LightSource("ambientlight", {ri.HANDLEID: "2", "intensity":[0.4]})

ri.Translate(0,0.25,3)
ri.Rotate(-40,1,0,0)
ri.TransformBegin()
ri.Rotate(35,0,1,0)
ri.Surface("plastic")
box(2.0, 1.0, 2.0, 50000, 0.02)
ri.TransformEnd()
ri.WorldEnd()
ri.End()

  • -
  • -

<< 3/4 >>